Blog
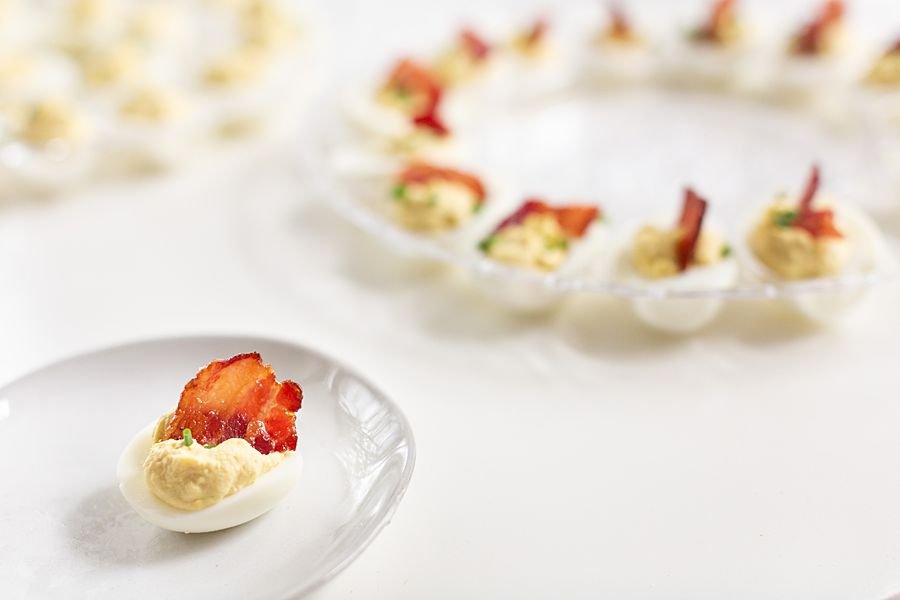
Candied Bacon Deviled Eggs

Bacon and eggs has never tasted so good.I have found that deviled eggs are one of those things that people either love them or hate them. I am definitely in that first “love them” camp.I think that The hardest thing about making deviled eggs is getting the shell off of the boiled egg. It’s always the most time-consuming and frustrating part of the whole process, isn’t it? Once I figured out how to get the shell off an egg cleanly every single time by using an egg cooker (see below for the one I use), my world has officially changed. I had tried boiling them, baking them in the oven, you name it but I could not get them to cook to the right done-ness or get those dang shells off without ripping the eggs apart.So once they are steam to perfection and the shells come off cleanly, that’s when the magic starts. But the real winner in this recipe is the candied bacon on top. There’s something about that salty sweet goodness on top of the tangy egg yolk mixture that just makes this recipe sing.It is so dang good.Ready to try it for yourself? Let’s get it started.
Candied Bacon Deviled Eggs Recipe

Candied Bacon
- 5 slices thick cut bacon
- 2 tablespoons brown sugar
- pepper (to taste)
Deviled Eggs
- 18 large eggs
- 1/3 cup mayonnaise
- 3 teaspoons Dijon mustard
- 3 teaspoons apple cider vinegar
- green onions
For the bacon
- Preheat the oven to 400 degrees.
- On a foil lined baking sheet, place your strips of bacon and sprinkle the brown sugar over the bacon. Add pepper to taste as well.
- Place another sheet of aluminum foil over the top of the bacon and place another baking sheet on top of it (this will keep the bacon from wrinkling up and will stay flat).
- Bake for 20 minutes.
For the deviled eggs
- Boil the eggs and let cool.
- Once the eggs have cooled completely, peel them and slice in half lengthwise. Remove the yolk to a small bowl with a spoon and place the egg whites on a plate.
- Mash the yolks with a fork and add the mayonnaise, mustard, vinegar, salt and pepper. Stir everything together until it's smooth.
- Put the mixture into a zip top bag and cut the tip off in order to make a make-shift pastry bag. Squeeze the mixture back into the hole of each egg white. Sprinkle green onions on top for garnish.
- Tear apart (or slice) bacon into 1 inch pieces and place on top of each egg.

Products Used
More Brunch Recipes You'll Love
Blood Orange Prosecco MuleEggwhite FrittataProtein Packed Yogurt BowlIf you'd like to see more recipes like this, subscribe to my youtube channel!
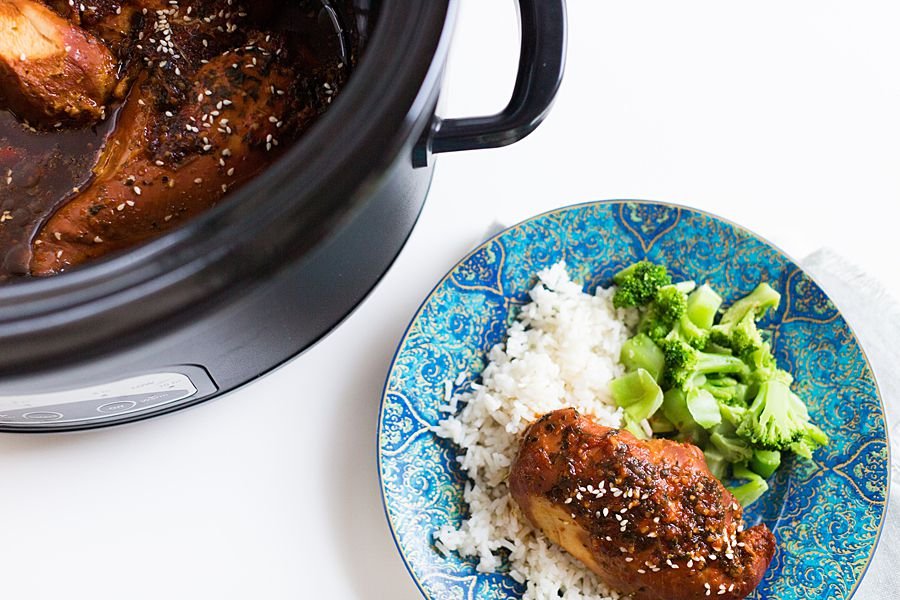
Slow Cooker Honey Garlic Chicken

When I was in college, I worked at a couple different stores in the mall. The best thing about working in the mall is the food court. After all, whatever you are hungry for, they have it there – and they have free samples (which every broke college kid can appreciate).One of my favorite places frequent (which I can’t remember the name of it now) used to sell something called bourbon chicken. Now, I don’t think it had any bourbon in it at all, but it did have this delicious brown sugar/honey glaze on the roasted chicken that made it absolutely delicious.So I thought I’d try my hand at baking something like it.
Slow Cooker Honey Garlic Chicken

- 4 boneless (skinless chicken breasts)
- 4 garlic cloves (minced)
- 1/3 cup honey
- 1/2 cup low sodium ketchup
- 1/2 cup low sodium soy sauce
- 1/2 teaspoon dried oregano
- 2 tablespoons fresh parsley
- 1/2 tablespoon toasted sesame seeds
- Arrange chicken thighs on the bottom of your slow cooker; set aside. (please look at the notes section)
- In a mixing bowl, combine garlic, honey, ketchup, soy sauce, oregano and parsley; whisk until thoroughly combined.
- Pour the sauce over the chicken thighs. Close with a lid and cook for 4 to 5 hours on LOW, or 3 to 4 hours on HIGH.** (please look at the notes section)
- Remove lid and transfer chicken to a serving plate.
- Spoon the sauce over the chicken and sprinkle with toasted sesame seeds. Serve.
Use enough chicken breasts or thighs (bone-in or boneless, skin-on or without) to cover the bottom of your slow cooker.
**All crock pots cook at different times and temperatures. Some readers suggest to only cook the chicken for 3 hours, while others said it took 4 hours in their crock pot. More importantly, 165 degrees Fahrenheit is the safe internal temperature for both the white meat of the chicken and dark meat. If you would like to thicken the sauce, 30 minutes before the chicken is done, whisk a cornstarch slurry into the sauce; cover and continue to cook.
How to make a Cornstarch Slurry: Use 1 tablespoon cornstarch mixed with 1 tablespoon cold water; mix it together until mixture forms a paste. 30 minutes before the chicken is done cooking, whisk the cornstarch slurry into the sauce inside the slow cooker; cover and continue to cook for 30 minutes.

More Recipes You'll Love
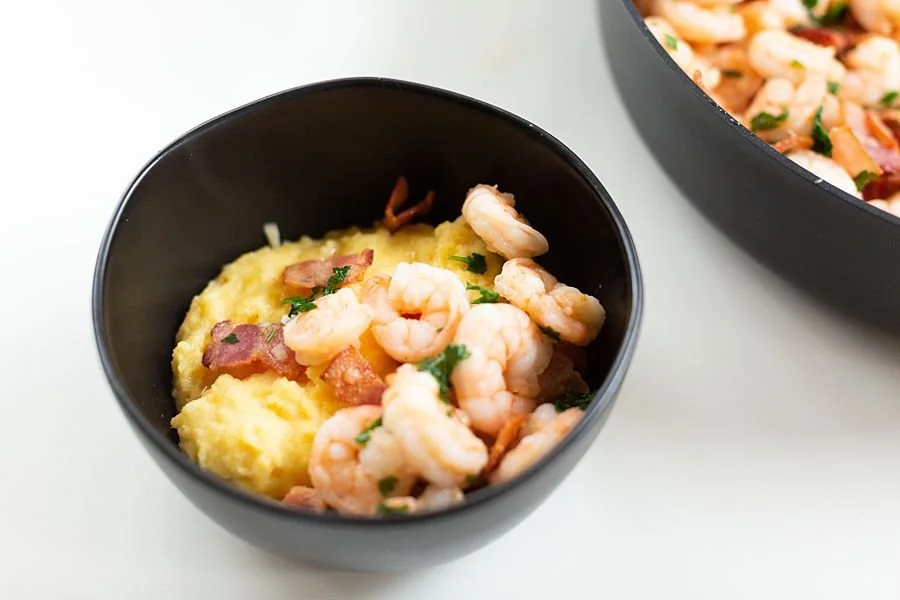
Sauteed Shrimp with Creamy Polenta Recipe

My family is French Cajun (Akadian), so those delicious creole flavors and all the butter you can stuff into a recipe are okay in my book.
One of my all time favorite cajun recipes is that for shrimp and grits. It’s got creamy grits and is topped with sauteed shrimp in a light “gravy”. But for this shrimp recipe, I though I’d do something a little different.Polenta Valsugana recently sent me some of their authentic Italian polenta. It’s so authentic, the package and use instructions are all in Italian. So in brainstorming what I should make with this polenta, it hit me – shrimp and grits. Except instead of grits, I’d be making some fresh polenta.Did you know that grits and polenta are both made from corn? (Read below to find out how they’re different)
What is Polenta?
Polenta is a traditional Italian dish that is ground corn (cornmeal) that it ground to a medium or coarse consistency.
What are the Different Types of Polenta?
Stone-ground: Stone-ground cornmeal can be yellow or white, and is produced by literally grinding corn between two millstones. Stone-ground cornmeal makes a rustic polenta with a bit of texture, as it still has the bits of the whole grain, including the hull and germ. It has deep corn flavor.Coarse: Coarse cornmeal is somewhat gritty, similar to stoneground in that it has bits of grain visible. Coarse-ground cornmeal has a noticeable corn flavor and nubby texture.Medium: This type of cornmeal is ground to a finer consistency than coarse or stoneground kinds, with the kernel sifted out. If you prefer a super-smooth polenta and very creamy texture, this is the one to use.
What’s the Difference Between Grits and Polenta?
Both grits and polenta are made from ground corn, but the main difference here is what type of corn. Polenta, as you can probably guess from the color, is made from yellow corn, while grits are normally made from white corn (or hominy).
Cajun Shrimp and Creamy Polenta

Creamy polenta and sauteed shrimp are perfectly paired in this delicious cajun shrimp and polenta recipe
For the Polenta
- 4 cups chicken stock
- 1 cup milk
- 1 cup coarse or medium-grind cornmeal
- 3 tablespoons butter
- 1/2 cup grated Parmesan cheese
For the Shrimp
- 2 pound shrimp (peeled and deveined)
- 10 slices bacon (chopped)
- 2 tablespoons lemon juice
- 2 tablespoons chopped parsley
- 1 cup thinly sliced scallions
- 2 large clove garlic (minced)
For the Polenta:
- Bring the chicken stock and milk to a boil in a heavy-duty sauce pan or small Dutch oven.
- Gradually sprinkle the polenta into the pan while whisking at the same time. Turn the heat to a very low simmer, cover and continue to cook the polenta for 25 – 30 minutes, until it’s thick, fluffy and begins to pull away from the sides of the pan. Stir occasionally so it doesn’t stick to the bottom of the pan.
- When it’s done, remove from the heat and stir in the butter, cheese and additional salt to taste if needed.
- Serve warm, sprinkled with additional cheese if desired.
For the Shrimp
- Rinse shrimp and pat dry. Fry the bacon in a large skillet until browned; drain well. In grease, add shrimp. Cook until shrimp turn pink.
- Add lemon juice, chopped bacon, parsley, scallions and garlic. Saute for 3 minutes.
- To serve, spoon some of the polenta into a bowl and top it with the shrimp mixture.
Products Used:
More Dinner Recipes You'll Love:
Beef StroganoffSlow Cooker Mongolian BeefOne Pot Creamy Chicken and Rice If you like this recipe, make sure to subscribe to my Youtube Channel so you can see more.
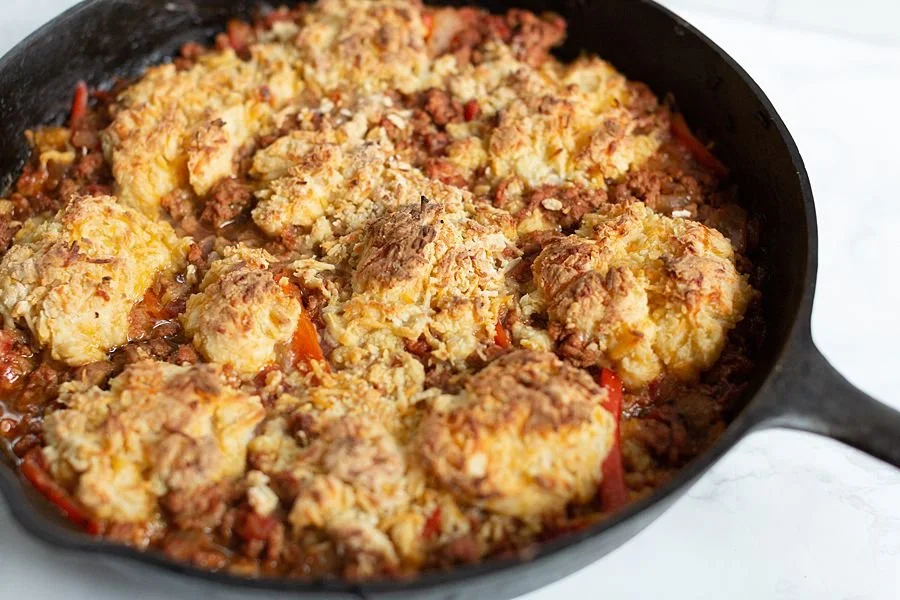
Ground Turkey and Biscuit Skillet

I’m trying to eat healthy. I really am. And yet, food is just so darn good!What must all of the deliciousness be so full of fat and carbs?While this recipe is not carb-free, it is lower in fat than traditional chili recipes because of the use of ground turkey instead of ground beef.But the real star of the show is that soft and delicious cheesy biscuit on top! It’s the perfect texture that as soon as your spoon hits it, your mouth starts watering.So if you’re looking for healthy ground turkey recipes, this is definitely one to try!
Turkey & Biscuit Skillet

Biscuits:
- 1 cup all-purpose flour
- 1 teaspoon baking powder
- ¼ teaspoon baking soda
- 3 tablespoons salted butter
- 1/3 cup buttermilk
- 1 ½ cups grated cheddar cheese
Turkey Chili
- 1 tablespoon vegetable oil
- 1 medium onion (diced)
- 1 red bell pepper (thinly sliced)
- 2 pounds ground turkey
- 1 tablespoon chili powder
- 2 tablespoons tomato paste
- 1 can (14.5 ounces diced tomatoes)
- Salt and pepper (to taste)
For the Biscuits:
- Preheat your oven to 425 degrees. In a bowl, whisk together flour, baking powder, baking soda, and ¼ teaspoon salt.
- Cut butter into flour mixture with a pastry cutter (or two knives) until mixture is crumbly. Stir in the buttermilk and cheddar until just incorporated.
For the Chili:
- In a large, heavy ovenproof skillet, heat oil over medium-high heat. Add bell pepper and onions. Cooking, stirring, until tender, 8 to 10 minutes.
- Add the turkey, tomato paste, and chili powder to skillet and cook until the meat is no longer pink.
- Add the diced tomatoes (with liquid) and cook until the liquid has reduced, about 3 minutes. Season with salt and pepper. Remove from heat.
Putting it all together:
- Take 3 tablespoon size scoops of the batter and place it on top of the chili. Bake in the oven until the biscuits are golden brown, about 20 minutes.


Products Used:
More one pan meals recipes you’ll love:
One Pan Chicken SpaghettiOne Pot Shrimp & Corn ChowderOne Pan Balsamic Chicken & Peach Skillet If you’d like to see more recipes like this, follow me on Youtube!
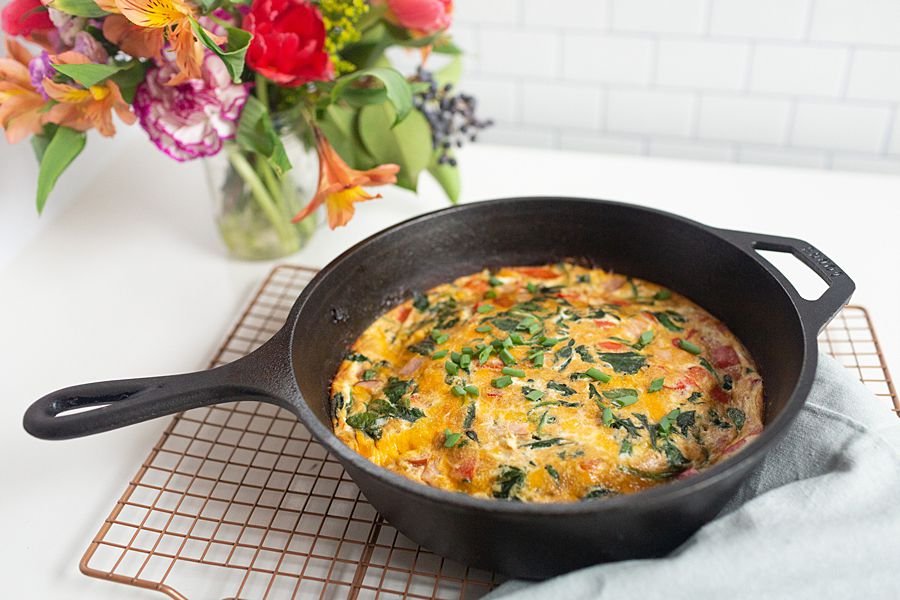
Eggwhite Frittata

If I’m going to make breakfast, it’s going to be something hearty and protein-packed.
As much as I love my sweet and baked goods, breakfast and brunch is reserved for savory breakfast recipes in my book. There’s something about a warm, filling breakfast that will keep you satisfied and not leave you hungry.
This healthy egg white recipe is just that. And if you’re looking to use whole eggs instead, I’ll show you how to do that as well.
What kind of dairy do I use in a frittata?
Fattier milk products like heavy cream, sour cream, and half and half are perfect for this recipe. Low fat milk and plant-based milk products are too watery for a frittata recipe and will leave you with a soupy mess.
What kind of veggies should I use in my frittata?
Frittatas are one of those kitchen sink kind of meals. You can use all sorts of veggies and leftovers for the base of your frittata. Whatever you use, just make sure it end up being about 3 cups of cooked veggies before adding in the eggs. If you add your eggs to raw vegetables, they will release too much water and your frittata will be runny.
What kind of cheese should I use in my frittata?
Don't be limited to just cheddar! Pepper jack, Parmesan, and even goat cheese can give you some great creamy textures and added flavors.
Egg White Frittata

- 2 tbsp butter
- 1 red bell pepper (diced)
- 6 ounces Canadian bacon (diced)
- 5 ounces baby spinach (roughly chopped)
- ¼ cup heavy cream
- 2 ½ cups egg whites (or 12 whole eggs)
- ½ teaspoon salt
- 1 cup cheddar cheese (shredded)
- 2 tbsp green onions (sliced thinly)
-
Preheat your oven to 425°.
- Place a large cast iron skillet over medium high heat. Once the pan gets hot, put the butter in the pan.
- Add the spinach, red bell pepper, and Canadian bacon to the pan. Give it a stir.
- While the veggie mixture is cooking, get out a second bowl. In this bowl, combine the heavy cream, egg whites, and salt. Whisk until frothy. Add the cheese.
- Once the veggies are soft, add the egg mixture to the pan and stir. Let it sit for about one minute or until the outside edges of the eggs start to turn white.
-
Put the whole pan in the oven for 10-15 minutes (or until the frittata is mostly firm with a little bit of jiggle still in the middle).
- Garnish with green onions and serve immediately.

Products Used:
More Healthy Recipes You'll Love:
Italian Tuna Stuffed TomatoesOne Pot Rotini Al FrescoShrimp & Sausage Skillet If you'd like to see more recipes like this, subscribe to my Youtube channel!
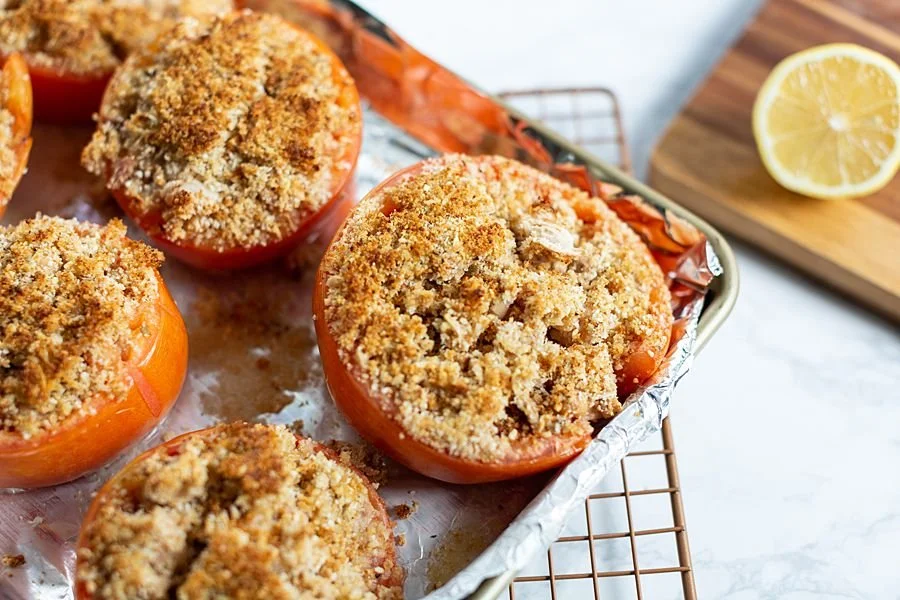
Italian Tuna Stuffed Tomatoes

I love me a big, juicy hamburger.Try as hard as I might, eating “healthy” is just plain hard. I want to eat all the things! Unfortunately, my body does not want me to eat everything I lay eyes on. And so, I’m in the position that I am in today…trying to make better food choices. Notice – I didn’t say DIET. That is truly a four-letter word in my book. Plus, diets are almost always broken. I’m not trying to create a new person with my food choices – just make better choices occasionally.As much as I love chicken and ground turkey, I’m tired of them. I’m even tired of salmon, and I love salmon! So in my search for healthy dinner recipes, I came across a tuna recipe. Now, I’m not big on tuna. But, I figured for one meal, I could try something new.The recipe I tried was a stinker. Absolutely terrible. The fish had zero flavor and it just looked like mush. So I created my own recipe.This recipe is an Italian tuna stuffed tomato. It’s juicy, flavorful, has different textures in it, and is low in calories. It’s also quick to throw together so you can make a good choice for dinner before you have time to jump in the car to get fast food.
Ready for a healthy tuna recipe? Let’s get to it!
Italian Tuna Stuffed Tomatoes

- 6 medium tomatoes
- 1 can (15.5 ounces white beans, drained and rinsed)
- 1 teaspoon minced garlic
- 2 teaspoons Dijon mustard
- 2 teaspoons finely grated lemon zest
- 1 tablespoon fresh lemon juice
- 2 cans (5 ounces each light tuna in oil, drained and flaked)
- 1 cup Italian seasoned breadcrumbs
- ½ cup grated Parmigiano-Reggiano cheese
- 1 tablespoon olive oil
- Salt and pepper (to taste)
- Preheat the oven to 425 degrees. Remove the top quart of tomatoes, and scoop out the core and seeds. Season the tomato cups with salt and pepper.

- Chop ¼ cup of the tomato core. Discard the remaining seeds and cores.

- In a bowl, slightly mash about half the beans, then stir in chopped tomato, ½ cup breadcrumbs, ¼ cup Parmigiano-Reggiano, garlic, mustard, lemon zest, and lemon juice. Gently fold in tune and remaining beans. Season with salt and pepper.
- Transfer tomato shells to a baking dish, and fill each with the tuna mixture, dividing evenly and mounding slightly.

- In a bowl, stir together the remaining ½ cup breadcrumbs, ¼ cup of Parmigiano-Reggiano, and oil. Season with salt and pepper.
- Top the tomato shells with the breadcrumb mixture. Loosely cover with foil and bake until softened lightly, about 30 minutes. Uncover and bake until the breadcrumbs are golden brown, about 5 minutes. Serve immediately.


More Healthy Recipes You'll Love:
One Pot Rotini Al FrescoShrimp & Sausage Skillet If you'd like to see more recipes like this, follow me on Pinterest!
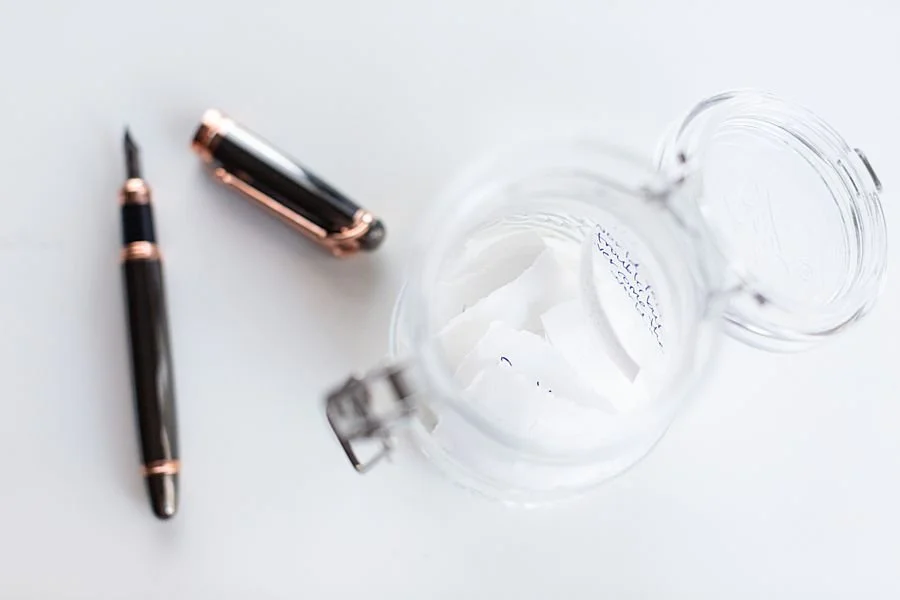
Creating an Affirmation Jar | 101 Positive Thoughts, Mantras, and Affirmations to Start Your Day

The world is in chaos.I guess it always has been in one way or another, but it sure feels like "the sky is falling" from where I'm sitting.Today as I'm writing this from a local coffee shop and feeling oh so thankful to be able to go inside the building, order a drink, and sit at a table while I work, I can't help but feel the weight of the world on my shoulders. There is rioting, looting, gang violence, sex-trafficking, and just outright ugliness everywhere I turn. It's disheartening to say the least.So here I sit. Feeling this weight. Absorbing the negative energy I feel all around me. And so thankful at the same time. I am lucky enough to work for myself and still have the ability to work. No one in my family, nor I have gotten sick. We are healthy, happy, and moving forward.But some days are harder than others. Some days I let the harshness around me influence my mental health. And some days, it's just too much to handle. On these such days, I look for the good. I look for the people helping one another and being kind to one another. I seek out the positive. And that starts form within.
I've recently started an affirmation jar. This little jar is full of positive messages, helpful mantras, motivational bible verses, and daily reminders of the positive impact I can have on the world if I just focus on what I can do instead of what I can't do.So if you're like me and need some daily reminders of the good stuff we have in life and positive messages we should have flooding our neuro-pathways, here's a list of 101 affirmations. I've written each of these on a little piece of paper and put them in a jar. Every morning. I pull out the positive message for the day. It's a great way to keep me grounded and not let the negativity take over. I hope it helps you as well!
-
-
- "For I know the plans I have for you," declares the LORD, "plans to prosper you and not to harm you, plans to give you hope and a future." -Jeremiah 29:11
- I’m courageous and stand up for myself.
- I will succeed today.
- I deserve to have joy in my life.
- I’m worthy of love.
- "And we know that in all things God works for the good of those who love him, who have been called according to his purpose." -Romans 8:28
- I approve of myself and love myself deeply.
- My body is healthy, and I’m grateful.
- I’m more at ease every day.
- I’m calm, happy, and content.
- "The steadfast love of the LORD never ceases; his mercies never come to an end; they are new every morning; great is your faithfulness." - Lamentations 3:22-23
- My life is a gift and I appreciate everything I have.
- I’ll surround myself with positive people who will help bring out the best in me.
- I don’t need someone else to feel happiness.
- I’m allowed to take the time to heal.
- My imperfections make me unique.
- I’m allowed to make mistakes; they don’t make up my whole story.
- I choose not to criticize myself or others around me.
- My potential to succeed is limitless.
- Money comes to me easily and effortlessly.
- Difficult times are part of my journey and allow me to appreciate the good.
- I forgive those who have hurt me.
- I’m in charge of my life and no one will dictate my path besides me.
- "So we do not lose heart. Though our outer self is wasting away, our inner self is being renewed day by day. For this light momentary affliction is preparing for us an eternal weight of glory beyond all comparison, as we look not to the things that are seen but to the things that are unseen." 2 Corinthians 4:16-18
- I constantly attract opportunities that create more money.
- I’m doing my best and that is enough.
- I have the power to create change.
- I know exactly what to do to achieve success.
- I choose to be proud of myself and the things I choose to do.
- I will not compare myself to strangers on the Internet.
- I am enough.
- I let go of all that no longer serves me.
- "Be strong and courageous. Do not be afraid or terrified because of them, or the LORD your God goes with you; he will never leave you nor forsake you." -Deuteronomy 31:6
- I love myself fully, including the way I look.
- My life becomes richer as I get older.
- I can absolutely do anything I put my mind to.
- I’m worthy of respect and acceptance.
- My contributions to the world are valuable.
- I am worthy of making more money.
- My needs and wants are important.
- I make a significant difference to the lives of people around me.
- I am blessed with an amazing family and friends.
- I attract money easily into my life.
- My life is full of amazing opportunities that are ready for me to step into.
- I’m free to create the life I desire.
- "For I am convinced that neither death nor life, neither angels nor demons, neither the present nor the future, nor any powers, neither height nor depth, nor anything else in all creation, will be able to separate us from the love of God that is in Christ Jesus our Lord." - Romans 8:38-39
- I’m open to new adventures in my life.
- I’m bold, beautiful, and brilliant.
- My body shape is perfect in the way it’s intended to be.
- When I allow my light to shine, I unconsciously give other people permission to do the same.

- "Our faith can move mountains." -Matthew 17:20
- I am open and receptive to all the wealth life offers me.
- I will not judge others.
- My actions create constant prosperity.
- I will embrace today and take a chance doing something that scares me.
- Money and spirituality can co-exist in harmony.
- I am full of positive loving energy.
- I welcome love and romance into my life.
- "The LORD is my light and my salvation; whom shall I fear? The LORD is the stronghold of my life; of whom shall I be afraid?" -Psalm 27:12
- I am in a loving and supportive relationship.
- No amount of guilt can change the past, and no amount of worrying can change the future.
- To make small steps toward big goals is progress.
- Negative thoughts only have the power I allow them.
- "Trust in the LORD with all your heart, and do not lean on your own understanding. In all your ways acknowledge him, and he will make straight your paths." -Proverbs 3:3-6
- I can choose to make my curses my blessings.
- I deserve love and I get it in abundance.
- I am loved, loving and lovable.
- I will accept that sometimes things must end.
- I am blessed with an incredible family and wonderful friends.
- I give out love and it is returned to me multiplied manyfold.
- I forgive myself and set myself free.
- "What, then, shall we say in response to these things? If God is for us, who can be against us?" -Romans 8:31
- I believe I can be all that I want to be.
- I am in the process of becoming the best version of myself.
- I have the freedom & power to create the life I desire.
- I will not compare myself to others.
- I choose to be kind to myself and love myself unconditionally.
- I am thankful I woke up this morning.
- My possibilities are endless.
- I will not do things for others that makes me unhappy.
- I am worthy of my dreams.
- I deserve to be healthy and feel good.
- "I can do all things through Christ who strengthens me." -Philippians 4:13
- I am full of energy and vitality and my mind is calm and peaceful.
- Every day I am getting healthier and stronger.
- I honor my body by trusting the signals that it sends me.
- I manifest perfect health by making smart choices.
- I am grateful to be alive. It is my joy and pleasure to live another wonderful day.
- Happiness is my birthright. I choose to be happy and I deserve to be happy.
- Being happy comes easy to me. Happiness is my second nature.
- "May the God of hope fill you with all joy and peace as you trust in him, so that you may overflow with hope by the power of the Holy Spirit." -Romans 15:13
- Good things are happening.
- I will not listen to the "haters".
- I am deeply fulfilled by what I do.
- I’m allowed to take up space.
- "Jesus looked at them and said, ‘With man it is impossible, but not with God. For all things are possible with God.'" -Mark 10:27
- My past is not a reflection of my future.
- I am smart enough to make my own decisions.
- I’m in control of how I react to others.
- I choose peace.
- "Fear not, for I am with you; be not dismayed, for I am your God; I will strengthen you, I will help you, I will uphold you with my righteous right hand." -Isaiah 41:10
If you'd like to see more uplifting and positive things to incorporate into your life, follow me on Facebook!
-
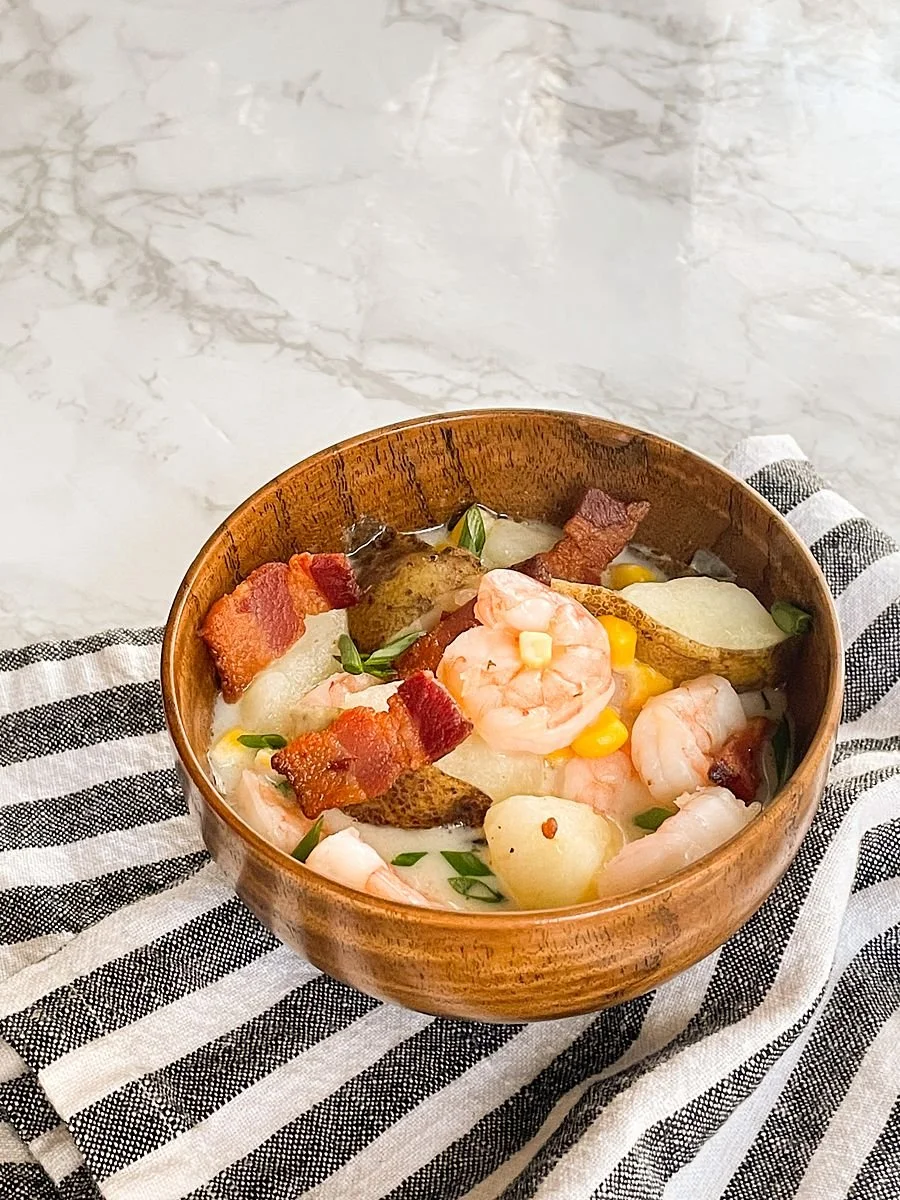
One Pot Shrimp & Corn Chowder

Sometimes, I get tired of chicken.I think that’s normal though. We eat a lot of chicken dishes in our house.Grilled chicken.Fried chicken.Baked chicken.Chicken. Chicken. Chicken.After all, it’s easy to cook, you can change the flavor just by adding a different sauce or spice, and it cooks relatively quickly.So for tonight’s dinner, I’m mixing things up and making shrimp. Shrimp is so great to cook with because it takes literally 3 minutes to cook completely and it’s packed with protein!If you’re looking for a one pot wonder, this is it! Everyone at my house gobbled it up and we’re asking for more!
What can I substitute for the bacon?
First of all, bacon is delicious, so why would you want to skip it? But I get it. So instead of bacon you could opt to cook the potatoes in a little vegetable oil and then skip the bacon topping. Or you could change up the flavor profile completely and use sausage. It’s totally up to you!
What’s the difference between a chowder and a soup?
A soup is usually made with stock or broth and can have vegetables, meat or fish as ingredients and is generally not very thick. A chowder may have the same ingredients, but is more chunky, creamy and thick, much like a stew. While this “chowder” is not thick in consistency, it does have milk as the main liquid - so it’s a chowder.
One Pot Shrimp & Corn Chowder

One pot holds it all - perfectly cooked shrimp, tender potatoes, corn, and savory bacon. This is a quick recipe to make for any weeknight dinner!
- 12 oz bacon (cut into 1/2 inch pieces)
- 8 green onions (thinly sliced crosswise)
- 4 medium baking potatoes
- 4 Tablespoons all-purpose flour
- 6 cups milk
- 2 teaspoons Old Bay seasoning
- 1 teaspoon dried thyme
- 3 cups water
- 16 oz frozen corn (thawed and drained)
- 32 oz large shrimp (peeled and deveined)
-
In a stockpot, cook bacon over medium-high heat until crisp and browned, about 4-6 minutes. With a slotted spoon, transfer bacon to paper towels to drain.
-
Add potatoes and flour to the pot and cook, stirring, about 1 minute.
-
Add milk, seafood seasoning, thyme and water. Bring to a oil, and then reduce to a simmer. Cook, stirring occasionally, until the potatoes are tender, 10 to 12 minutes.
-
Add corn, shrimp, and green onions. Cook until the shrimp are just opaque, 2 to 3 minutes. Season with salt and pepper.
-
Serve immediately and top with bacon.
Products Used:
More One Pot Meals You'll Love:
One Pot Cajun Chicken Alfredo PastaOne Pan Chicken SpaghettiOne Pan Balsamic Chicken & Peach SkilletIf you'd like to see more recipes like this, follow me on Facebook!

Antique Cars, Fused Glass, and Caverns, Oh My! | Springfield, MO

When thinking of places in the US I want to visit, Springfield, Missouri wasn't even on my radar.I mean I knew that, "The 417" is home to Missouri State University and is the birthplace of Route 66, but other than that, I didn't know much about the city. It wasn't until Discover Springfield asked me to visit that I started looking more into the city. In researching our activities beforehand, I found all sorts of fun, unique activities that our whole family would enjoy.I've compiled a ton of tips, ideas, and experiences that we had and I'm ready to show you what Springfield is all about!

Where should I stay in Springfield?
I'm always a lover of staying in AirBnBs, but the Holiday Inn & Suites on the North side of Springfield, MO was perfect for us. The rooms were clean, spacious, and having breakfast downstairs in the restaurant was perfect, so we didn't have to worry about leaving the hotel to look for food first thing in the morning. With two kids in tow, we were happy to just go downstairs to get a bite to eat instead of having to get everyone ready for the day beforehand. It's the little things when traveling with kids, am I right? All of the staff was so friendly too!
What is there to eat in Springfield?

Whole Hogs BBQ
There's a reason why there's a bunch of BBQ contest trophies in the front window of this restaurant. It may not look like much from the outside, but the food here is delicious!The Pulled pork sandwich was so tasty! And there was 6 different barbecue sauces on the table that you could choose from. My husband also got the beef and sausage plate and he said everything was delicious for him too.What I really loved is that their kids meal was REAL food. Both of my kids had the smoked chicken and it was freshly pulled white meat chicken that would have been just as good on an adult's plate.
Bricktown Brewery
I love the vibe of this place! It's a relaxed bar setting with the ability to bring your kids - win win! The burgers were delicious, as was the chicken Caesar salad! Definitely a great place to stop in for dinner and try one of the many beers they have on tap!
The Grotto
This fast-food feeling place has great dishes, uses quality ingredients, and delicious food. It's also great for kids with a wide array of options. I got the Steak & Gorgonzola Salad and it was delicious!
Black Sheep Burgers & Shakes
If you're looking for the best burger in the city and delicious fries to go with it, this is the place! I had the Foodie Burger,, and, at our waitress' recommendation, got the candied bacon on top. Holy moly. So good! The truffle fries were amazing too. There is no shortage of fry sauces either! With an order of fries, you'll get a bunch of options for fry dipping.
Civil Kitchen
I love the vibe of this place! The dishes are all at a great price point, and it's conveniently located near History Museum on the Square. I got the Maple Bourbon Petite Filets with mashed potatoes and brussels sprouts and it was delicious! Everyone else at my table got burgers and they said they were tasty too! It seems like a great place to hang out after work for a drink or have dinner with friends.
Lost Signal Brewing Company
If you're noticing a trend with us visiting breweries, you're right. My husband loves trying local craft breweries wherever we go, so this place was a must on our list.I like citrus-y beers with not too much hops, so the Little Bo Pits was perfect for me! And it went really well with my pulled pork sandwich. I definitely recommend using the spicy BBQ sauce on it - so good! The Mexican street corn was a good side dish as well. My kids loved the chicken wings and chicken street tacos. The menu isn't extensive, but it doesn't really need to be if the food is good - and it is.
What there is to do in Springfield?
Springfield has a little something for all sorts of interests. Like fishing? There's something for that. Like crafting? They've got that covered too.
Creative Escape Glass

Route 66 Car Museum

Bass Pro Shop
Dubbed the “Granddaddy of Bass Pro Shops” this giant Bass Pro Shop is just under 500,000 square feet and is the headquarters for the outdoor store chain. It’s not the largest (Memphis, Tennessee has that title at 535,000 square feet), but sure is impressive. If you are a fan of the outdoors and enjoy fishing, hunting, camping, etc. you just have to visit this store. My kids’ favorite part was the free carousel, but it's also home to the National Archery Hall of Fame, NRA Sporting Arms Museum, and the John A and Genny Morris Conservation Education Center. Inside the “shop” is also an elaborate conference center and café.

Fantastic Caverns
We have plenty of caverns in Texas, but we certainly don’t have one where you can ride in a car through one! This propane-powered vehicle goes all throughout a beautiful cavern and from the comfort of your seat can see all the stalagmites and stalactites your heart could ever want! And the best part? No carrying your kids when they get tired of walking!You'll be amazed by the story of the 12 year old girls that first explored the cave and the size of the opening they went through to get in! And they're open 362 days per year, so you have plenty of opportunities to check it out!
Pythian Castle
If you like historical sites or things of a spooky nature, check this place out! Pythian Castle offers ghost tours, murder mystery dinners, and an escape room. Or you can just take an afternoon and explore the historic home. The castle was an orphanage, army base, and a flea market, but had been restored so it’s original beauty.
World’s Largest Fork
I think this one is pretty self explanatory, but at 2215 W Chesterfield Blvd in Springfield, MO, you’ll find the biggest cutlery you’ve ever seen. It’s just a simple stop and see it kind of thing, but if you get creative, you can make some super fun vacation memories with it. At 35 feet tall and weighing in at 11 tons, you can't miss it.Historic Street is also great for restaurants, shopping, and local favorites.
Looking for more family-friendly vacation ideas?

Andy B's
If you have a family with kids of any age, you just have to spend the day at Andy B's. This family-friendly location has laser tag, bowling, virtual reality, and an arcade. They also have a full menu and bar so you can play, eat, and enjoy spending time together as a family - with something for everyone!Since my kiddos both love anything competitive (where could they have gotten that from?), they both loved the laser tag and bowling the best. They had so much fun shooting their dad and I with laser guns and then bowling with the bumpers was a must.
Itty Bitty City
If you have younger kids, they're going to love Itty Bitty City! Picture a tiny town where they can be anything they like - from veterinarian to policeman - and go to their own grocery store as well. It's a cute place for the kids to play pretend and explore.
Dickerson Park Zoo
While we have a pretty awesome zoo here in Houston, it’s always fun to visit other cities’ zoos and see what they have to offer. This zoo definitely didn’t disappoint! While it was a little chilly when we visited (we’re from Texas, so 37 degrees is cold, okay?), the animals were totally used to it and out and about in their confinements.
Our favorite animals we spotted were the giraffes, kangaroos, and lions. It was also really neat to see how the peacocks were just everywhere! They were wandering all over the place - but steering clear of the tiger cage of course.This is a great place to visit if you have little ones or are an animal lover yourself.
Wonders of Wildlife
When my son was little, I had a membership to the local aquarium. It was the greatest outing for him because he could sit and stare at the fish and turtles all day. Over the years, that love for sea creatures hasn’t changed one bit. The only exception is that now my son likes to make sure to point out every octopus he sees (I am so not a fan of octopus). All that to be said, this aquarium was awesome. There’s plenty to see and experience there! And when USA Today votes it as America's Best Aquarium, you know you're in for a treat.
My favorite was seeing Johnny Morris' boat suspended in what looked like a painting - it was gorgeous! With tank after tank of unique fish and wildlife, this is no ordinary aquarium!
More Family Friendly Travel Ideas
Clarksville, Tennessee | Family Friendly Places to Stay, Eat, and GoWhere to Stay & What to See in Corpus Christi, Texas Want more travel tips like this? Follow me on Facebook!

Gulf Coast Luxury at Cinnamon Shore

This post is sponsored by Cinnamon Shore.
A couple years ago, my husband and I took our kids to stay in Port Aransas. Neither one of us had been there before, but I found a really cute place in Cinnamon Shore that looked really nice so I booked it. It was one of our favorite vacations to date.While we were there, we were able to entertain the kids with a sand castle competition, ride on a golf cart on the beach, and watch a movie on the lawn in the community area. We left that weekend trip vowing to go back one day just the two of us.And this past week, we were able to do just that. We stayed in a beautiful condo in the same Cinnamon Shore area and it was even better than we remembered. We roasted marshmallows on the fire pit, ate at both on site restaurants, and swam in one of the three pools on the property. It was amazing.So if you're looking to visit the Corpus Christi/Mustang Island/South Padre Island area but are looking for something a little more upscale with all of the amenities you could ever want, Cinnamon Shore is the place to go.
Where to Stay
We stayed at the beautiful Serenity Blue at Cinnamon Shore. It’s part of a large community that is right on the dunes! They’ve got 2 dune cross overs to the beach, three community pools, on-site dining, weekly entertainment, two community lakes for fishing, a pirate ship playground, a dog play ground and dog washing area, and a fitness center. And don’t forget to rent a golf cart from Top Deck Golf Carts because that’s how everyone travels from place to place in this beach-side community.
Where to Eat

Dylan’s Pizzeria
Right as you enter Cinnamon Shore, you'll find Dylan's Coal Oven Pizzeria. We were able to have dinner there one evening and the guys working there couldn't have been nicer! They gave us some great recommendations on what to order and we were so glad to have taken their advice!I had the Bianca Pizza with pesto chicken added. It's a white sauce pizza and I'm not lying when I tell you that it was probably the best white pizza I've ever had. It was amazing. My husband had the Tradizionale with sausage and peppers and he said that his was great too.I'd also recommend getting the Pineapple Jalapeno Margarita. It was so flavorful! The predominate flavor was pineapple and then a gentle heat sneaks up on you towards the end. Delicious! I can't wait to go back and eat there again!
Lisabella’s
When you're staying at Cinnamon Shore for a relaxing getaway, this restaurant is a must for dinner. Their menu is primarily seafood, with some steak and quail thrown in as well.Recommendations: Get the crab cake for an appetizer. It's got tons of crab in it and is served with a delicious beurre blanc sauce. For your meal, get either the Red Snapper or the Filet. I've also heard that the Seafood Enchiladas are good as well.Our chocolate cake for dessert wasn't all that special. So maybe skip dessert here.Pro Tip: You'll want to make a reservation. Because of social distancing, a reservation is required to get a table - especially on Tuesday and Thursday evenings when there is a live band playing.The locals also recommended La Playa, Phoenix, Venetian Hot Plate, Island Market, Lelo’s, and Roosevelt’s. So I’ll try to check out a few of these the next time I’m in town.
Indulge Yourself
The best way to relax while on vacation is to plan ahead and anticipate your needs.When I travel, I always have a plan for what we’re going to eat upon arrival. It never fails. You go on a road trip, you get to your destination, you get unpacked, and then you’re exhausted and hungry with no energy to go out to eat.That’s why on this trip, I ordered from Bodega Box to have a charcuterie box of nibbles to be delivered around the time that we’d be arriving. It was perfect! They thought of everything and it was the perfect snack to tide us over until our dinner reservation. Plus, we had some left over to use for a beach picnic the next day!Shopping is great here too! Be sure to check out Roam, Roam Home, The Palm Republic, and Coastal Closet. They have all sorts of things from clothing to home décor and you’re sure to find something you like.
What to Do
The beach is definitely the #1 spot to spend some time while you’re enjoying the Port Aransas area.Texas Sandfest is a close second. We brought our kids a couple years ago to this event and it was amazing! There were people from all over the world building huge, detailed sand art and displaying it for all to see. There were some really amazing pieces! The event takes place every April (although this year’s was canceled) and they’re already scheduled for next year’s to be bigger than ever!Cinnamon Shore also has daily activities scheduled all year round! While we were there, there was s'mores at the fire pit, sand castle building lessons, and yoga. During the Fall, they also have movies in the outdoor theater, beach workouts, surfing lessons, and tons of live music. During the summer months, they have up to 5 different activities scheduled each day! You WILL NOT be bored at Cinnamon Shore
More Texas Towns You’ll Love:
Corpus ChristiKerrvillePlanoIf you'd like to see more travel tips like this, follow me on Facebook!
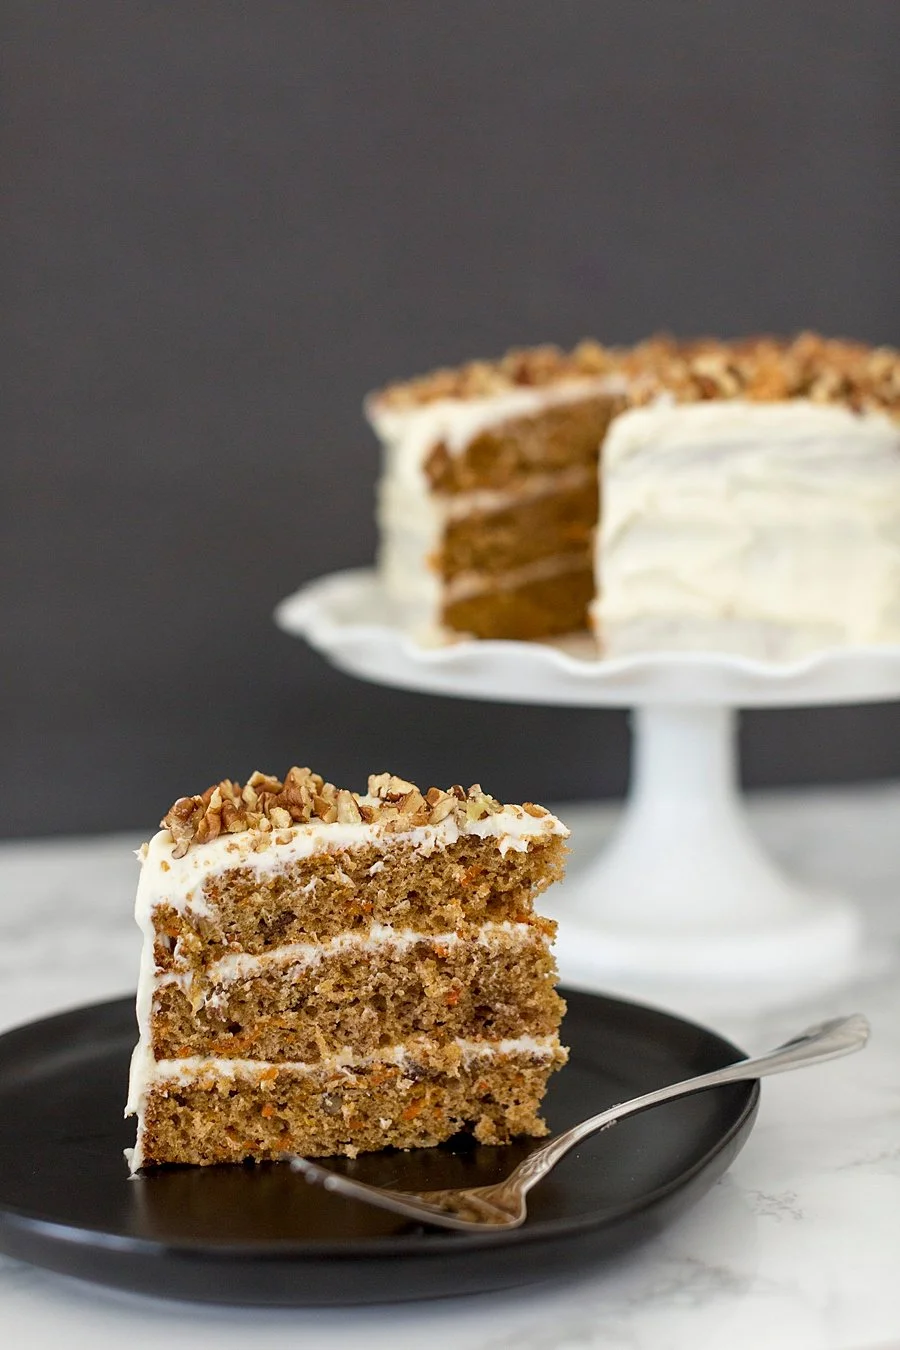
The Most Moist Carrot Cake You've Ever Put in Your Mouth

Carrot cake is my happy place.During the pandemic, there has been a lot of good to come out of it. We've learned how hard our teachers have it schooling our kids. We've learned that nurses and doctors put their lives on the line more than we might think on a daily basis. And we've learned how to cook for our families day in and day out.We've also seen a lot of people giving back. Businesses donating masks. Organizations forming to support laid off workers and families. And just how much social media is needed in this time to get through the every day and connect with others.
“When I was a boy and I would see scary things in the news, my mother would say to me, "Look for the helpers. You will always find people who are helping.” - Mr. Rogers
 One personal experience I've had was getting produce from Farm Gals. Farm Gals is a local non-profit that teaches kids how to plant and farm and all Corona season long, they've been giving away fresh produce and goods to anyone who drove by and opened their trunk.Two days ago, I did just that. I saw the line forming and though, "why not?" and pulled in behind the last car.I opened the trunk of my car, some teenage boys wearing masks and gloves put several bags of unknown goods in the car, and then I drove off. When I got home, I saw that we had 5 pounds of fresh (huge) carrots, 5 pounds of cucumbers, a quart of fresh lemon juice, and 3 lbs of pork sausage patties.
What makes a Carrot Cake moist?
The first ingredient you should always use in a moist carrot cake is freshly grated carrots. Do not buy the pre-sliced ones at the store - they're already dried out once you purchase them, so they're only going to soak up all of the moisture in your cake and leave you with a dry cake. Yuck.Another ingredient that helps is brown sugar. The darker the better. You can use light brown sugar, dark brown sugar, or even this raw sugar cane cone (see the photo below if you have no clue what I'm talking about), but the best option is going to be the darkest.

How do I Get the Most Flavor in my Carrot Cake?
It's all about the vanilla, baby! My personal favorite is Mexican Vanilla. It's raw and absolutely fantastic. You can find it usually at a Mexican meat market or if you're ever "over the border". I usually buy a few bottles when I go to Mexico. The second best option is at Costco. Costco's Kirkland brand Vanilla is a great vanilla as well. It doesn't have a strong alcohol smell/taste to it like some of the other brands you'll find on the shelf and the cost per ounce ratio is way better too!
Moist Carrot Cake Recipe
Moist Carrot Cake

Fresh carrots are shredded and transformed into this moist, delicious carrot cake with cream cheese icing.
Cake Ingredients
- 2 cups chopped pecans (1 cup for cake, 1 cup for garnish)
- 1 and 1/2 cups packed light or dark brown sugar
- 1/2 cup granulated sugar
- 1 cup 240ml vegetable oil or canola oil (or melted coconut oil)*
- 4 large eggs
- 3/4 cup smooth unsweetened applesauce
- 1 teaspoon pure vanilla extract
- 2 and 1/2 cups all-purpose flour (spoon & leveled)
- 2 teaspoons baking powder
- 1 teaspoon baking soda
- 1/2 teaspoon salt
- 1 and 1/2 teaspoons ground cinnamon
- 1 teaspoon ground ginger
- 1/4 teaspoon ground nutmeg
- 1/4 teaspoon ground cloves
- 2 cups grated carrots (about 4 large)
Cream Cheese Frosting
- 16 ounces full-fat block cream cheese (softened to room temperature)
- 1/2 cup unsalted butter (softened to room temperature)
- 4 and 1/2 cups confectioners’ sugar
- 1 Tablespoon heavy cream or milk
- 1 and 1/2 teaspoons pure vanilla extract
- pinch of salt (to taste)
- Make the cake: Preheat oven to 300°F. Line a large baking sheet with parchment paper or a silicone baking mat. Spread the chopped pecans on the sheet and toast for 7-8 minutes. Remove from the oven and allow to cool for 10-15 minutes.
- Turn the oven up to 350°F. Grease two or three 9-inch cake pans, line with parchment paper, then grease the parchment paper. Parchment paper helps the cakes seamlessly release from the pans.
- Whisk the brown sugar, granulated sugar, oil, eggs, applesauce, and vanilla together in a large bowl until combined and no brown sugar lumps remain.
- In another large bowl, whisk the flour, baking powder, baking soda, salt, cinnamon, ginger, nutmeg, and cloves together. Pour the wet ingredients into the dry ingredients and, using a rubber spatula or wooden spoon, fold the ingredients together until just combined.
- Fold in the carrots and 1 cup of the toasted pecans. (The rest of the pecans are for garnish.)

- Pour/spoon the batter evenly into the cake pans. If using three cake pans, bake for 20-24 minutes. If using two cake pans, bake for 30-35 minutes. Test the center with a toothpick. If it comes out clean, the cakes are done. If not, continue to bake until cooked through. Do not over-bake. Allow the cakes to cool completely in the pans set on a wire rack. The cakes must be completely cool before frosting and assembling.

- Make the frosting: In a large bowl using a handheld or stand mixer fitted with a whisk or paddle attachment, beat the cream cheese and butter together on medium-high speed until smooth, about 2 minutes. Add the confectioners’ sugar, cream/milk, vanilla extract, and a pinch of salt. Beat on low speed for 30 seconds, then increase to high speed and beat for 3 minutes until completely combined and creamy. Add more confectioners’ sugar if frosting is too thin, more milk if frosting is too thick, or an extra pinch of salt if frosting is too sweet. Frosting should be soft, but not runny.

- Assemble and frost: First, using a large serrated knife or cake leveler, layer off the tops of the cakes to create a flat surface. Place 1 cake layer on your cake stand or serving plate. Evenly cover the top with frosting. Top with 2nd layer, more frosting, and then top with the 3rd layer. Spread remaining frosting all over the top and sides. Decorate the sides and top of the cake with the remaining toasted pecans. Refrigerate cake for at least 15-20 minutes before slicing. This helps the cake hold its shape when cutting.

- Cover leftover frosted cake tightly and store in the refrigerator for up to 5 days.

- Make Ahead & Freezing Instructions: The cake layers can be baked, cooled, and covered tightly at room temperature overnight. Likewise, the frosting can be prepared then covered and refrigerated overnight. When ready to decorate, let the frosting sit at room temperature to slightly soften for 15 minutes, then give it one more mix with the mixer on medium speed for about 1 minute before frosting cake. Frosted cake or unfrosted cake layers can be frozen up to 2-3 months. Thaw overnight in the refrigerator and bring to room temperature before decorating/serving.
- Nuts: If desired, you can substitute the pecans with walnuts. Or feel free to skip the nuts if you want a nut-free carrot cake. No other changes to the recipe required.
- Applesauce: Instead of applesauce, you can use 3/4 cup crushed pineapple if desired. Slightly drain the canned crushed pineapple first. You want it the consistency of applesauce– not too watery. You could also use 3/4 cup mashed bananas, sour cream, plain yogurt, or canned pumpkin puree.
- Carrots: My #1 tip for carrot cakes is to grate whole carrots at home. Do not use packaged pre-shredded carrots because they are hard and dry.
- Oil: If using melted coconut oil, make sure all of the other cake batter ingredients (carrots included) are room temperature. Otherwise, the melted coconut oil will begin to solidify before the batter goes into the oven.
- Cream Cheese: Use blocks of real cream cheese. Not cream cheese spread.
9×13 Inch Cake: Simply pour the batter into a greased and lightly floured 9×13 inch pan and bake for 40-45 minutes or until a toothpick inserted in the center comes out clean. - Carrot Bundt Cake: Use a 10-12 cup generously greased bundt pan. Bake for 55-75 minutes. All ovens and bundt pans are different, so that’s why the bake time varies. Keep a close eye on it.
- Add-Ins: If you’d like to add raisins or coconut, reduce the pecans (or leave them out) to 1/2 cup. Then, add 1 cup of raisins or shredded coconut. Stick to around 1 – 1.5 cups total add-ins. Or you can leave the cake plain without any add-ins.
- Carrot Cake Cupcakes: Fill cupcake liners 2/3 full. Bake at 350°F (177°C) for 20-22 minutes. Yields about 3 dozen. Or try my carrot cake cupcakes recipe.
Products Used:
[activecampaign form=1]

Perfect for Snacking Pretzel Bites

If ever there was a time for snacking, the time is now.And the answer for "what should I eat?" is definitely these soft pretzel bites.
Who Ate My Quarantine Snacks?
Covid-19 has left us all stuck in our homes and held captive by our snacks. Here on the Texas Gulf Coast, we only know one way of preparing to stay put for a while - and that's "hunkering down" hurricane style, i.e., with plenty of bottled water, toilet paper, and packaged sweets and chips that will stay good for a while.Most of the time, those snacks are gone in the first few days. And that might be the case for you in quarantine now too. But this season of staying home is much different than those hurricane-like days in the past. It's been an endless array of groundhog days were every day seems to feel exactly like the day before - and we still have electricity and running water (thank the Lord!).So with every day feeling like the next, it's that much more important to keep our spirits up with cheap entertainment. In our house, that means going outside to explore and cooking.
Cooking is Interactive Learning!
Yesterday, that meant my daughter and I got in the kitchen and made some soft pretzel bites. My kids love pretzels and these soft ones are perfect straight from the oven. We pretended the dough was Play Doh and made long skinny "snakes" of dough and after they were cut into bite-size pieces, she"painted" the pieces with egg wash.This recipe makes approximately 120 pretzel bites and I can guarantee you that they will all be gone in a day. Or if you serve them when you have a party, they will most definitely be a hit!
Soft Pretzel Bites Recipe
Pretzel Bites

The perfect salty snack for any party or afternoon munch session are these soft pretzel bites. They're fresh bread dough topped with coarse salt and served with a cheddar cheese sauce!
Soft Pretzels:
- 1 1/2 cups warm water
- 2 tablespoons light brown sugar
- 1 package active dry yeast ((2 1/4 teaspoons))
- 3 tablespoons unsalted butter (melted)
- 2 1/2 teaspoons salt
- 4 1/2 cups bread flour (or all purpose)
- Vegetable oil
- 3 quarts water
- 1/3 cup baking soda ((for boiling the pretzels))
- 1 whole egg beaten with 1 tablespoon cold water
- Coarse sea salt
Cheese Sauce:
- ½ Tablespoon unsalted butter
- ½ Tablespoon all-purpose flour
- ½ cup milk
- 8 ounces Cheddar cheese (grated)
For the Pretzels:
-
Combine the 1 1/2 cups water, sugar, yeast, and butter in the bowl of a stand mixer and mix with the dough hook until combined. Let sit for 5 minutes.

- Add the salt and flour and mix on low speed until combined. Increase the speed to medium and continue kneading until the dough is smooth and begins to pull away from the side of the bowl, about 3 to 4 minutes. If the dough appears too wet, add additional flour, 1 tablespoon at a time. Remove the dough from the bowl, place on a flat surface and knead into a ball with your hands.

- Oil a bowl with vegetable oil, add the dough and turn to coat with the oil. Cover with a clean towel or plastic wrap and place in a warm spot until the dough doubles in size, about 1 hour.

- Preheat the oven to 425 degrees F.
- Bring the 3 quarts of water to a boil in a small roasting pan over high heat and carefully add the baking soda. It will boil over, so add slowly and be careful!
-
Remove the dough from the bowl and place on a flat surface. Divide the dough into 8 equal pieces, about 4 1/4 to 4 1/2 ounces each. Roll each piece into a long rope measuring 22 inches and shape. Cut the dough into one inch pieces to make the pretzel bites. Boil the pretzel bites in the water solution in batches.

-
We did about 15 bites at a time. Boil for about 30 seconds. Remove with a large slotted spoon. Place pretzel bites on a baking sheet that has been sprayed with cooking spray. Make sure they are not touching. Brush the tops with the egg wash and season liberally with the salt. Place into the oven and bake for 15 to 18 minutes until golden brown.

- Remove to a baking rack and let rest 5 minutes before eating. Serve with cheese sauce.
To make the Cheese Sauce:
-
Melt the butter in a medium saucepan over medium heat. Add the flour and cook 1 minute. Whisk in the milk and cook until slightly thickened. Remove from heat and stir in the Cheddar cheese until smooth and all of the cheese is melted. Season with salt and pepper, to taste.
*If you want to make cinnamon and sugar pretzel bites-instead of adding salt, sprinkle the bites with cinnamon and sugar. For the frosting mix-soft cream cheese-about 3 T, powdered sugar, a teaspoon of vanilla extract, and a little bit of milk. Whisk together. Add more milk if it is too thick, if it is too thin, add more powdered sugar. I don't measure. I just guess until the consistency is right.*

Products Used:
If you'd like to make the traditional twist soft pretzels, check out the recipe here.[activecampaign form=1]

5 Tips for Easy Spring Cleaning

This post contains affiliate links. All photos and opinions are mine and should not be used without written permission.
I don't know about you, but all of this time I'm spending at home is making me look around my house and realize I need to purge. Badly. I've got a few unorganized spaces and I know that when I'm organized, I'm more focused and productive. So in case you need some help in this department, I'm going to show you what I do in order to get inspired and get tidy. This post is adapted from a video I created for Walmart's Grocery Pickup Magazine.
Focus on one space at a time
Rome wasn’t built in a day and cleaning up your house isn’t going to happen that fast either! Start with one area that bothers you most and take it from there. For me, it’s my desk. Let’s get this thing cleaned up!
Get Everything Out.
Take everything out of the area you’re working on. Clean out every drawer. Open the doors and pull out all of those loose papers.
Make the Hard Decisions
Once you have everything out of your space, separate all of the items in 3 categories – Keep, Donate/Sell, Trash. This is definitely the hard part because you simply cannot keep everything! You’ve got to purge some stuff, Mama! Use a Great Value trash bag to bag it all up.
Clean everything before you put it back.
Dust, wipe down, and disinfect it all so that you know that everything that is going back into that space is going to be clean and safe for your family. One thing I do is I keep all of my general cleaning supplies in one easy to carry tote. I love using my magic eraser to get those hard to clean marks off of walls, tables, and floors. I seriously don’t know how they work but they’re amazing! I also use this time to fix anything that may be broken or missing pieces.
Create a space for everything you’re keeping
Before you just start shoving everything back into the space, have a plan in mind! Make sure you have a specific place for everything, because if everything has its own place, you’re sure to stay organized.
I feel so much better now that I have a clean desk and area to work in!Happy Spring Cleaning![activecampaign form=1]
Springtime Protein Packed Yogurt Bowl
This post is sponsored by Randalls. All photos and opinions are mine and should not be used without written permission.
After a dreary Winter, I am really loving the weather during this sunny Spring! Spring time to me means eating outdoors, fresh seasonal food, and enjoying that glorious sunshine! So when some girlfriends of mine wanted to get together for a garden party (pre-quarantine), I said yes so fast they weren’t ready for it!As the writer of a food blog, I knew I was going to be bringing my A game to this themed party. I’ve been trying to eat healthier lately, so I felt like keeping the menu light was definitely the way to go. I couldn’t decide if I wanted to do gluten free, plant based, or just include ingredients that promote relaxation, so I decided to do all of the above!
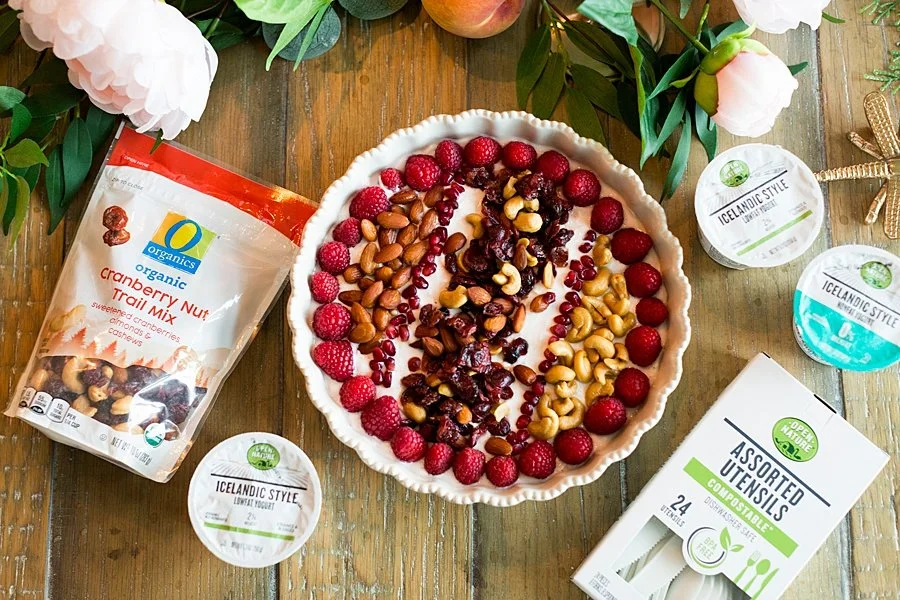
First up is this protein-packed power bowl. This healthy bowl is packed full of pro-biotics, fresh fruits, and healthy fats - so what’s there not to like? But the best part is that it’s easy to make but it looks like a million bucks.What I like about this recipe too is the versatility. You could easily make this yogurt bowl as individual plated portions, serve it family style, or even create a yogurt bar complete with all the toppings so your guests/family members can mix and match their own ingredients.
What’s in a Power Bowl?
I’m going to let you in on a little secret...power bowls include whatever you want to put into it.But they also typically have lots of protein, good fats, nuts, and are generally good for you.So for this specific power bowl, I wanted it to have fresh ingredients, be low in fat, and be packed with flavor. Here’s what’s in my bowl:
Open Nature Icelandic Yogurt, Mixed Berry Acai Flavor
Part 2% and part skim milk, this sweet yogurt contains a plethora of fruits such as strawberries, raspberries, blackberries, and acai. Not only is that color perfection, but the flavor is as well. I hate boring yogurt and this flavor is anything but boring!
Open Nature Icelandic Yogurt, Vanilla Flavor
This lowfat yogurt is made with 2% milk, so it’s perfectly creamy with just the slightest hint of vanilla. It made for a great contrast with the mixed berry acai yogurt I added it to, but I’m sure it would be equally as delicious on its own.
Pomegranate seeds
After cracking open a hard, red pomegranate, you’ll find these gems. These crunchy black seeds are encased in sweet red juice and are a great texture contrast to the smooth and creamy yogurts. They have tons of antioxidants and fiber too, so they’re perfect for digestive health.
O Organics Trail Mix Cranberry Nut
I hate a trail mix that is nothing but granola, so this trail mix rates pretty high for me (there’s no granola in it whatsoever). It’s got crunchy almonds, cashews, and tangy dried cranberries in it, so it really does make your tastebuds do a little dance.
Raspberries
Packed with Vitamin C and E, raspberries are great for brain health. Plus, they taste good - even if you just eat them off of your fingers like my daughter does.
Where do I Find the Ingredients?
I purchased all of my O Organics® and Open Nature® ingredients for this power bowl at my local Randalls.They also carry these brands exclusively at all of the Albertsons Companies family of stores, including ACME Markets, Jewel-Osco, Vons, Pavilions, Tom Thumb, Shaw’s, Star Market, United Supermarkets, and Carrs/Safeway. You can visit Albertsons.com or randalls.com to find a store near you. And while you’re there, be sure to check out their meal prep tips and recipe ideas as well!The best part about shopping at my local Randalls is the online savings. I love creating my shopping list online, adding my digital coupons, and making things easier on myself for when I’m actually in the store (especially if I have the kids with me).While I’m not spending much time in store lately, Randalls has made some awesome accommodations to their shopping experience - like special shopping hours for seniors and keeping the shelves stocked.
Ready for the recipe?
Protein-Packed Power Bowl
This healthy bowl is packed full of pro-biotics, fresh fruits, and healthy fats - so what’s there not to like? But the best part is that it’s easy to make but it looks like a million bucks.
- 4 containers Open Nature Icelandic Yogurt Mixed Berry Acai
- 1 container Open Nature Icelandic Yogurt (Vanilla)
- ½ package O Organics Trail Mix Cranberry Nut
- 1 pint Raspberries
- 2 oz Pomegranate gems
- Open the yogurt containers and pour the content of them into your bowl. You can use as much or as little as you like of each (I used mostly Mixed Berry Acai Open Nature Icelandic Yogurt with just a dollop of Vanilla Open Nature Icelandic Yogurt).
- Add the fruits and trail mix however you like (I, of course, had to make a design, but that’s totally up to you).
- Enjoy!
 Now, when you’re eating your good-for-you yogurt bowl, make sure to use your good-for-the-planet cutlery! These Open Nature® Compostable Spoons are perfect for a garden party or just a night eating around the dinner table. Since they’re made out of a plant-based material, you can enjoy these use and toss spoons and not feel guilty about adding to a landfill somewhere.
 This garden party had everything I love in it - food, flowers, and good friends. I just love the freshness of this time of year!If you’d like to see more Spring recipes like this, follow me on Facebook!

Forget Brunch with the Girls, Try Coffee and Cupcakes for Valentine's Day Instead!

I'm just going to say it. Valentine's Day is not my favorite holiday. I've never really cared to give my classmates fold-over valentine's that have cutesie messages in them and are sealed with a heart sticker. My husband and I hardly ever celebrate it. For us, it's just another day because we do little things to show one another that we love each other every single day. That being said, I've shown in the past my Valentine's Date Night Checklist, How to Create the Ultimate Valentine's Day Breakfast in Bed, and even given 10 Ideas on What to Get Hubby for Valentine's Day. But when it comes to "Galentine's Day", that's a whole other thing entirely. There's just something about being around your girlfriends and crafting, eating, and chatting that is just so fun! Maybe it's because we all get a kick out of the hearts and pink and red decor, but it's always a good time - no matter what we do.This year, we decided to make things easy on ourselves by skipping the brunch and having a "Coffee and Cupcakes" girl's morning instead. We had so much fun and I'm going to show you everything you need to pull of this easy-peasy event!
Decor
I am a firm believer in using a lot of items from your home that you have already and then just adding a few pieces that will make the theme or holiday pop. For this Valentine's Day setup, I chose to go with a Modern Farmhouse Valentine's Day celebration that was just the right amount of pink, red, hearts, and love to set the tone. A lot of the items I got from Jane.com, but since that site is seasonal, I thought I'd show you other options to get similar items if you liked them and wanted them fro yourself.
Mirror
Full disclosure...I grabbed this white farmhouse mirror right off of my mantel. I like it on the table because it added some height to the overall look and it draws your eye up. If you're looking for one like it, I found one like it here.
Buffalo Plaid Table Runner
This black and white checkered table runner is so versatile! I keep it on my table year round and change out the decor around it. Super simple!
Felt Leaves Garland
You know I had to add a little green into the mix, so this fake leaf garland was perfect! I found a similar one here that would look great as well!
Farmhouse Pitcher
I found this adorable green farmhouse pitcher at Dirt Cheap and I put some fake (but good fake) flowers in it. I found a similar looking white farmhouse pitcher here.
Vintage Metal Mug Holder
This mug holder might be my favorite find on the table. It's such a great use of space and easy for people of all ages to grab a cup to use for their coffee or hot chocolate. It looks perfect in a coffee bar in your kitchen.
Hand Towel & Towel Ladder
I am so in love with this little kitchen towel ladder! And then I found the most perfect little Valentine's Day kitchen towel and of course I had to incorporate it in to the look as well.
Wood Chalkboard Coffee Sign
Perfect Peace Designs made this for me and I just love it! It ties the whole table together and I'm so impressed by her creativity!
Pom Pom & Tassel Wall Hanging
My friend Lauren at Cotton & Sawdust is so talented! She makes the coolest stuff and how gorgeous is this wall hanging made out of pom poms and tassels? She also makes some beautiful macrame pieces as well!
Food & Fun
First of all, music is a must! Anything from "Girl's Just Want to Have Fun" to Spice Girls is perfect!
Mugs
After we had the right tunes playing, we got our coffee on! I found the most adorable Valentine's Day mugs, so everyone had a different one!
Cupcakes
First of all, these cupcakes look WAY fancier than they are. Here's my little secret...these are made from a regular old box mix. The only difference is that I got these tulips parchment paper liners and filled the cupcake liners with double the batter (so instead of the box mix making 24 cupcakes, it only makes 12 over-sized cupcakes instead). The best thing about these is that they're made out of parchment paper, so your cupcake goodness won't all come off on the wrapper. You can get red paper, pink paper, or this craft paper 3 color set that I used. They also have other colors here for any occasion (or just because) you like!
Up to 65% off New Deals added every day at Jane.com! Shop today!
Decorating the Cupcakes
Could have I just iced them myself? Yes. But it's way more fun to do it with your friends...because it always turns into a competition of who's looks best. Here's a tip for how to make it as mess-free and easy to ice as possible. I use store-bought icing and put it into tipless piping bags. I just apply light pressure, swirl the icing around the top, and voila! A pretty little cupcake! Just don't forget the oversized heart sprinkle. If you'd like to see more tips like this, follow me on Facebook!
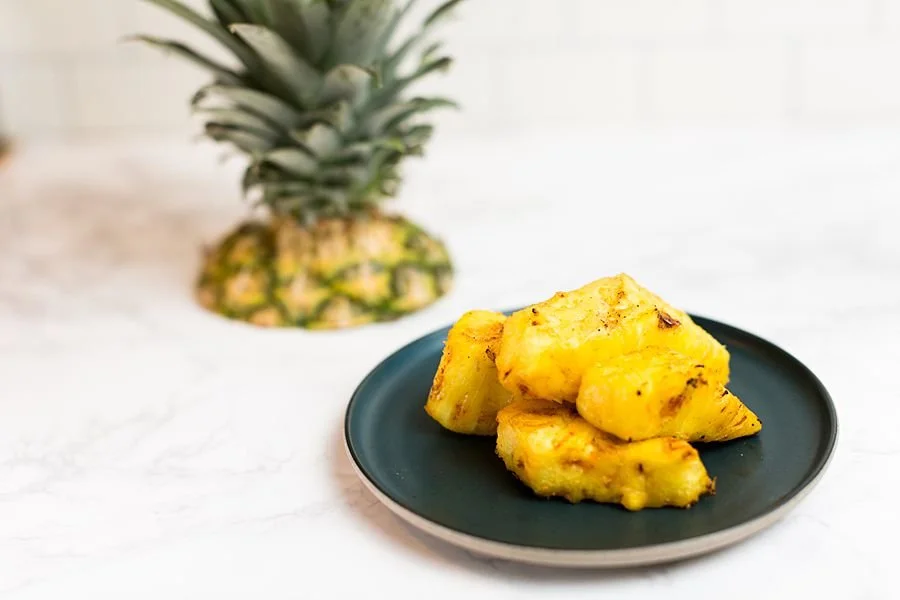
Spicy Grilled Pineapple

This post contains affiliate links. All photos and opinions are mine alone and should not be used without written permission.
Meal Planning
Lately I've been really trying to plan out what we're going to have for dinner in advance. On one day a week - usually Sundays, I plan out what we're going to have for dinner the rest of the week. I take into account what activities we have that day and how much time I actually have to spend in the kitchen. At the same time, I write out the grocery list and make sure I have all of the seasonings I need. I like using my HEB app on my phone to make my grocery list because it puts every item on the list categorized by aisle number, so I'm not going to be criss-crossing across the store. I'm not sure if other grocery stores have that, but that's where I shop and it's a huge plus for me that the app has that feature!
Here's what last week's menu looked like:
Last Week's Menu
Sunday - Chicken Enchiladas, Rice, and Charro BeansMonday - Spaghetti & Garlic BreadTuesday - Fish TacosWednesday - Chicken & DumplingsThursday - Texas HashFriday - Chicken FettuccineSaturday: King Ranch Casserole
If you're interested, I got the recipe for the chicken enchiladas, chicken and dumplings, chicken fettuccine, and king ranch casserole all from the Magnolia Table cookbook and can vouch that they're all amazing and were gobbled up. (and now there's a second one coming out? I need it!)
Taco Tuesday
So on Tuesday, tacos were on the menu and I thought, why not add a pineapple relish on top? So I bought a fresh pineapple along with the rest of my groceries. I like prepping my ingredients all at once, so while I was coring the pineapple, I thought, why not grill it? Flavors of fruits are always so much more enhanced when they're grilled, so why not grill it before I chop it and add it to my tacos? So I marinated the pineapple and got it ready for the next day - Taco Tuesday.After marinating overnight, the pineapple chunks went on the grill. Y'all, the smell of that sweet pineapple hitting the grill was like Heaven to my nose. Holy moly! I knew as soon as I smelled it that I was going to have to try a bite as soon as I was done grilling it.
We have a situation on our hands.
The pineapple came off the grill and I took a bite. At first, it was that familiar, sweet taste of pineapple, but then the cayenne kicked in just at the end, giving it just the right amount of heat. So good. Like, so so good. I called for my husband to come over and try a bite and soon it was all gone. We devoured that whole dang pineapple before it ever even touched a taco. Now, even as I write this, my mouth is watering for me to make it again. And I will very soon - you can bet on that!So I guess the right thing for me to do now is to give you the recipe, huh? If I must....but don't say I didn't warn you when I say that this pineapple doesn't last off the grill long!
Uses for Grilled Pineapple
You could easily make this spicy grilled pineapple in slices to put on a teriyaki burger, in chunks to serve alone as an appetizer, paired with vanilla ice cream for dessert, or (if you can restrain yourself better than I can) as a pineapple slaw to top your tacos. Or how about a refreshing pineapple margarita? Now that I think about it, the possibilities are endless when it comes to this grilled pineapple recipe! Maybe I should find a support group...
Spicy Grilled Pineapple

Sweet and juicy pineapple has a little kick of heat for the perfect summer treat.
- 1 pineapple (peeled, cored, and sliced)
- 1/4 teaspoon honey
- 3 tablespoons butter (melted)
- 1 teaspoon cayenne pepper
- 1/8 teaspoon salt
-
Combine the honey, butter, cayenne pepper and salt in a resealable plastic bag.

-
Place the pineapple in the bag, seal it, and toss it to coat evenly. Let marinate for at least 30 minutes (or overnight)
-
Grill pineapple for 2 to 3 minutes per side, or until heated through and grill marks appear.

Products Used
If you'd like more recipes like this, follow me on Pinterest!
[activecampaign form=1]
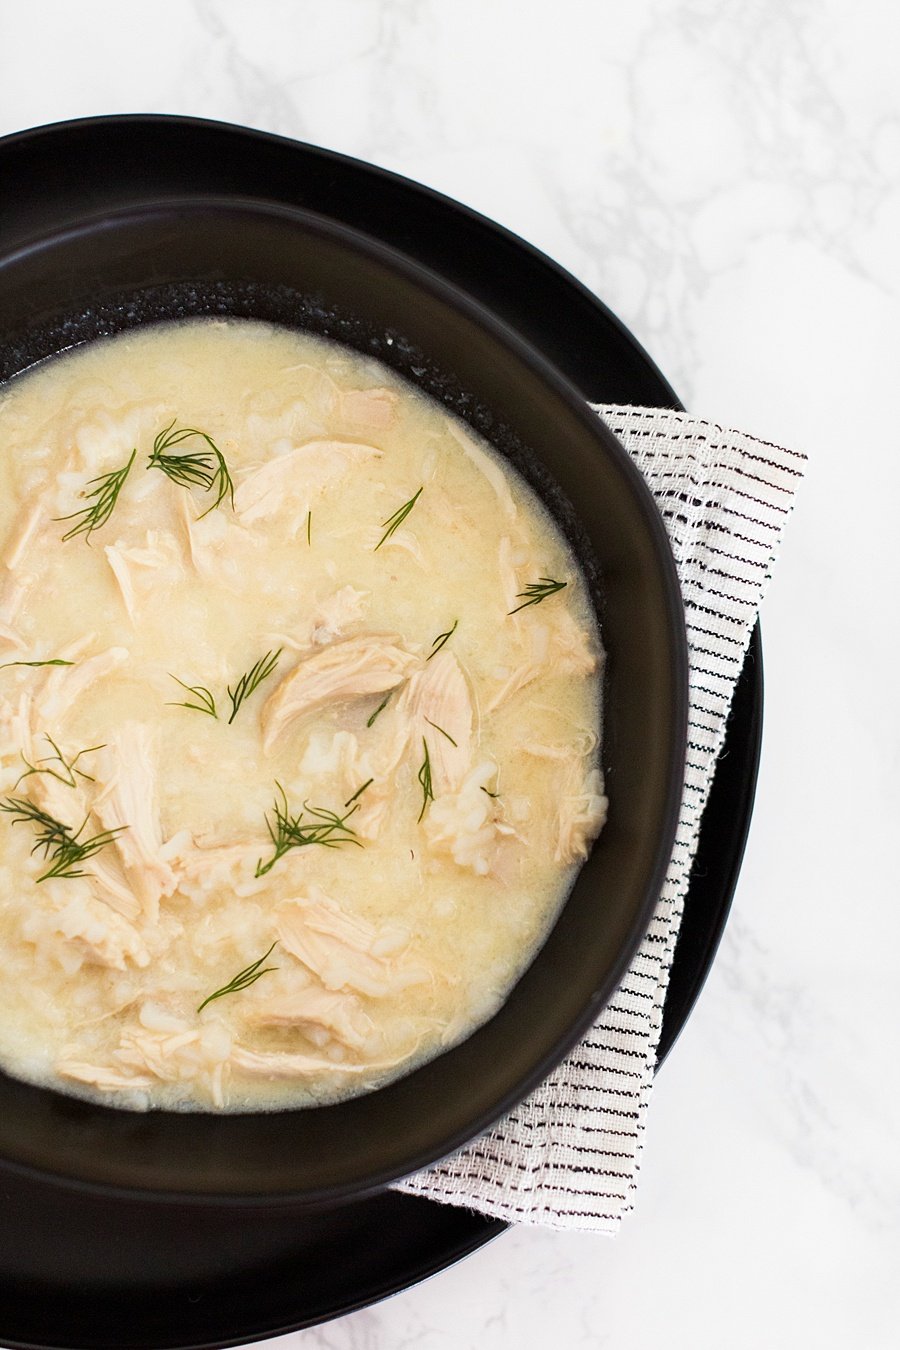
Avgolemono (Greek Chicken & Rice Soup)

This post contains affiliate links. All photos and opinions are mine and should not be used without written permission.
The weather in Houston in the winter time is just ridiculous. One day, it's 85 degrees and sunny and the next it's 40 degrees and raining. It not only wreaks havoc on selecting an outfit for the day, but it also tends to get every one in our household sick. This season is no different. We've all been passing around a cough/cold thing, and I'm ready for it to just pack its things and leave already!It's on days like today (it dropped 35 degrees from this morning to this evening) that a stick-to-your-ribs kind of dinner is oh so needed. I found a recipe for chicken soup that used rotisserie chicken, but after adding a little something extra to it, I think it's just perfect. Well, that and everyone devoured it at dinner tonight.This traditional Greek food is avgolemono, a chicken and rice soup with an egg yolk and lemon base that is generally served as the first meal on Christmas day in Greece.So, while I don't think we'll be having it for breakfast on Christmas Day, we will be making this one over and over again. Here's how you can make this chicken and rice soup too:
Avgolemono (Greek Chicken & Rice Soup)

This traditional Greek food is avgolemono, a chicken and rice soup with an egg yolk and lemon base that is generally served as the first meal on Christmas day in Greece.
- 4 cups homemade chicken stock or low-sodium broth
- Salt and freshly ground pepper
- 2 cups cooked white rice (warmed)
- 2 large egg yolks
- 1/4 cup plus 2 tablespoons fresh lemon juice
- 1 rotisserie chicken (meat pulled from the bones and coarsely shredded (1 pound))
- 1/4 cup chopped fresh dill
-
In a large saucepan, season the stock with salt and pepper and bring to a simmer.

-
Transfer 1 cup of the hot stock to a blender. Add 1/2 cup of the rice, the egg yolks and the lemon juice and puree until smooth.
-
Stir the puree into the simmering stock along with the chicken and the remaining 1 1/2 cups of rice and simmer until thickened slightly, 10 minutes.
-
Stir in the dill and serve.

Products Used


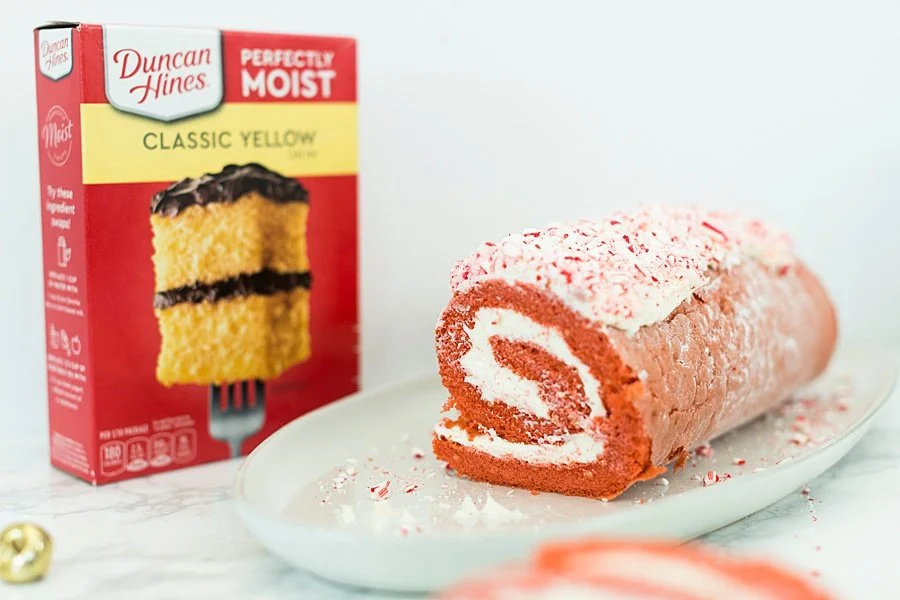
Candy Cane Christmas Cake Roll

Whether you're attending a Christmas party at someone's house or hosting a holiday get together in your own home, this Christmas cake roll is sure to be a big hit! Here's why I like it:
- This recipe uses a box cake mix, so that means it automatically starts off easy
- Talk about cheap to make! You literally use leftover candy canes and budget-friendly ingredients to make this dessert and the finished product costs less than $5 total.
- It's a super festive dessert that looks great and looks like you worked really hard, but it's simple as long as you work quickly and effectively.
 So get out those cake mix boxes and let's start baking!
Candy Cane Christmas Cake Roll
Spongy cake is wrapped up with sweet icing and topped with leftover candy cane pieces. It's the perfect dessert to enjoy this holiday season!
- 6 eggs
- 1 red velvet boxed cake mix
- 1/2 cup water
- 1/4 cup vegetable oil
- 1/4 cup powdered sugar
- 2 containers whipped frosting ((16 oz containers))
- 1/2 cup candy canes (finely chopped)
-
Heat oven to 375°. Line the bottom of a jelly roll pan (size 15x10x1) with parchment paper. Spray the paper and sides of the pan with baking cooking spray (the kind with flour in it).
-
In a large bowl, beat the eggs for 6 minutes or until frothy. Add in the cake mix, water, and oil. (I used a butter cake mix, so I also added a red gel food coloring to make it appear red, but if you use a red velvet cake mix, you can skip this step). Mix the ingredients until well blended.
-
Pour 3 1/2 cups of batter into the pan and use a spatula to spread the batter to the sides of the pan. Set aside the remaining batter.
-
Bake for about 14 minutes (or until a toothpick will come out clean in the middle). Take a large (clean) kitchen towel and sprinkle the powdered sugar all over it. Once the cake is done, immediately turn the cake out onto the powdered sugar covered towel and peel off the parchment paper. Starting at the narrow end, roll the towel and cake into itself, creating a spiral. Cool the rolled-up cake on the counter for 10 minutes at room temperature and then place in the refrigerator for one hour to cool.
-
For the remainder of the batter, line a muffin tin with 6 baking cups and divide the batter between the cups. Bake at 375° for 15-18 minutes.
-
Unroll the cake carefully and remove the towel. Allow the end to remain slightly curled. Spread one full container and one half of another container of frosting over the surface of the cake. Re-roll the cake, wrap in plastic wrap, and refrigerate 30 minutes.
-
Remove the cake from the refrigerator. Spread half of the second container of icing across the top of the roll. Cover the icing with candy cane pieces. Slice and enjoy!
Products Used:


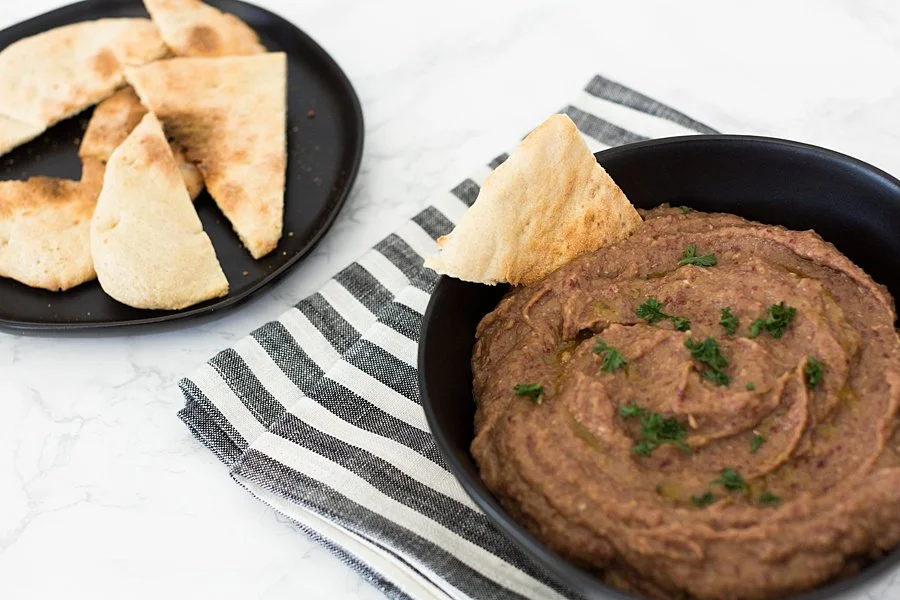
Red Bean Hummus

This post contains affiliate links and is sponsored by Flavor Your Life. All photos and opinions are mine and should not be used without permission.
There are a few things that I always have ready in my pantry. A selection of spices, baking supplies, and a good quality European Extra Virgin Olive Oil are always on hand.
What is EVOO?
Extra Virgin Olive Oil comes from the fruit of an Olive tree. It's made by pressing the fruit without using heat or chemicals. Olive Oil is qualified as "Extra Virgin" when it has lower peroxide values. Lower peroxide levels indicate a fresher oil and a faster processing time. In addition to this, oils must be judged by expert tasters that will deem it as a higher quality.
Why European EVOO?
Olive trees all over Europe are revered for the "liquid gold" they produce. Farmers there have spent hundreds of years cultivating the land, trees, and caring for their orchards in order to give optimal growing conditions. Because of this expertise in growing these fruit trees, the taste of European EVOO is absolutely incredible! The different regions of Europe also produce different flavor profiles (sort of like how honey tastes like what plants it's next to). For instance, Spanish oil is typically a golden yellow with a fruity, nutty flavor while Italian olive oil is often dark green and has a grassy flavor. Greek olive is also usually more green in color and packs a strong flavor, while French oil is typically lighter in color and has a mild flavor.These olives that are typically harvested during the months of late November and into December taste mild and buttery, while olives harvested too early (around late August) are typically bitter and pungent. In the recipe below, I used the EVOO brand Olitalia, but any European Extra Virgin Olive Oil will do. I really enjoyed being able to taste this Italian EVOO and cooking with it! I can't wait to make an herb dip to really get the most out of that delicious flavor it has.What do you get when you combine an eggplant with red kidney beans? Red Bean Hummus, of course! Just picture refried beans that are actually good for you! Here's how to make them:
Red Bean Hummus

This veggie-packed dip is perfect for colder weather days and makes for a healthy light meal when served with pita bread or on a salad.
- 3 Tbsp Extra Virgin Olive Oil
- 1 egg plant
- 15 oz can red kidney beans (rinsed and drained)
- 2 garlic cloves
- 1 tsp cumin powder
- 1/2 tsp smoked paprika
- juice of 1 small lemon
- salt and pepper to taste
- 1 tsp ground coriander
-
Heat the oven to 400°F. Place the eggplant on a baking tray and roast for 40 minutes until soft. Allow to cook and then remove the skin.
-
Place the roasted egg plant flesh with all the ingredients, except the extra virgin olive oil, into a food processor.
-
Pulse until smooth.
-
Slowly add in the extra virgin olive oil until it becomes a smooth dipping consistency.
-
Add salt and pepper to taste.
-
Spoon into a deep serving bowl and finish with a swirl of extra virgin olive oil.
Olitalia believes all great cooking revolves around great oil. Olitalia is the #1 brand most used by chefs in Italy and is now available for home cooking in the US. Look for Olitalia at Eataly locations. Go to Olitalia's website here to learn more and be sure to follow them on Instagram! If you'd like to see more recipes like this, follow me on Pinterest!

OREO Cookie Ball Thanksgiving Turkeys

This post contains affiliate links. All photos and opinions are mine and should not be sued without written permission.
It's time to get our gobble on! Thanksgiving is only a week away and I'm stoked to get together with family and talk, laugh, and eat! These OREO turkey cookie balls are the cutest desserts you'll see on that Thanksgiving table of yours and everyone is sure to love them!
OREO Cookie Ball Thanksgiving Turkeys

Tasty OREO cookies are mixed with cream cheese, coated in chocolate, and decorated to look like cute little turkeys = perfect for your Thanksgiving table!
- 1 pkg (8 oz brick cream cheese, softened)
- 36 OREO Cookies (finely crushed)
- 16 oz dark chocolate melting chocolate (melted)
- 48 Candy eyes
- ¼ cup Peanut butter candy (halved)
- ¼ cup Almond slices
- Crush the OREO cookies until they’re a breadcrumb consistency.
- Mix the cream cheese and cookie crumbs until well blended. Using a 1 tablespoon scoop, scoop the portion the balls out and roll in your hands until smooth.
- Place on a parchment paper-lined cookie sheet and freeze for 1 hour.
- Dip the balls, one at a time, in the melted chocolate.

- Using the melted chocolate as the glue, attach the candy eyes, peanut butter candy, and almond slices to the cookie balls.
- Refrigerate 1 hour or until firm. Keep refrigerated.
Products Used:
If you'd like to see more recipes like this, follow me on Pinterest!