Blog
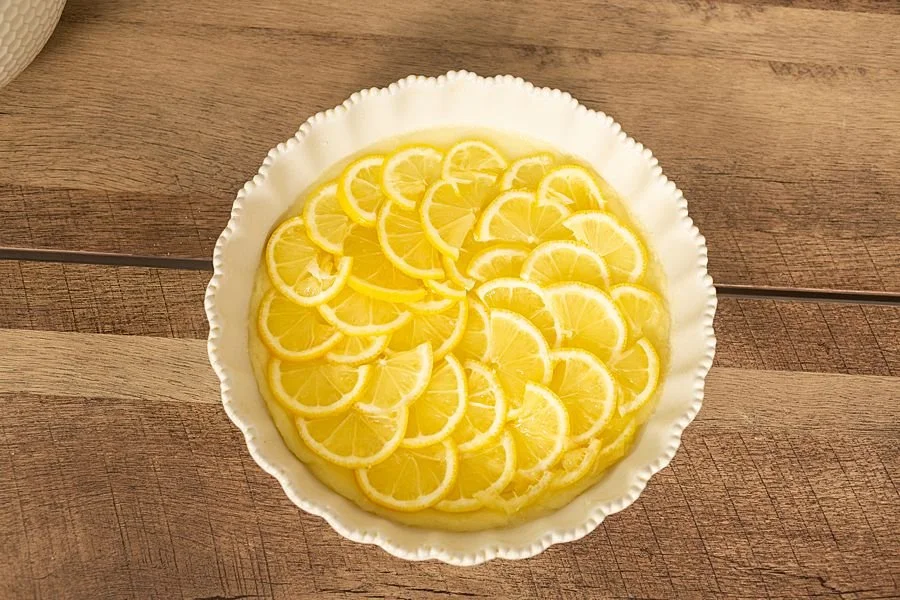
Lemon Upside Down Cake

One of my favorite cakes is the pineapple upside down cake. Oh man.It's got a delicious fluffy cake layer with that caramelized sugar and pineapple on the bottom, so that when you flip it over, all that goodness sits right on top, making such a beautiful and delicious summer dessert.Well, after Wonderfully Seedless Lemons sent me some of their seedless lemons to try, I knew I needed to make the next best thing - Seedless Lemon Upside Down Cake. If you can't find seedless lemons, you can always remove the seeds yourself.This is sure to be a new lemon dessert for your summer dessert table during these warm months.
Lemon Upside Down Cake

Upside-down layer:
- 1 stick unsalted butter
- ½ cup (plus 2 tablespoons sugar)
- 2 large unwaxed lemons (ends trimmed, then halved, seeded, and sliced ⅛ inch thick)
Cake:
- 2½ cups all-purpose flour
- 1 teaspoon baking powder
- ½ teaspoon baking soda
- ½ teaspoon kosher salt
- 2 large eggs
- 1 cup olive oil
- 1 cup full-fat plain Greek yogurt
- 1 cup sugar
- Position a rack in the center of your oven and preheat the oven to 350°F. Butter a 9-inch round cake pan and line it with parchment paper.
- In a medium saucepan over low heat, melt the butter. Remove the pan from the heat and add ½ cup of the sugar and 2 tablespoons of water. Whisk the mixture until the sugar dissolves and the mixture is glossy and thickened a little. Pour the melted butter and sugar into the prepared cake pan and smooth into an even layer to cover the bottom. Place the cake pan in the freezer until the butter and sugar layer freezes; leave the pan in the freezer until you are ready to transfer the batter to the pan.
- In a small bowl, gently toss the lemon slices with the remaining 2 tablespoons of sugar. Leave the lemon slices in the sugar to macerate for 10 minutes.
- Sift the flour, baking powder, baking soda, and salt into a large bowl. Set aside. Combine the eggs with the olive oil in another large bowl and beat vigorously with a whisk until well combined. Add the yogurt and sugar. Make a well in the flour mixture and add the wet mixture in three additions, folding in each addition until no dry bits of flour remain. Set aside.
- Fan the lemon slices out to cover the melted butter and sugar in the cake pan, overlapping the slices by as much as 1⁄8 inch. Pour the cake batter directly on top of the lemon slices.
- Bake for about 1 hour, until a cake tester inserted into the center comes out with only a few moist crumbs clinging to it. Transfer to a wire cooling rack and let cool for 15 minutes. Invert the cake onto a serving plate and carefully remove the parchment-paper lining. Allow the cake to cool for 1 hour more before serving
More Dessert Recipes You'll Love:
Bourbon Chocolate Pecan PieStrawberry TrifleSweet, Sweet Summertime Blueberry Cookies If you'd like to see more recipes like this, SUBSCRIBE to my YouTube channel!
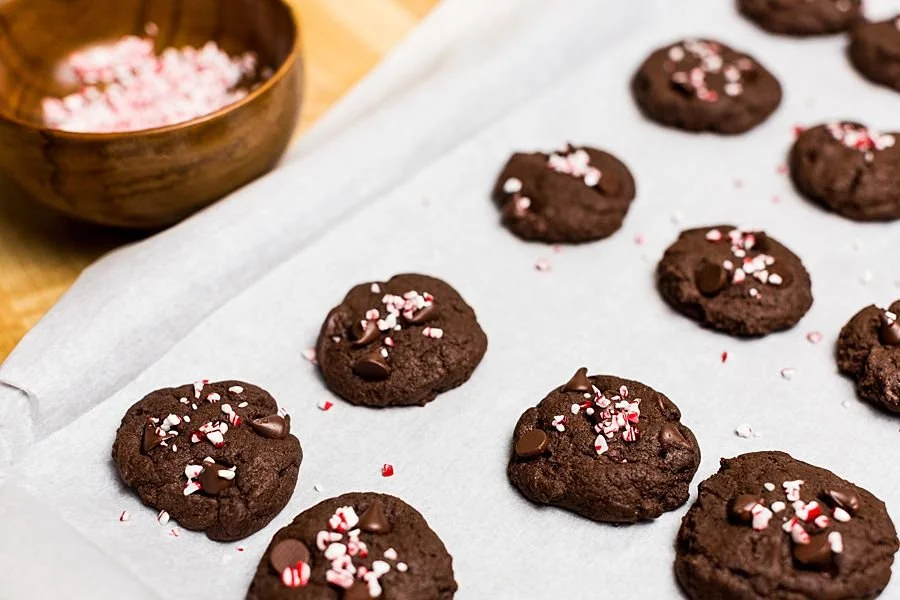
Uses for Leftover Candy Canes | Chocolate Peppermint Cookies
As a blogger, I’m always trying to challenge myself.I make new goals each year, try out new recipes, and broaden my reach as much as possible. That’s why today I’m taking part in a blogger Christmas cookie swap!If you’re not sure what this is – it’s where a bunch of foodie bloggers create tasty Christmas cookie recipes and readers can hop from one blog to the next – getting a whole bunch of new recipes added to their holiday gathering arsenal.If you’re here from Sam Weaver’s blog, welcome! If you’re just starting out on this cookie journey, welcome to you as well. After you watch the recipe video or read the recipe, be sure to scroll down and check out With Love From Catt’s recipe after mine.
Chocolate Peppermint Cookies

Leftover candy canes are crushed and placed atop chocolatey peppermint cookies that are perfect for the holiday season.
- 1/2 cup unsalted butter (softened // 1 stick equals 1/2 cup)
- 3/4 cup sugar
- 1 large egg
- 1/4 tsp natural peppermint extract
- 1 1/4 cup unbleached all-purpose flour (or whole-wheat pastry)
- 1/3 cup cocoa powder
- 1/4 tsp salt
- 1/2 tsp baking soda
- 1/4 tsp baking powder
- 1 candy cane (finely crushed)
- 1/3 cup dark (bittersweet or semisweet chocolate chips)
- Preheat oven to 350 degrees F.
- In a large bowl, cream the butter and sugar together for about 1-2 minutes. Add egg, peppermint extract and beat until light and fluffy, scraping down the sides as you go to ensure even mixing.
- Add flour, salt, cocoa powder, baking soda and powder to a sifter and sift gradually over the wet ingredients mixing as you go. Mix until well combined.
- Add chocolate chips and stir in with a mixing spoon and then chill in the freezer for 10 minutes while the oven finishes heating.
- Form the dough into small balls (heaping 1 Tbsp) and place 1.5 inches apart on an un-greased or parchment-lined baking sheet. Press the tops down and then top with a few more chocolate chips (to indicate what’s inside).
- Bake for 10-12 minutes – the edges should start to dry but the tops will still be slightly soft looking. Let set on the cookie sheet for a few minutes more but sprinkle crushed candy cane on immediately.
- Transfer to a cooling rack to rest until completely cooled. Store in an airtight container to keep fresh for up to a few days or freeze for several weeks.

More Cookie Recipes You'll Love
Cast Iron Skillet Chocolate Chunk CookieLemon & Raspberry Swirl CookiesSweet Tea Iced Shortbread Cookies If you enjoyed this cookie recipe, be sure to SUBSCRIBE to my YouTube channel to see more! Next up on the cookie swap is Catt at WithLoveFromCatt.com. Her Raspberry Filled Linzer cookies look so yummy and I can't wait to try them myself! Go check out her recipe here.
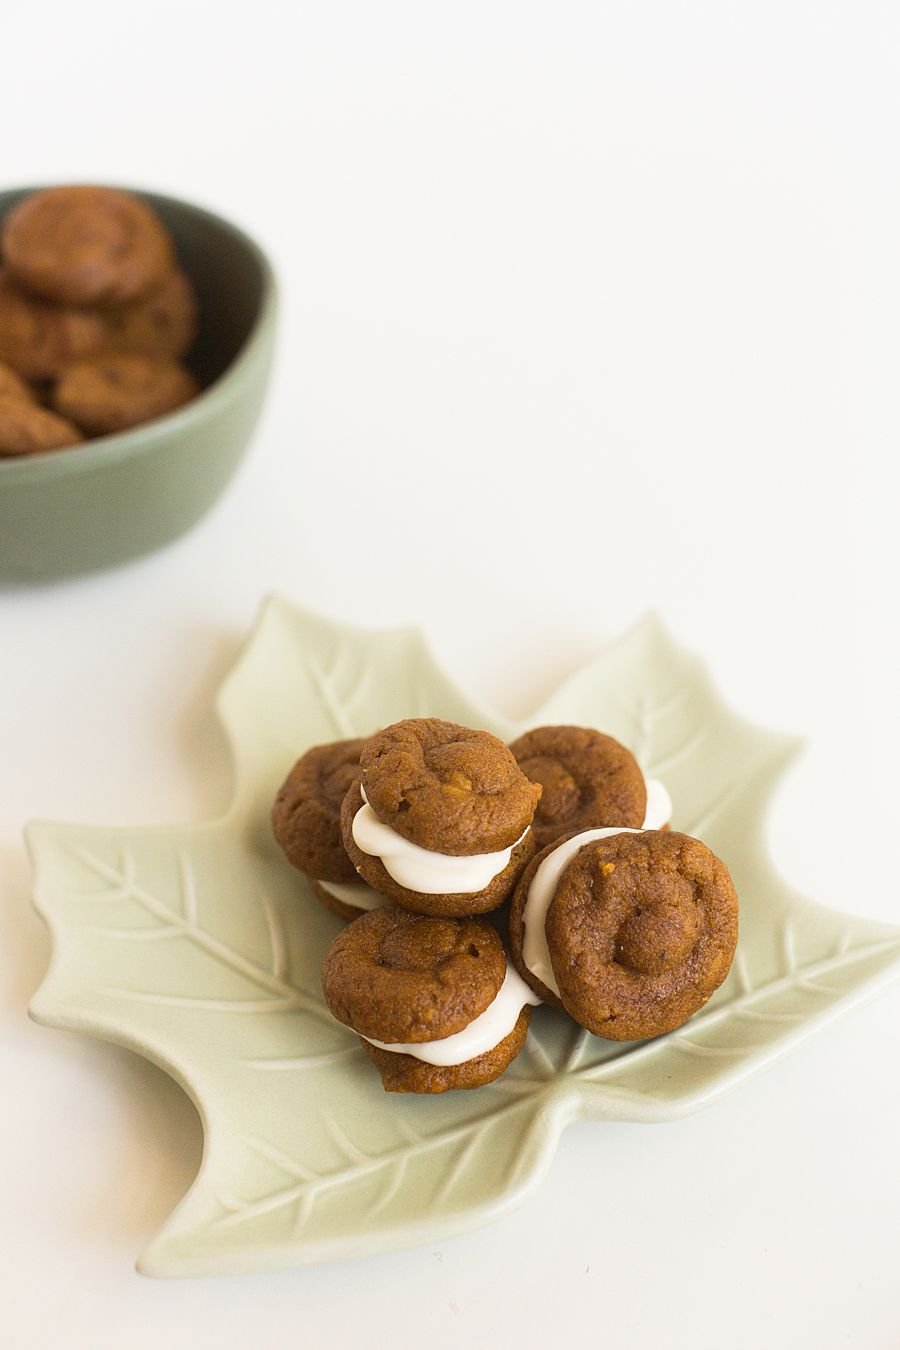
PUMPKIN WHOOPIE PIES | Easy Fall Dessert

More There is nothing I love more about fall than pumpkin. Pumpkin flavored everything! Except, I’ve never actually had a pumpkin spice latte from Starbucks. I should probably get on that. Oh well. Moving on… I seem to find a reason to make these soft and yummy pumpkin cookies every year. A like them because they’re light and airy and they don’t feel like you’re eating something that’s going to weigh you down. And with the scrumptious flavor of pumpkin pie in it, you really can’t go wrong. This is definitely my go-to pumpkin dessert recipe.
PUMPKIN WHOOPIE PIES | Easy Fall Dessert

For the Whoopie Pies:
- 3 cups 375 g all-purpose flour
- 1 tablespoon cinnamon
- 1 teaspoon baking powder
- 1 teaspoon baking soda
- 1 teaspoon salt
- 1 tablespoon pumpkin pie spice
- 1 cup granulated sugar
- 1 cup dark brown sugar
- 1 cup canola or vegetable oil
- 2 14.5 oz cans pumpkin puree, canned pumpkin
- 2 eggs
- 1 teaspoon vanilla extract
For the Maple-Cream Cheese Filling:
- 3 cups powdered sugar
- 8 ounces cream cheese (at room temperature)
- 4 ounces unsalted butter (at room temperature)
- 3 tablespoons maple syrup
- 1 teaspoon vanilla extract
- Preheat oven to 350 degrees F. Line baking sheets with parchment paper or a silicone baking mat.
- In a bowl, whisk the granulated sugar, the dark brown sugar, and the oil together. Add the pumpkin puree and whisk to combine thoroughly. Add the eggs and vanilla and whisk until combined.
- Next, add in the flour, cinnamon, baking powder, baking soda, salt, and pumpkin pie spice.
- Put the pumpkin mixture into a zip-top bag, snip the corner, and make half dollar size swirls one inch apart on the prepared baking sheets.
- Bake for 10 to 12 minutes, making sure that the cookies are just starting to crack on top and a toothpick inserted into the center of a cookie comes out clean. The cookies should be firm when touched. Remove from the oven and let the cookies cool completely on a cooling rack.
- To make the filling, beat the butter on medium speed until smooth with no visible lumps, about 3 minutes. Add the cream cheese and beat until smooth and combined, about 2 minutes. Add the powdered sugar a little at a time, then add the maple syrup and vanilla and beat until smooth.
- To assemble the whoopie pies: Turn half of the cooled cookies upside down. Pipe or spoon the filling (about a tablespoon) onto that half. Place another cookie, flat side down, on top of the filling. Press down slightly so that the filling spread to the edges of the cookie. Repeat until all the cookies are used. Put the whoopie pies in the refrigerator for about 30 minutes to firm before serving.
More Fall Recipes You'll Love:
Goat Cheese Stuffed FigsSweet Potato Casserole BitesIf you’d like to see more recipes like this one, be sure to SUBSCRIBE to my Youtube Channel!
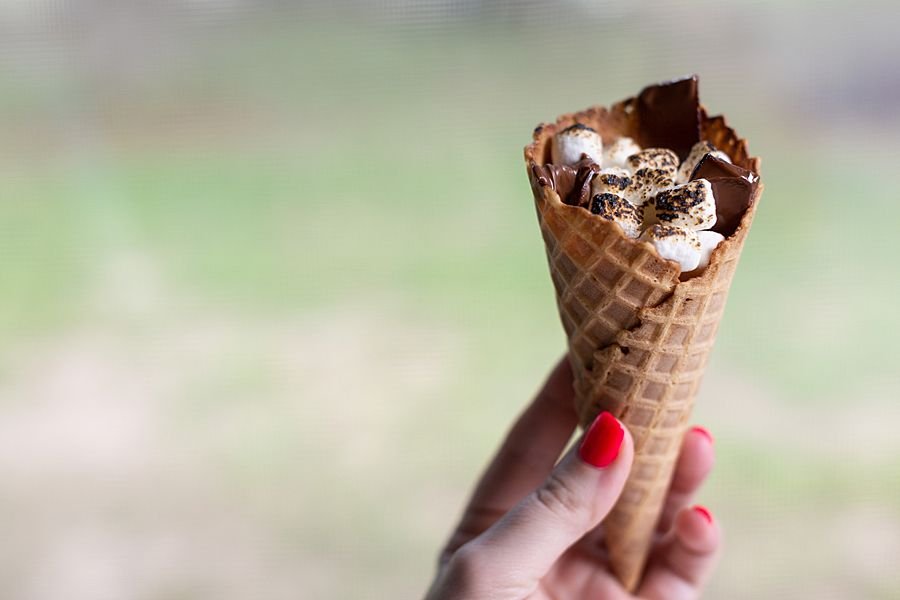
S'more Cones

Hello, my name is Stacy and I’m a chocaholic.
This is not something I’m proud of necessarily, but hey, it’s who I am! I love any form of chocolate I can get – except for that disgusting stuff they try to pull off as real chocolate – “white chocolate”. Yuck.So naturally, any recipe that has chocolate in it is okay in my book. Chocolate chip cookies, brownies, tarts, cannolis, and even cocoa powder used as a seasoning for steak – I’ll try it all. But the best way to use chocolate?S’mores.
S’mores have a bit of nostalgia attached to them, don’t they? You can probably remember the first time you had one, or maybe a camping trip where you set many a marshmallow ablaze over an open campfire. But while simple in nature, there are many different ways to enjoy a s'more.The one I’m going to show you today is a less mess version of that roasted marshmallow classic. In this recipe for s’mores cones, waffle cones are stuffed full with chocolate pieces and marshmallows, wrapped in aluminum foil, and put in a heat source.Now, I say “heat source” because these have been known to have been made in an oven, on a grill, and even over a campfire with a stick protruding out of them. Think of them as the fancier cousin of the traditional s’more. In theses s’more cones, you get all the delicious flavors of a traditional cone – but in a neat, compact package. They’re perfect for backyard barbecues, family movie nights, while camping under the stars, or when you just need a sweet treat on a weekday evening.What I also like about this recipe is that you can use any different type of chocolate that you have – Hershey bars, Reese’s peanut butter cups, chocolate chips, snickers, etc. You can even add peanut butter to the inside of the cone to make it even heartier of a dessert.Ready to try them for yourself? Let’s get to it!
S’mores Cone Recipe

In this recipe for s’mores cones, waffle cones are stuffed full with chocolate pieces and marshmallows, wrapped in aluminum foil, and put in a heat source.
- Waffle cones
- Mini marshmallows
- Your favorite type of chocolate
- Fill the waffle cone with mini marshmallows and chocolate pieces.
- Wrap in aluminum foil.
- Place on a grill and cover for 2 minutes, flip at the 1 minute mark.
- Remove with tongs and let cool.
- Unwrap foil and remove cone.
If making on a campfire, wrap the end of a s'mores stick in with the cone with foil. Rotate in the fire for a couple minutes.
If making in an oven, turn your oven onto 400 degrees and place the foil-wrapped cones on a baking sheet. Allow to cook for 1 minute and then flip the cones to the other side and cook for another minute.
More Summertime Recipes You’ll Love
Candied Bacon Deviled EggsColorful Pasta SaladFresh Dewberry Cobbler If you’d like to see more family fun ideas like this, subscribe to my Youtube Channel!
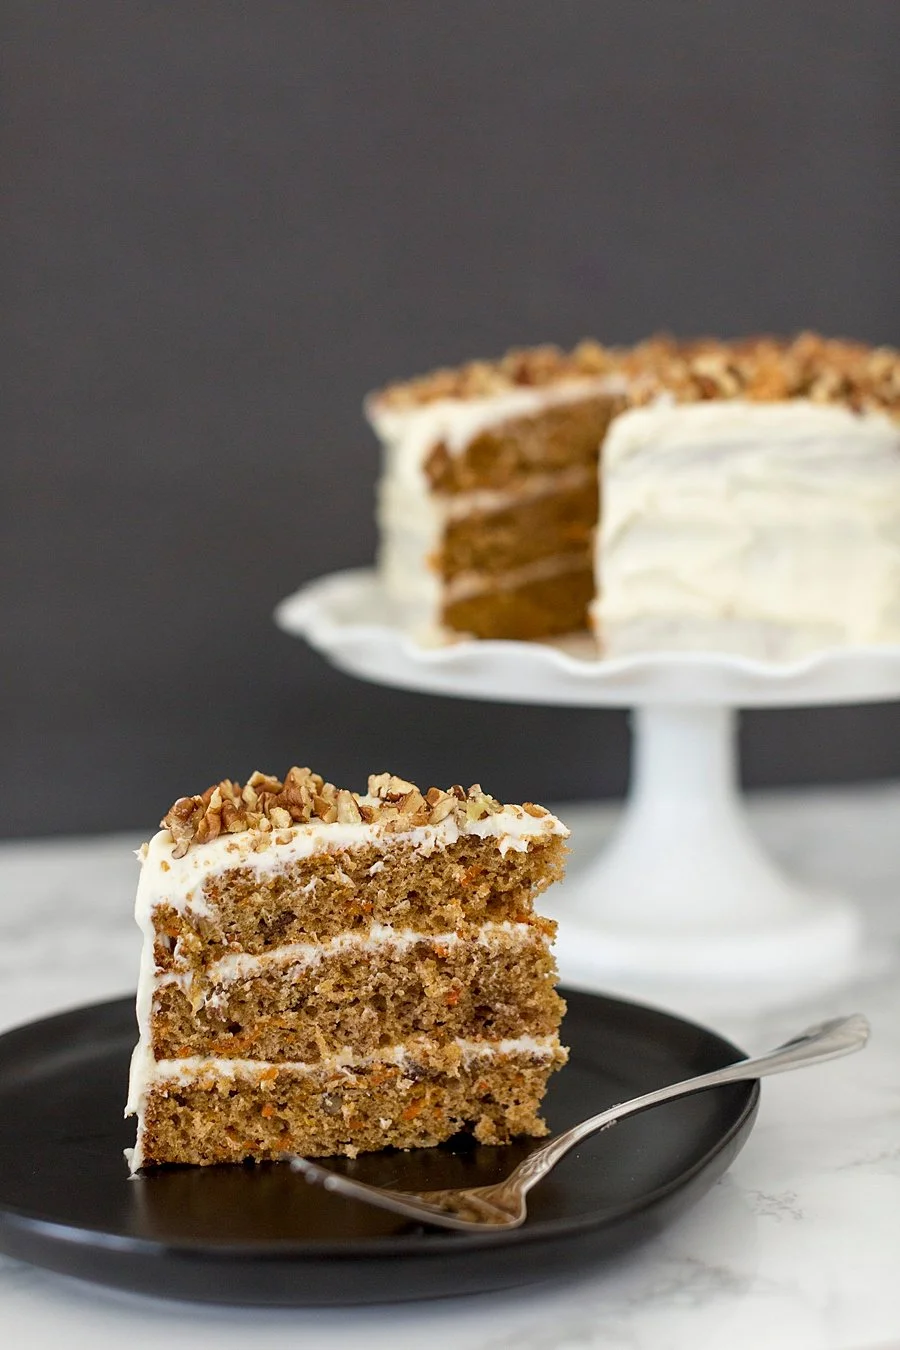
The Most Moist Carrot Cake You've Ever Put in Your Mouth

Carrot cake is my happy place.During the pandemic, there has been a lot of good to come out of it. We've learned how hard our teachers have it schooling our kids. We've learned that nurses and doctors put their lives on the line more than we might think on a daily basis. And we've learned how to cook for our families day in and day out.We've also seen a lot of people giving back. Businesses donating masks. Organizations forming to support laid off workers and families. And just how much social media is needed in this time to get through the every day and connect with others.
“When I was a boy and I would see scary things in the news, my mother would say to me, "Look for the helpers. You will always find people who are helping.” - Mr. Rogers
 One personal experience I've had was getting produce from Farm Gals. Farm Gals is a local non-profit that teaches kids how to plant and farm and all Corona season long, they've been giving away fresh produce and goods to anyone who drove by and opened their trunk.Two days ago, I did just that. I saw the line forming and though, "why not?" and pulled in behind the last car.I opened the trunk of my car, some teenage boys wearing masks and gloves put several bags of unknown goods in the car, and then I drove off. When I got home, I saw that we had 5 pounds of fresh (huge) carrots, 5 pounds of cucumbers, a quart of fresh lemon juice, and 3 lbs of pork sausage patties.
What makes a Carrot Cake moist?
The first ingredient you should always use in a moist carrot cake is freshly grated carrots. Do not buy the pre-sliced ones at the store - they're already dried out once you purchase them, so they're only going to soak up all of the moisture in your cake and leave you with a dry cake. Yuck.Another ingredient that helps is brown sugar. The darker the better. You can use light brown sugar, dark brown sugar, or even this raw sugar cane cone (see the photo below if you have no clue what I'm talking about), but the best option is going to be the darkest.

How do I Get the Most Flavor in my Carrot Cake?
It's all about the vanilla, baby! My personal favorite is Mexican Vanilla. It's raw and absolutely fantastic. You can find it usually at a Mexican meat market or if you're ever "over the border". I usually buy a few bottles when I go to Mexico. The second best option is at Costco. Costco's Kirkland brand Vanilla is a great vanilla as well. It doesn't have a strong alcohol smell/taste to it like some of the other brands you'll find on the shelf and the cost per ounce ratio is way better too!
Moist Carrot Cake Recipe
Moist Carrot Cake

Fresh carrots are shredded and transformed into this moist, delicious carrot cake with cream cheese icing.
Cake Ingredients
- 2 cups chopped pecans (1 cup for cake, 1 cup for garnish)
- 1 and 1/2 cups packed light or dark brown sugar
- 1/2 cup granulated sugar
- 1 cup 240ml vegetable oil or canola oil (or melted coconut oil)*
- 4 large eggs
- 3/4 cup smooth unsweetened applesauce
- 1 teaspoon pure vanilla extract
- 2 and 1/2 cups all-purpose flour (spoon & leveled)
- 2 teaspoons baking powder
- 1 teaspoon baking soda
- 1/2 teaspoon salt
- 1 and 1/2 teaspoons ground cinnamon
- 1 teaspoon ground ginger
- 1/4 teaspoon ground nutmeg
- 1/4 teaspoon ground cloves
- 2 cups grated carrots (about 4 large)
Cream Cheese Frosting
- 16 ounces full-fat block cream cheese (softened to room temperature)
- 1/2 cup unsalted butter (softened to room temperature)
- 4 and 1/2 cups confectioners’ sugar
- 1 Tablespoon heavy cream or milk
- 1 and 1/2 teaspoons pure vanilla extract
- pinch of salt (to taste)
- Make the cake: Preheat oven to 300°F. Line a large baking sheet with parchment paper or a silicone baking mat. Spread the chopped pecans on the sheet and toast for 7-8 minutes. Remove from the oven and allow to cool for 10-15 minutes.
- Turn the oven up to 350°F. Grease two or three 9-inch cake pans, line with parchment paper, then grease the parchment paper. Parchment paper helps the cakes seamlessly release from the pans.
- Whisk the brown sugar, granulated sugar, oil, eggs, applesauce, and vanilla together in a large bowl until combined and no brown sugar lumps remain.
- In another large bowl, whisk the flour, baking powder, baking soda, salt, cinnamon, ginger, nutmeg, and cloves together. Pour the wet ingredients into the dry ingredients and, using a rubber spatula or wooden spoon, fold the ingredients together until just combined.
- Fold in the carrots and 1 cup of the toasted pecans. (The rest of the pecans are for garnish.)

- Pour/spoon the batter evenly into the cake pans. If using three cake pans, bake for 20-24 minutes. If using two cake pans, bake for 30-35 minutes. Test the center with a toothpick. If it comes out clean, the cakes are done. If not, continue to bake until cooked through. Do not over-bake. Allow the cakes to cool completely in the pans set on a wire rack. The cakes must be completely cool before frosting and assembling.

- Make the frosting: In a large bowl using a handheld or stand mixer fitted with a whisk or paddle attachment, beat the cream cheese and butter together on medium-high speed until smooth, about 2 minutes. Add the confectioners’ sugar, cream/milk, vanilla extract, and a pinch of salt. Beat on low speed for 30 seconds, then increase to high speed and beat for 3 minutes until completely combined and creamy. Add more confectioners’ sugar if frosting is too thin, more milk if frosting is too thick, or an extra pinch of salt if frosting is too sweet. Frosting should be soft, but not runny.

- Assemble and frost: First, using a large serrated knife or cake leveler, layer off the tops of the cakes to create a flat surface. Place 1 cake layer on your cake stand or serving plate. Evenly cover the top with frosting. Top with 2nd layer, more frosting, and then top with the 3rd layer. Spread remaining frosting all over the top and sides. Decorate the sides and top of the cake with the remaining toasted pecans. Refrigerate cake for at least 15-20 minutes before slicing. This helps the cake hold its shape when cutting.

- Cover leftover frosted cake tightly and store in the refrigerator for up to 5 days.

- Make Ahead & Freezing Instructions: The cake layers can be baked, cooled, and covered tightly at room temperature overnight. Likewise, the frosting can be prepared then covered and refrigerated overnight. When ready to decorate, let the frosting sit at room temperature to slightly soften for 15 minutes, then give it one more mix with the mixer on medium speed for about 1 minute before frosting cake. Frosted cake or unfrosted cake layers can be frozen up to 2-3 months. Thaw overnight in the refrigerator and bring to room temperature before decorating/serving.
- Nuts: If desired, you can substitute the pecans with walnuts. Or feel free to skip the nuts if you want a nut-free carrot cake. No other changes to the recipe required.
- Applesauce: Instead of applesauce, you can use 3/4 cup crushed pineapple if desired. Slightly drain the canned crushed pineapple first. You want it the consistency of applesauce– not too watery. You could also use 3/4 cup mashed bananas, sour cream, plain yogurt, or canned pumpkin puree.
- Carrots: My #1 tip for carrot cakes is to grate whole carrots at home. Do not use packaged pre-shredded carrots because they are hard and dry.
- Oil: If using melted coconut oil, make sure all of the other cake batter ingredients (carrots included) are room temperature. Otherwise, the melted coconut oil will begin to solidify before the batter goes into the oven.
- Cream Cheese: Use blocks of real cream cheese. Not cream cheese spread.
9×13 Inch Cake: Simply pour the batter into a greased and lightly floured 9×13 inch pan and bake for 40-45 minutes or until a toothpick inserted in the center comes out clean. - Carrot Bundt Cake: Use a 10-12 cup generously greased bundt pan. Bake for 55-75 minutes. All ovens and bundt pans are different, so that’s why the bake time varies. Keep a close eye on it.
- Add-Ins: If you’d like to add raisins or coconut, reduce the pecans (or leave them out) to 1/2 cup. Then, add 1 cup of raisins or shredded coconut. Stick to around 1 – 1.5 cups total add-ins. Or you can leave the cake plain without any add-ins.
- Carrot Cake Cupcakes: Fill cupcake liners 2/3 full. Bake at 350°F (177°C) for 20-22 minutes. Yields about 3 dozen. Or try my carrot cake cupcakes recipe.
Products Used:
[activecampaign form=1]
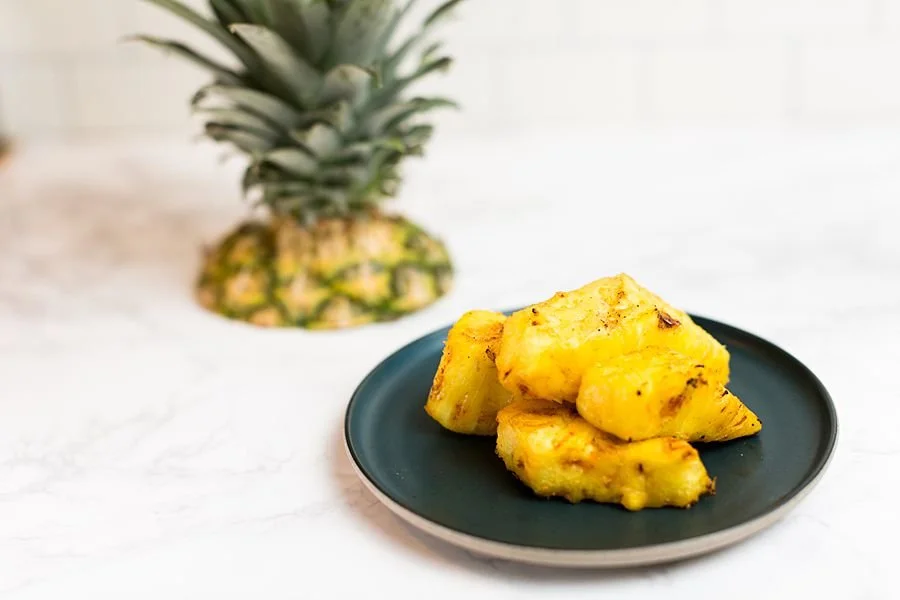
Spicy Grilled Pineapple

This post contains affiliate links. All photos and opinions are mine alone and should not be used without written permission.
Meal Planning
Lately I've been really trying to plan out what we're going to have for dinner in advance. On one day a week - usually Sundays, I plan out what we're going to have for dinner the rest of the week. I take into account what activities we have that day and how much time I actually have to spend in the kitchen. At the same time, I write out the grocery list and make sure I have all of the seasonings I need. I like using my HEB app on my phone to make my grocery list because it puts every item on the list categorized by aisle number, so I'm not going to be criss-crossing across the store. I'm not sure if other grocery stores have that, but that's where I shop and it's a huge plus for me that the app has that feature!
Here's what last week's menu looked like:
Last Week's Menu
Sunday - Chicken Enchiladas, Rice, and Charro BeansMonday - Spaghetti & Garlic BreadTuesday - Fish TacosWednesday - Chicken & DumplingsThursday - Texas HashFriday - Chicken FettuccineSaturday: King Ranch Casserole
If you're interested, I got the recipe for the chicken enchiladas, chicken and dumplings, chicken fettuccine, and king ranch casserole all from the Magnolia Table cookbook and can vouch that they're all amazing and were gobbled up. (and now there's a second one coming out? I need it!)
Taco Tuesday
So on Tuesday, tacos were on the menu and I thought, why not add a pineapple relish on top? So I bought a fresh pineapple along with the rest of my groceries. I like prepping my ingredients all at once, so while I was coring the pineapple, I thought, why not grill it? Flavors of fruits are always so much more enhanced when they're grilled, so why not grill it before I chop it and add it to my tacos? So I marinated the pineapple and got it ready for the next day - Taco Tuesday.After marinating overnight, the pineapple chunks went on the grill. Y'all, the smell of that sweet pineapple hitting the grill was like Heaven to my nose. Holy moly! I knew as soon as I smelled it that I was going to have to try a bite as soon as I was done grilling it.
We have a situation on our hands.
The pineapple came off the grill and I took a bite. At first, it was that familiar, sweet taste of pineapple, but then the cayenne kicked in just at the end, giving it just the right amount of heat. So good. Like, so so good. I called for my husband to come over and try a bite and soon it was all gone. We devoured that whole dang pineapple before it ever even touched a taco. Now, even as I write this, my mouth is watering for me to make it again. And I will very soon - you can bet on that!So I guess the right thing for me to do now is to give you the recipe, huh? If I must....but don't say I didn't warn you when I say that this pineapple doesn't last off the grill long!
Uses for Grilled Pineapple
You could easily make this spicy grilled pineapple in slices to put on a teriyaki burger, in chunks to serve alone as an appetizer, paired with vanilla ice cream for dessert, or (if you can restrain yourself better than I can) as a pineapple slaw to top your tacos. Or how about a refreshing pineapple margarita? Now that I think about it, the possibilities are endless when it comes to this grilled pineapple recipe! Maybe I should find a support group...
Spicy Grilled Pineapple

Sweet and juicy pineapple has a little kick of heat for the perfect summer treat.
- 1 pineapple (peeled, cored, and sliced)
- 1/4 teaspoon honey
- 3 tablespoons butter (melted)
- 1 teaspoon cayenne pepper
- 1/8 teaspoon salt
-
Combine the honey, butter, cayenne pepper and salt in a resealable plastic bag.

-
Place the pineapple in the bag, seal it, and toss it to coat evenly. Let marinate for at least 30 minutes (or overnight)
-
Grill pineapple for 2 to 3 minutes per side, or until heated through and grill marks appear.

Products Used
If you'd like more recipes like this, follow me on Pinterest!
[activecampaign form=1]
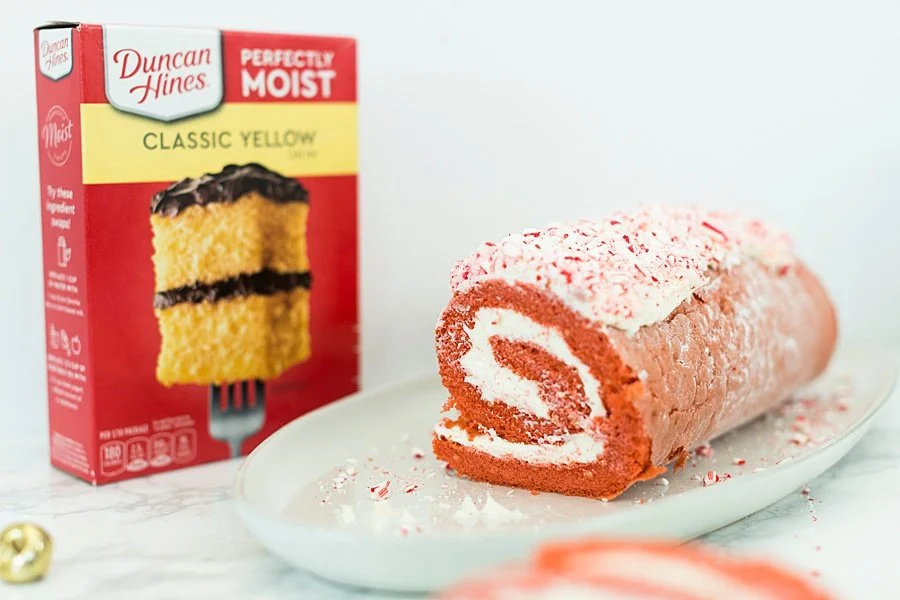
Candy Cane Christmas Cake Roll

Whether you're attending a Christmas party at someone's house or hosting a holiday get together in your own home, this Christmas cake roll is sure to be a big hit! Here's why I like it:
- This recipe uses a box cake mix, so that means it automatically starts off easy
- Talk about cheap to make! You literally use leftover candy canes and budget-friendly ingredients to make this dessert and the finished product costs less than $5 total.
- It's a super festive dessert that looks great and looks like you worked really hard, but it's simple as long as you work quickly and effectively.
 So get out those cake mix boxes and let's start baking!
Candy Cane Christmas Cake Roll
Spongy cake is wrapped up with sweet icing and topped with leftover candy cane pieces. It's the perfect dessert to enjoy this holiday season!
- 6 eggs
- 1 red velvet boxed cake mix
- 1/2 cup water
- 1/4 cup vegetable oil
- 1/4 cup powdered sugar
- 2 containers whipped frosting ((16 oz containers))
- 1/2 cup candy canes (finely chopped)
-
Heat oven to 375°. Line the bottom of a jelly roll pan (size 15x10x1) with parchment paper. Spray the paper and sides of the pan with baking cooking spray (the kind with flour in it).
-
In a large bowl, beat the eggs for 6 minutes or until frothy. Add in the cake mix, water, and oil. (I used a butter cake mix, so I also added a red gel food coloring to make it appear red, but if you use a red velvet cake mix, you can skip this step). Mix the ingredients until well blended.
-
Pour 3 1/2 cups of batter into the pan and use a spatula to spread the batter to the sides of the pan. Set aside the remaining batter.
-
Bake for about 14 minutes (or until a toothpick will come out clean in the middle). Take a large (clean) kitchen towel and sprinkle the powdered sugar all over it. Once the cake is done, immediately turn the cake out onto the powdered sugar covered towel and peel off the parchment paper. Starting at the narrow end, roll the towel and cake into itself, creating a spiral. Cool the rolled-up cake on the counter for 10 minutes at room temperature and then place in the refrigerator for one hour to cool.
-
For the remainder of the batter, line a muffin tin with 6 baking cups and divide the batter between the cups. Bake at 375° for 15-18 minutes.
-
Unroll the cake carefully and remove the towel. Allow the end to remain slightly curled. Spread one full container and one half of another container of frosting over the surface of the cake. Re-roll the cake, wrap in plastic wrap, and refrigerate 30 minutes.
-
Remove the cake from the refrigerator. Spread half of the second container of icing across the top of the roll. Cover the icing with candy cane pieces. Slice and enjoy!
Products Used:


OREO Cookie Ball Thanksgiving Turkeys

This post contains affiliate links. All photos and opinions are mine and should not be sued without written permission.
It's time to get our gobble on! Thanksgiving is only a week away and I'm stoked to get together with family and talk, laugh, and eat! These OREO turkey cookie balls are the cutest desserts you'll see on that Thanksgiving table of yours and everyone is sure to love them!
OREO Cookie Ball Thanksgiving Turkeys

Tasty OREO cookies are mixed with cream cheese, coated in chocolate, and decorated to look like cute little turkeys = perfect for your Thanksgiving table!
- 1 pkg (8 oz brick cream cheese, softened)
- 36 OREO Cookies (finely crushed)
- 16 oz dark chocolate melting chocolate (melted)
- 48 Candy eyes
- ¼ cup Peanut butter candy (halved)
- ¼ cup Almond slices
- Crush the OREO cookies until they’re a breadcrumb consistency.
- Mix the cream cheese and cookie crumbs until well blended. Using a 1 tablespoon scoop, scoop the portion the balls out and roll in your hands until smooth.
- Place on a parchment paper-lined cookie sheet and freeze for 1 hour.
- Dip the balls, one at a time, in the melted chocolate.

- Using the melted chocolate as the glue, attach the candy eyes, peanut butter candy, and almond slices to the cookie balls.
- Refrigerate 1 hour or until firm. Keep refrigerated.
Products Used:
If you'd like to see more recipes like this, follow me on Pinterest!
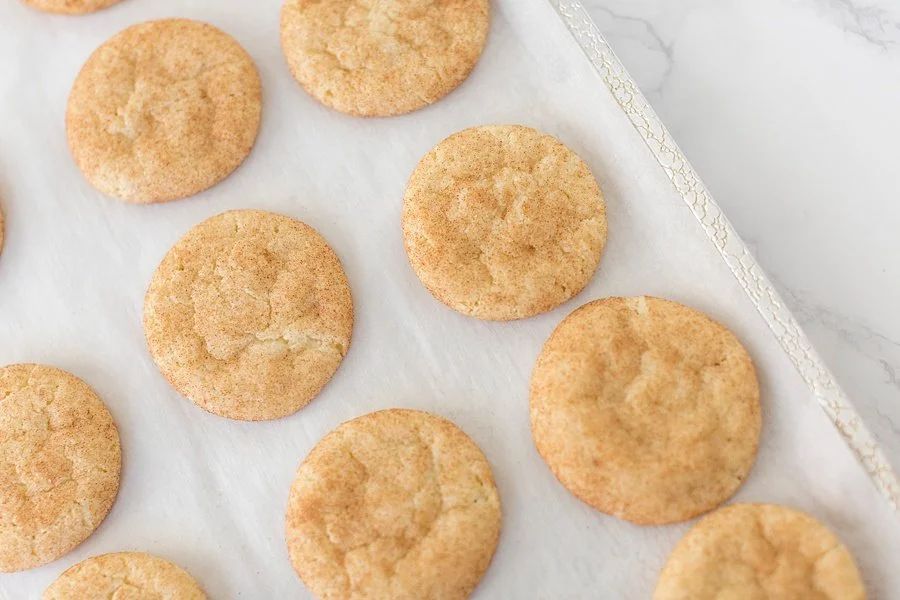
Snickerdoodles

This post contains affiliate links. All photos and opinions are mine and should not be used without written permission.
Snickerdoodle cookies have always reminded me of cinnamon toast. After all, they’re basically just sugar cookies rolled in cinnamon and sugar and then baked to perfection, so that means they qualify as a breakfast food, right?Sadly, the last time I made these cookies, they didn’t make it to see the light of dawn. I doubled the batch and the cookies were gone within a couple hours. It’s amazing how many people come over when you tell them there’s fresh cookies there. Haha.But I don’t blame my people at all! These cookies are so easy to make and even easier to eat! I included them in my Baked Goods Basket this year and I’m excited to be able to give the gift of carbs to the people in my life!If you need to make these cookies (and you do), here’s the recipe.What you'll need:
Cinnamon Sugar Snickerdoodle Cookies

Soft and buttery cookies are rolled in cinnamon and sugar and baked to perfection. These chewy cookies make the perfect dessert or contribution for a holiday cookie exchange!
- 1 cup butter (room temperature)
- 3/4 cup granulated sugar
- 1/2 cup light brown sugar
- 1 egg (plus 1 yolk)
- 1 tablespoon vanilla
- 1 teaspoon baking soda
- 1 teaspoon cream of tartar
- 1/2 teaspoon kosher salt
- 1 teaspoon ground cinnamon
- 2 3/4 cup flour
Cinnamon Sugar Mixture
- 1/4 cup granulated sugar
- 1 tablespoon ground cinnamon
- Preheat oven to 325°F. Line a baking sheet with a parchment paper and set aside.
- In the bowl of your stand mixer fitted with the paddle attachment mix the butter, granulated sugar, and light brown sugar together on medium speed until light and fluffy, 2-3 minutes. Add in the egg, the yolk, vanilla, baking soda, cream of tartar, salt, and cinnamon and mix for 1 minute, scraping the sides of the bowl as necessary.

- Turn mixer to low and add in flour, mixing until just combined.

- In a separate small bowl make your Cinnamon Sugar by mixing together cinnamon and sugar, stirring until evenly combined.
- Using a medium (2- tablespoon) cookie scoop portion out the dough and roll into a ball. Then roll each cookie dough ball into the cinnamon sugar mixture until coated.

- Place on prepared baking sheet about 2- inches apart. Bake for 10-12 minutes, turning cookie sheet halfway through baking.
- Allow the cookies to cool on the baking sheet for 3-4 minutes before transferring to a wire rack to cool completely.
If you'd like to see more recipes like this, follow me on Pinterest!
Peach, Honey & Mint Puff Pastry Tart

This post contains affiliate links.
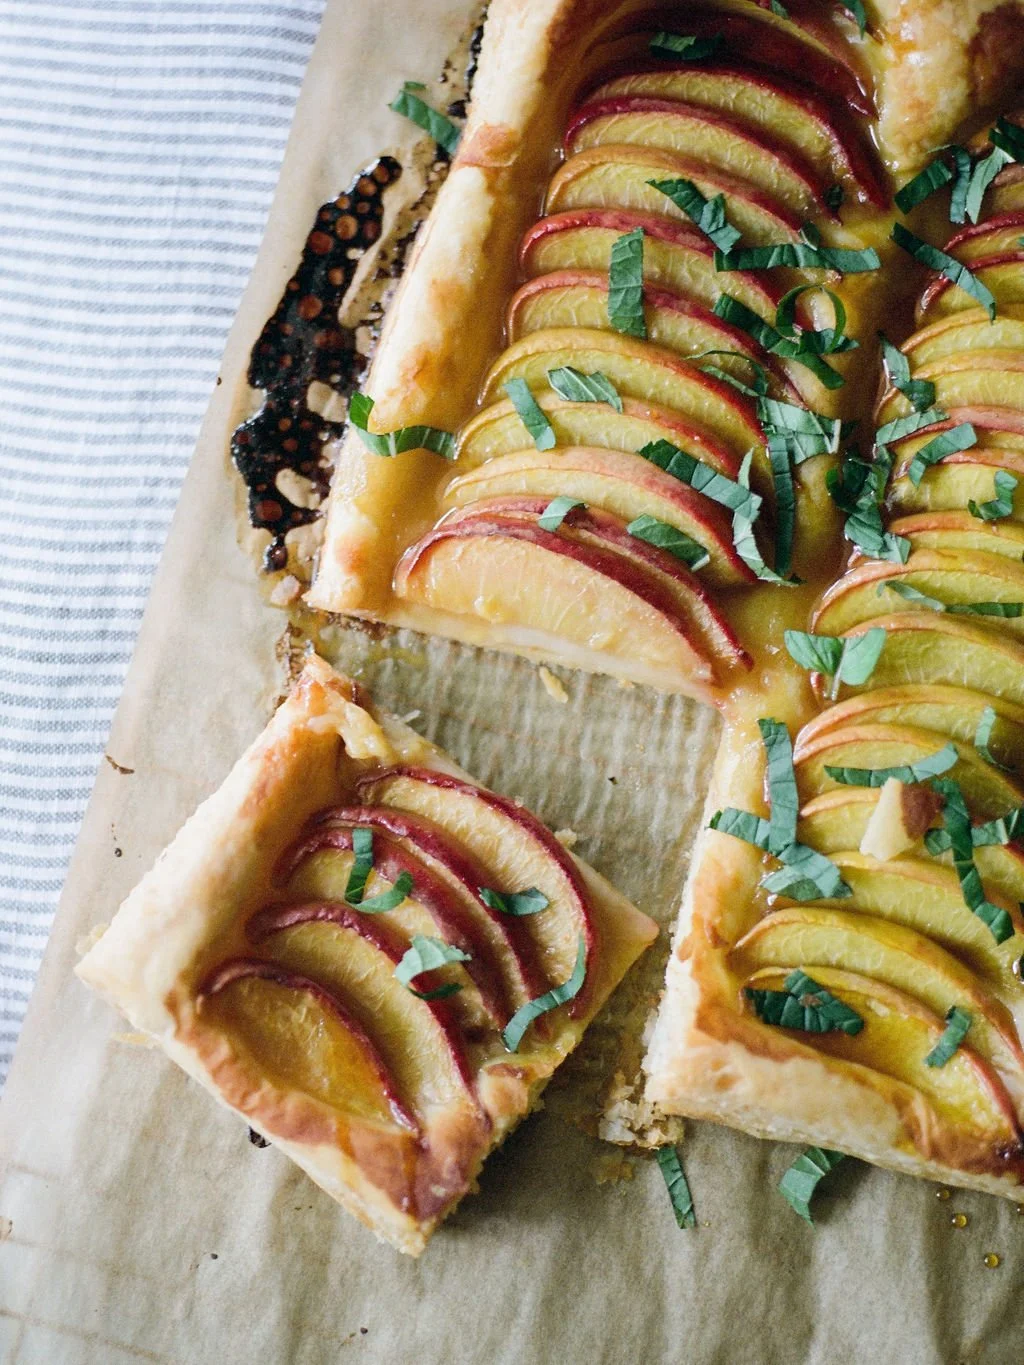
Let the peach obsession begin! To be completely honest, my favorite way to eat a peach is just to bite straight into the thing. However, I know that lacks all imagination and people would probably rather be presented with an actual dessert at the end of a meal than a bowl of fruit. So here we go...My dad has two peach trees in his yard. This year was the first year that we (the humans) got to them before the worms and the squirrels did. So with an abundance of peaches coming in every day, I needed to start researching what I was going to do with all of these delicious things!The first recipe I came up with was this one. My friend Christine and I were just playing around with ingredients and I was like, "Hey, let's see what happens..." And that's how this delicious little puff pastry tart came about. The fresh, juicy peaches are drizzled with sweet honey and topped with fragrant mint - all aboard a puff pastry crust that just screams - BITE INTO ME!This is the perfect last minute, throw together kind of dessert that you need in your life!
Peach, Honey & Mint Puff Pastry Tart

The fresh, juicy peaches are drizzled with sweet honey and topped with fragrant mint - all aboard a puff pastry crust that just screams - BITE INTO ME!
- 1 sheet puff pastry dough, thawed
- 3 peaches, sliced thin
- honey
- mint
-
Preheat oven to 375 degrees. Line a baking sheet with parchment paper. Place the puff pastry flat on a cookie sheet.
-
Arrange the sliced peaches on the puff pastry however you like. I love clean lines, so rows work great for me.

-
Drizzle the honey generously over the top of the peaches. Place the cookie sheet in the oven and bake for 30-35 minutes or until the pastry dough is fluffy and golden brown.

-
Remove from the oven and let cool for 15 minutes. Once cooled, drizzle again with honey and sprinkle the mint across the top of the tart. Cut into 9 square pieces and enjoy! (feel free to lick your fingers)


Products Used:
If you'd like to see more recipes like this, follow me on Facebook!