Blog
Blackened Catfish with Sweet Corn Relish | Supporting Texas Farmers

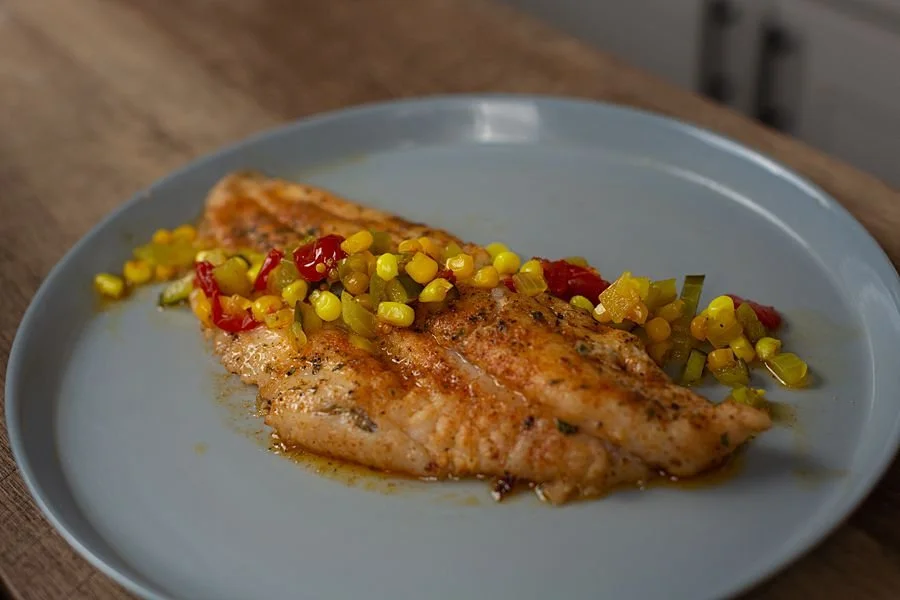
If you're looking for a an easy, flavorful, summer meal idea, this blackened catfish with sweetened corn relish is just what you've been looking for. It's got a savory crust of spices on the catfish and is served with a slightly sweet and tangy corn relish. Look further in the post for the recipe.In the past year, I’ve worked with farmers, ranchers, vineyard owners and all sorts of people who directly work the land and animals to produce something for the public to consume. My favorite part of these adventures has been getting to know the people behind the food. A month ago, I went to a cattle farm and got to hear the rancher talk about his passion for his animals, his employees, and serving quality beef to the public. It’s in these moments that it really hits home how important it is to know where your food comes from.
This week I had the amazing opportunity to visit a few farms in Wharton, Texas, with Water Grows, a partnership of Texas Corn Producers and USDA's Natural Resources Conservation Service (NRCS) in Texas. Myself and a host of other journalism types got to hear the farmers themselves talk about their passion for feeding people and the challenges they face. The Water Grows initiative enables agriculturists and those outside of agriculture to allow farmers and consumers to share their stories, connect, and learn how Texas farmers are growing more crops with less water so that we can save this precious resource for the future without sacrificing jobs and economic growth.We started off the trip by boarding a charter bus passing field after field while watching a video introducing us to the host organizations. At our first stop, we met Daniel Berglund on his corn and rice farm. Among the corn stalks and rice fields, he spoke about how he conserves water by gradual sloping in the fields, so that no water is wasted, and his crops can stay adequately watered. While there, we were able to sample a delicious hors d’oeuvre of dirty rice with corn aioli prepared by Chef Brandon Silva.
 Our next stop brought us to Homegrown Seafood. This seafood supplier grows catfish, red fish, shrimp, and striped bass. As we watched the catfish get harvested from the ponds, we learned that in just 9 months' time, catfish can grow up to 4 pounds in size (which is the size at which they harvest them). Also, in just one pond, they have around 60-70,000 catfish; and they have more ponds than I could count.
 Of course, on a hot summer Texas day, we had to have a little "Ranch Vodka Soda" to cool off a bit.
 Our last stop was at United Ag Cooperative. This working cotton gin and grain elevator gave us an inside look at how cotton plants are processed from picking to baling and just how much manpower it takes to pull it all off. It was so neat to learn how important the cotton industry is to our everyday way of life - beyond just textiles. This stop also had another delicious snack of smoked red potato salad prepared by Chef Brandon Silva.
 The day finished off with a 3-course meal prepared with the local ingredients by Chef Brandon Silva. The meal was held under a white tent with beautifully set tables on Daniel Berglund's front lawn of him home site. Chef Silva has decades of experience at some of Houston’s finest establishments, including Degust, Uchi, Holley’s, and has performed on multiple stages in Europe. This renowned chef even made appearances on Food Network’s show Chopped!
 For this meal, all the ingredients from the catfish to the beer and wine served were locally sourced from the region. There was Texas Succession beer from Braman Winery and Brewery, vegetables from Gundermann Acres, catfish from Homegrown Seafood, and a selection of wines from Lavaca Bluffs Vineyard and Winery.
 While I enjoyed every part of the activities that day, the best part of this experience for me was sitting down to have dinner with the farmers and their families that evening. Farming is very much a whole family affair. It takes everyone working together for the crops to be successful. And it takes neighbors working with neighbors for them all to be successful.
 On this culinary tour, we were able to experience and better understand the sustainable farming practices and the technology farmers are using to conserve and protect our valuable natural resources, especially water. There's something really special about knowing where your food comes from. Getting to see the actual rice fields growing and watching the guys bring in the heavy nets full of fish really puts into perspective how much passion goes into being a farmer.
 Want to support local and make a delicious meal for dinner tonight? How about this tasty blackened Texas catfish with sweet corn relish?Here's the recipe:
Blackened Catfish with Sweet Corn Relish

Corn Relish Ingredients
- 2 cups fresh or frozen corn
- 2 cups chopped onions
- 2 cups chopped seeded cucumbers
- 2 cups chopped tomatoes
- 1 large green pepper (chopped)
- 1 cup sugar
- 1 cup cider vinegar
- 1-1/2 teaspoons celery seed
- 1-1/2 teaspoons mustard seed
- 1 teaspoon salt
- 1/2 teaspoon ground turmeric
Blackened Catfish Ingredients
- 1 teaspoon ground black pepper
- 1 teaspoon garlic powder
- 1 teaspoon onion powder
- 1 teaspoon paprika
- 1 teaspoon dried parsley
- 1 teaspoon ground cayenne pepper
- 1 teaspoon kosher salt
- ½ teaspoon dried oregano
- ½ teaspoon dried thyme
- 4 4 ounce catfish fillets
- 1 stick unsalted butter
Corn Relish
- In a large saucepan, combine all of the ingredients. Bring to a boil.
- Reduce heat; simmer, uncovered, for 20-30 minutes or until thickened. Store in the refrigerator.
Blackened Catfish
- In a shallow bowl, mix together the black pepper, garlic powder, onion powder, paprika, parsley, cayenne pepper, kosher salt, oregano, and thyme until thoroughly combined.

- Press the catfish fillets into the spice mixture to thoroughly coat.

-
Place a large cast-iron skillet over high heat. Put half of the butter into the skillet; set remaining butter aside.
-
When the butter in the skillet is smoking hot, lay the catfish fillets into the skillet. Cook until the spices are burned onto the fillets and the catfish is opaque and flaky inside, about 3 minutes per side. Pour remaining butter over the catfish.
Put it All Together
- Top the catfish with the corn relish. Use as much or as little as you like!

More Texas Style Recipes You’ll Love
Bourbon Chocolate Pecan PieGringo’s Tex Mex Copycat Amazon SauceDewberry BBQ SauceMexican Street Corn Pasta Salad If you’d like to see more recipes like this, SUBSCRIBE to my YouTube Channel!
Lemon Upside Down Cake

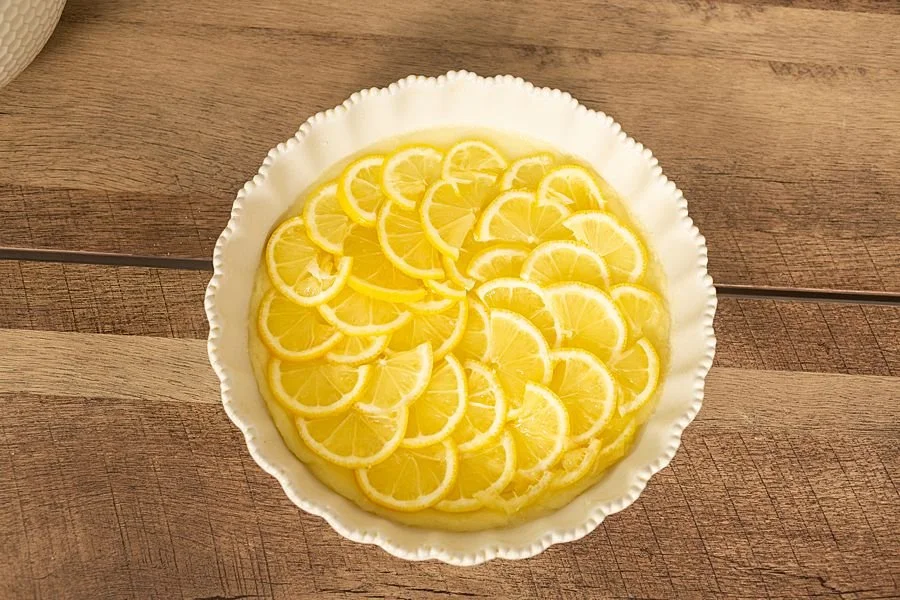
One of my favorite cakes is the pineapple upside down cake. Oh man.It's got a delicious fluffy cake layer with that caramelized sugar and pineapple on the bottom, so that when you flip it over, all that goodness sits right on top, making such a beautiful and delicious summer dessert.Well, after Wonderfully Seedless Lemons sent me some of their seedless lemons to try, I knew I needed to make the next best thing - Seedless Lemon Upside Down Cake. If you can't find seedless lemons, you can always remove the seeds yourself.This is sure to be a new lemon dessert for your summer dessert table during these warm months.
Lemon Upside Down Cake

Upside-down layer:
- 1 stick unsalted butter
- ½ cup (plus 2 tablespoons sugar)
- 2 large unwaxed lemons (ends trimmed, then halved, seeded, and sliced ⅛ inch thick)
Cake:
- 2½ cups all-purpose flour
- 1 teaspoon baking powder
- ½ teaspoon baking soda
- ½ teaspoon kosher salt
- 2 large eggs
- 1 cup olive oil
- 1 cup full-fat plain Greek yogurt
- 1 cup sugar
- Position a rack in the center of your oven and preheat the oven to 350°F. Butter a 9-inch round cake pan and line it with parchment paper.
- In a medium saucepan over low heat, melt the butter. Remove the pan from the heat and add ½ cup of the sugar and 2 tablespoons of water. Whisk the mixture until the sugar dissolves and the mixture is glossy and thickened a little. Pour the melted butter and sugar into the prepared cake pan and smooth into an even layer to cover the bottom. Place the cake pan in the freezer until the butter and sugar layer freezes; leave the pan in the freezer until you are ready to transfer the batter to the pan.
- In a small bowl, gently toss the lemon slices with the remaining 2 tablespoons of sugar. Leave the lemon slices in the sugar to macerate for 10 minutes.
- Sift the flour, baking powder, baking soda, and salt into a large bowl. Set aside. Combine the eggs with the olive oil in another large bowl and beat vigorously with a whisk until well combined. Add the yogurt and sugar. Make a well in the flour mixture and add the wet mixture in three additions, folding in each addition until no dry bits of flour remain. Set aside.
- Fan the lemon slices out to cover the melted butter and sugar in the cake pan, overlapping the slices by as much as 1⁄8 inch. Pour the cake batter directly on top of the lemon slices.
- Bake for about 1 hour, until a cake tester inserted into the center comes out with only a few moist crumbs clinging to it. Transfer to a wire cooling rack and let cool for 15 minutes. Invert the cake onto a serving plate and carefully remove the parchment-paper lining. Allow the cake to cool for 1 hour more before serving
More Dessert Recipes You'll Love:
Bourbon Chocolate Pecan PieStrawberry TrifleSweet, Sweet Summertime Blueberry Cookies If you'd like to see more recipes like this, SUBSCRIBE to my YouTube channel!
Rotisserie Chicken Poblano Soup

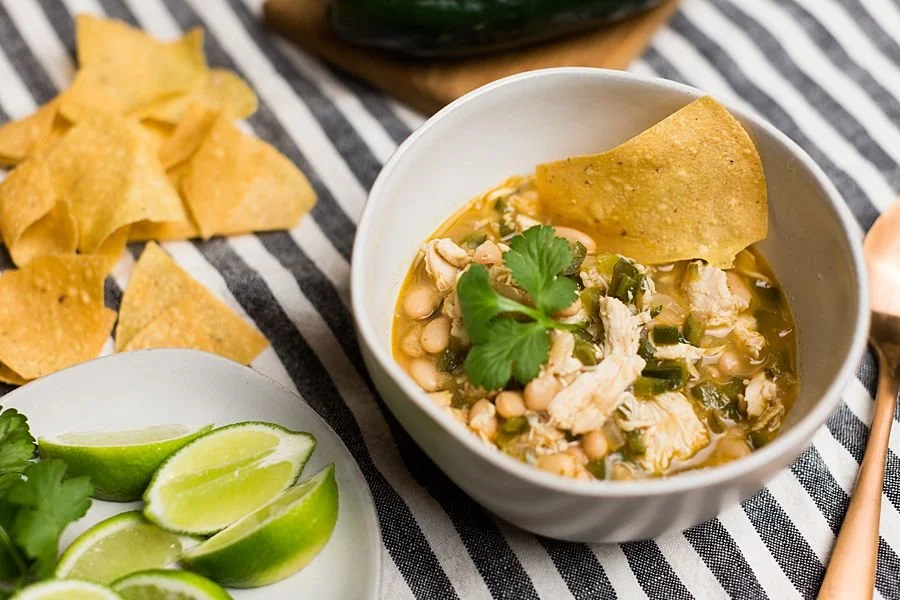
I’m going to tell you right now, when I made this for the first time for my husband, his response was, “this needs to be something we have every week.”I guess that means it’s good, right?When I set out to make chicken chili, it somehow tuned into this chicken soup and I’m so glad it did. It’s got a ton of flavor, protein and heartiness that’s perfect for the winter months.
Rotisserie Chicken Poblano Soup

- 2 14.5-ounce cans white beans
- 1 tablespoon canola oil
- 1 medium jalapeno pepper (minced)
- 2 medium poblano peppers (chopped)
- 1 large onion (chopped)
- 4 garlic cloves (minced)
- Kosher salt and freshly ground black pepper
- 1 tablespoon ground cumin
- 1 1/2 teaspoons ground coriander
- 1 teaspoon ancho chili powder
- 4 cups low-sodium chicken broth
- 2 limes (juiced, plus lime wedges, for serving)
- 1 rotisserie chicken (skin removed and meat shredded)
- 1/4 cup chopped cilantro leaves
- Drain and rinse the canned white beans. In a medium bowl, mash half of the beans with a potato masher until chunky. Reserve the beans until needed.
- Add the canola oil to a large Dutch oven and heat it over medium-high heat. Add the peppers, onions, and garlic and saute until soft and fragrant, about 5 minutes. Season the vegetables with salt, and pepper, to taste. Add the cumin, coriander, and chili powder and continue to saute for 1 more minute to toast the spices. Stir in the chicken stock, and lime juice and bring to a simmer. Add the beans and continue to simmer for 20 more minutes.
- After 20 minutes of simmering, taste for seasoning, and adjust if necessary. Stir in the shredded rotisserie chicken and cilantro and simmer until heated through, about 5 more minutes. Serve the chili in individual bowls topped with a dollop of sour cream, crushed tortilla chips, and lime wedges.

More Rotisserie Chicken Recipes You'll Want To Try
One Pan Chicken SpaghettiCreamy Chicken and RiceSlow Cooker Chicken Noodle Soup Like what you see? Be sure to SUBSCRIBE to my YouTube Channel!
Cracker Barrel Biscuits Copycat Recipe

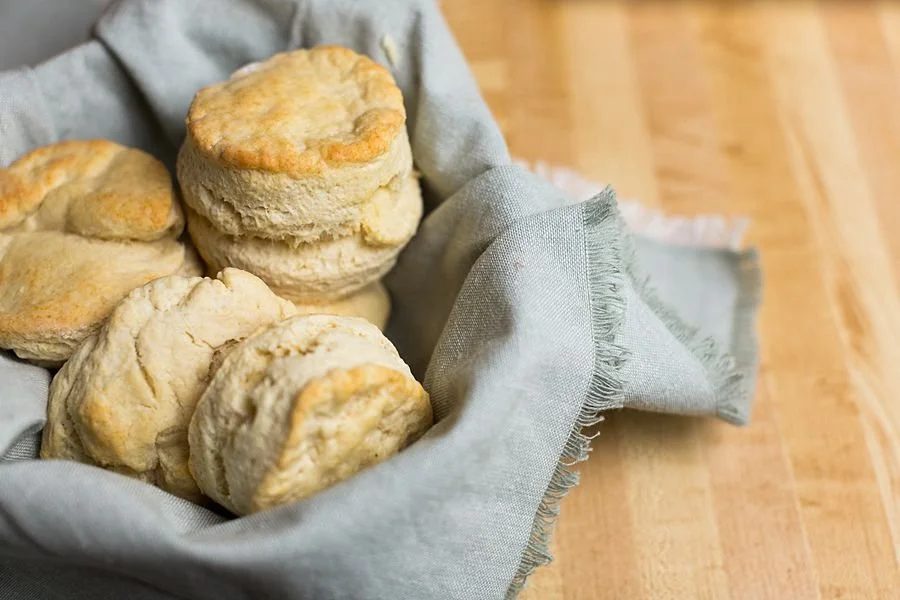
Would you like biscuits or cornbread?If you’re at a Cracker Barrel restaurant, the answer is yes and yes. Although my eyes and tastebuds always tend to favor the cracker barrel biscuits.They’re slightly salty with a pillowy soft interior just waiting to be slathered in butter.If you’re a fan of these southern style biscuits, you’re going to want to try this Cracker Barrel Biscuits Copycat Recipe.
Cracker Barrel Biscuits Copycat Recipe

- Ingredients
- 2 cups all-purpose flour
- 1 Tablespoon baking powder
- 1 Tablespoon granulated sugar
- 1 teaspoon salt
- 6 Tablespoons unsalted butter very cold (cut into cubes)
- ¾ cup milk (or buttermilk)
- For best results, chill your butter in the freezer for 10-20 minutes before beginning this recipe. It's ideal that the butter is very cold for light, flaky, buttery biscuits.
- Preheat oven to 425 degrees and line a cookie sheet with nonstick parchment paper. Set aside.
- In a food processor, combine flour, baking powder, sugar, and salt in a large bowl and mix well. Pulse 3 or 4 times to combine.
- Add butter to food processor. Pulse 6-8 times or until the mixture is resembles coarse crumbs.
- Add milk to the food processor and pulse 6-8 times or until the mixture starts coming away from the sides of the bowl.
- Transfer your biscuit dough to a well-floured surface and use your hands to gently work the dough together. If the dough is too sticky, add flour until it is manageable.
- Once the dough is cohesive, fold in half over itself and use your hands to gently flatten layers together. Rotate the dough 90 degrees and fold in half again, repeating this step 5-6 times but taking care to not overwork the dough.
- Use your hands (do not use a rolling pin) to flatten the dough to 1" thick and lightly dust a 2 ¾" round biscuit cutter with flour.
- Making close cuts, press the biscuit cutter straight down into the dough and drop the biscuit onto your prepared baking sheet. Repeat until you have gotten as many biscuits as possible and place less than ½" apart on baking sheet.
- Once you have gotten as many biscuits as possible out of the dough, gently re-work the dough to get out another biscuit or two until you have at least 6 biscuits.
- Bake on 425 degrees for 12 minutes or until tops are beginning to just turn lightly golden brown.
- If desired, brush with melted salted butter immediately after removing from oven. Serve warm and enjoy.
More Bread Recipes You'll Want to Try
Moist Banana BreadThe Best Sweet Cornbread RecipeWarm Bread Pudding with a Brown Sugar Rum Sauce If you liked this video, be sure to SUBSCRIBE to my YouTube Channel!

Uses for Leftover Candy Canes | Chocolate Peppermint Cookies
As a blogger, I’m always trying to challenge myself.I make new goals each year, try out new recipes, and broaden my reach as much as possible. That’s why today I’m taking part in a blogger Christmas cookie swap!If you’re not sure what this is – it’s where a bunch of foodie bloggers create tasty Christmas cookie recipes and readers can hop from one blog to the next – getting a whole bunch of new recipes added to their holiday gathering arsenal.If you’re here from Sam Weaver’s blog, welcome! If you’re just starting out on this cookie journey, welcome to you as well. After you watch the recipe video or read the recipe, be sure to scroll down and check out With Love From Catt’s recipe after mine.
Chocolate Peppermint Cookies

Leftover candy canes are crushed and placed atop chocolatey peppermint cookies that are perfect for the holiday season.
- 1/2 cup unsalted butter (softened // 1 stick equals 1/2 cup)
- 3/4 cup sugar
- 1 large egg
- 1/4 tsp natural peppermint extract
- 1 1/4 cup unbleached all-purpose flour (or whole-wheat pastry)
- 1/3 cup cocoa powder
- 1/4 tsp salt
- 1/2 tsp baking soda
- 1/4 tsp baking powder
- 1 candy cane (finely crushed)
- 1/3 cup dark (bittersweet or semisweet chocolate chips)
- Preheat oven to 350 degrees F.
- In a large bowl, cream the butter and sugar together for about 1-2 minutes. Add egg, peppermint extract and beat until light and fluffy, scraping down the sides as you go to ensure even mixing.
- Add flour, salt, cocoa powder, baking soda and powder to a sifter and sift gradually over the wet ingredients mixing as you go. Mix until well combined.
- Add chocolate chips and stir in with a mixing spoon and then chill in the freezer for 10 minutes while the oven finishes heating.
- Form the dough into small balls (heaping 1 Tbsp) and place 1.5 inches apart on an un-greased or parchment-lined baking sheet. Press the tops down and then top with a few more chocolate chips (to indicate what’s inside).
- Bake for 10-12 minutes – the edges should start to dry but the tops will still be slightly soft looking. Let set on the cookie sheet for a few minutes more but sprinkle crushed candy cane on immediately.
- Transfer to a cooling rack to rest until completely cooled. Store in an airtight container to keep fresh for up to a few days or freeze for several weeks.

More Cookie Recipes You'll Love
Cast Iron Skillet Chocolate Chunk CookieLemon & Raspberry Swirl CookiesSweet Tea Iced Shortbread Cookies If you enjoyed this cookie recipe, be sure to SUBSCRIBE to my YouTube channel to see more! Next up on the cookie swap is Catt at WithLoveFromCatt.com. Her Raspberry Filled Linzer cookies look so yummy and I can't wait to try them myself! Go check out her recipe here.

How to Make Homemade Hot Chocolate

Do you have any family Christmas traditions?
One of our favorite family activities is driving around to see Christmas lights each year. Sometimes we stay close by and others, we’ll drive quite a ways. But the outcome is always the same – we create lasting moments with our family that we will always remember.
Now, Christmas light viewing isn’t complete without having a cup of warm hot chocolate in your hands. Before we leave the house, I’ll make my super easy homemade hot chocolate recipe. This stuff is delicious, y’all.No, it’s not as easy as just opening up a packet and adding some hot water, but it is so creamy and delicious that you’ll never want to go back to the packets if you can help it.So whether it’s an evening of driving around in the car or a day spent opening up presents, this recipe is one the kids and kids at heart in your family will love. And make sure to include a few toppings for each person to make it their own.
What Toppings Go Well With Hot Cocoa?
The amount of toppings are endless when it comes to what you can put on your hot coca. Some of my favorite toppings include: marshmallows, toffee bits, coarse sea salt, mini chocolate chips, crushed peppermints, candy canes, soft peppermint sticks, whoppers, Lindt truffles, pirouette cookies, whipped cream, dark chocolate syrup, and caramel sauce.
Homemade Hot Cocoa

- ¼ cup cocoa powder
- ½ cup hot water
- 20 ounces chopped semi-sweet chocolate
- 10 cups whole milk (or 2%)
- 2 ½ cups half and half
- 1 12 ounces can evaporated milk (not fat-free)
- ½ cup sugar
- ¼ teaspoon salt
Stove Top Instructions
-
Add the water and cocoa powder to a large stock pot and whisk until mixed.
-
To the cocoa mixture, add the chopped chocolate, milk, half and half, evaporated milk, and salt.
-
Heat over medium heat until the chocolate is melted, stirring periodically.
Slow Cooker Instructions
- Start by adding the cocoa powder to a bowl, pour in the hot water, and whisk until mixed.
-
Add the cocoa mixture along with the chopped chocolate, milk, half and half, evaporated milk, and salt to a 6-quart slow cooker or larger. If you're serving this with a hot chocolate bar and toppings, consider leaving out the sugar to avoid the hot chocolate being too sweet. If you're serving the hot chocolate solo, add in the sugar.
- Cook the hot chocolate on the high setting for 3-4 hours or on low for 6 hours. Low for 6 hours is what I prefer. Make sure to stir the hot chocolate every hour to keep the chocolate from settling to the bottom.
- Keep on the warm setting if you're serving it hot chocolate bar style with toppings on the side. Leftover hot chocolate can be refrigerated for up to one week and warmed in the microwave before serving.
More Christmas Recipes You'll Love
Candy Cane Christmas Cake RollMeringue TreesHot Chocolate Monkey Bread With Marshmallows
Thank With Google
If you’ve been a reader for a while, then you’ve noticed something new here at the bottom of each blog post. I’ve gotten the awesome opportunity of being a part of an experiment pilot feature called Thank with Google. I’m excited to be one of Google’s paid early testers and get to tell you more about this new project from Google. What is Thank with Google? Thank with Google is a way for my fans/readers to support me and show their appreciation for certain posts through the purchase of a virtual sticker. It’s a fun and interactive way for my fans to connect with me and show me appreciation for my work. And I love the personal notes that can be included with the paid stickers as well. You can find the new Thank with Google feature floating at the bottom of the page here or on the sidebar (if you’re using a desktop). Please feel free to test it out and let me know what you think!
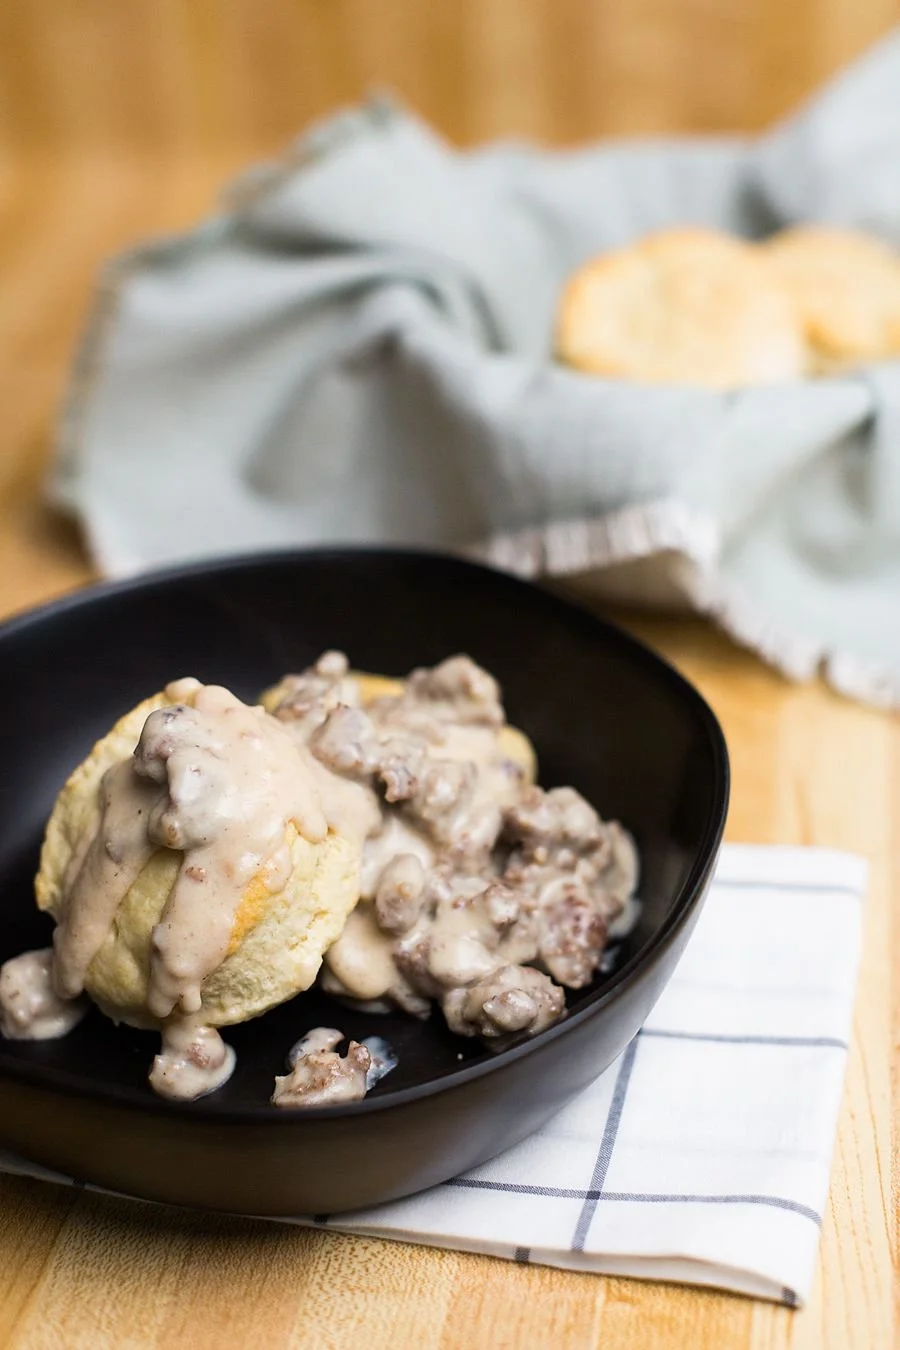
Homemade Southern Style Biscuits & Gravy in Just 30 Minutes

My husband’s favorite breakfast dish is Biscuits and Sausage Gravy.But since I’m not a morning person, he thought I would never make them for him. Well I showed him!This past week, I made southern biscuits and gravy for dinner! The made from scratch biscuits are so light and fluffy and soaked up all of that delicious maple sausage gravy.I know you’re tempted to buy the premade biscuits at the store, but I promise you that this recipe is SO much better than those!
Southern Style Biscuits and Gravy

Biscuit Ingredients
- 2 cups all-purpose flour (250g)
- 1 Tablespoon baking powder
- 1 Tablespoon granulated sugar
- 1 teaspoon salt
- 6 Tablespoons unsalted butter very cold (cut into cubes)
- ¾ cup milk (or buttermilk)
Gravy Ingredients
- 1 12 ounce package maple flavored sausage
- 3 tablespoons butter
- ¼ cup all-purpose flour
- 3 cups milk (or buttermilk)
- salt and pepper to taste
Biscuits Instructions
- For best results, chill your butter in the freezer for 10-20 minutes before beginning this recipe. It's ideal that the butter is very cold for light, flaky, buttery biscuits.
- Preheat oven to 425 degrees and line a cookie sheet with nonstick parchment paper. Set aside.
- In a food processor, combine flour, baking powder, sugar, and salt in a large bowl and mix well. Pulse 3 or 4 times to combine.
- Add butter to food processor. Pulse 6-8 times or until the mixture is resembles coarse crumbs.
- Add milk to the food processor and pulse 6-8 times or until the mixture starts coming away from the sides of the bowl.
- Transfer your biscuit dough to a well-floured surface and use your hands to gently work the dough together. If the dough is too sticky, add flour until it is manageable.
- Once the dough is cohesive, fold in half over itself and use your hands to gently flatten layers together. Rotate the dough 90 degrees and fold in half again, repeating this step 5-6 times but taking care to not overwork the dough.
- Use your hands (do not use a rolling pin) to flatten the dough to 1" thick and lightly dust a 2 ¾" round biscuit cutter with flour.
- Making close cuts, press the biscuit cutter straight down into the dough and drop the biscuit onto your prepared baking sheet. Repeat until you have gotten as many biscuits as possible and place less than ½" apart on baking sheet.
- Once you have gotten as many biscuits as possible out of the dough, gently re-work the dough to get out another biscuit or two until you have at least 6 biscuits.
- Bake on 425 degrees for 12 minutes or until tops are beginning to just turn lightly golden brown.
- If desired, brush with melted salted butter immediately after removing from oven. Serve warm and enjoy.
Gravy Directions
- Place sausage in a large, deep skillet. Cook over medium-high heat until evenly brown. Remove sausage with a slotted spoon, leaving the drippings in the pan. Stir in the butter until melted. Add flour, and stir until smooth. Reduce heat to medium, and cook until light brown. Gradually whisk in milk, and cook until thickened. Season with salt and pepper, and stir in cooked sausage. Reduce heat, and simmer for 12 to 15 minutes. If gravy becomes too thick, stir in a little more milk.
More Breakfast Recipes You'll Want To Try
Blueberry Crumble Breakfast Coffee CakeEggwhite FrittataIf you enjoyed this recipe, be sure to subscribe to my YouTube Channel!
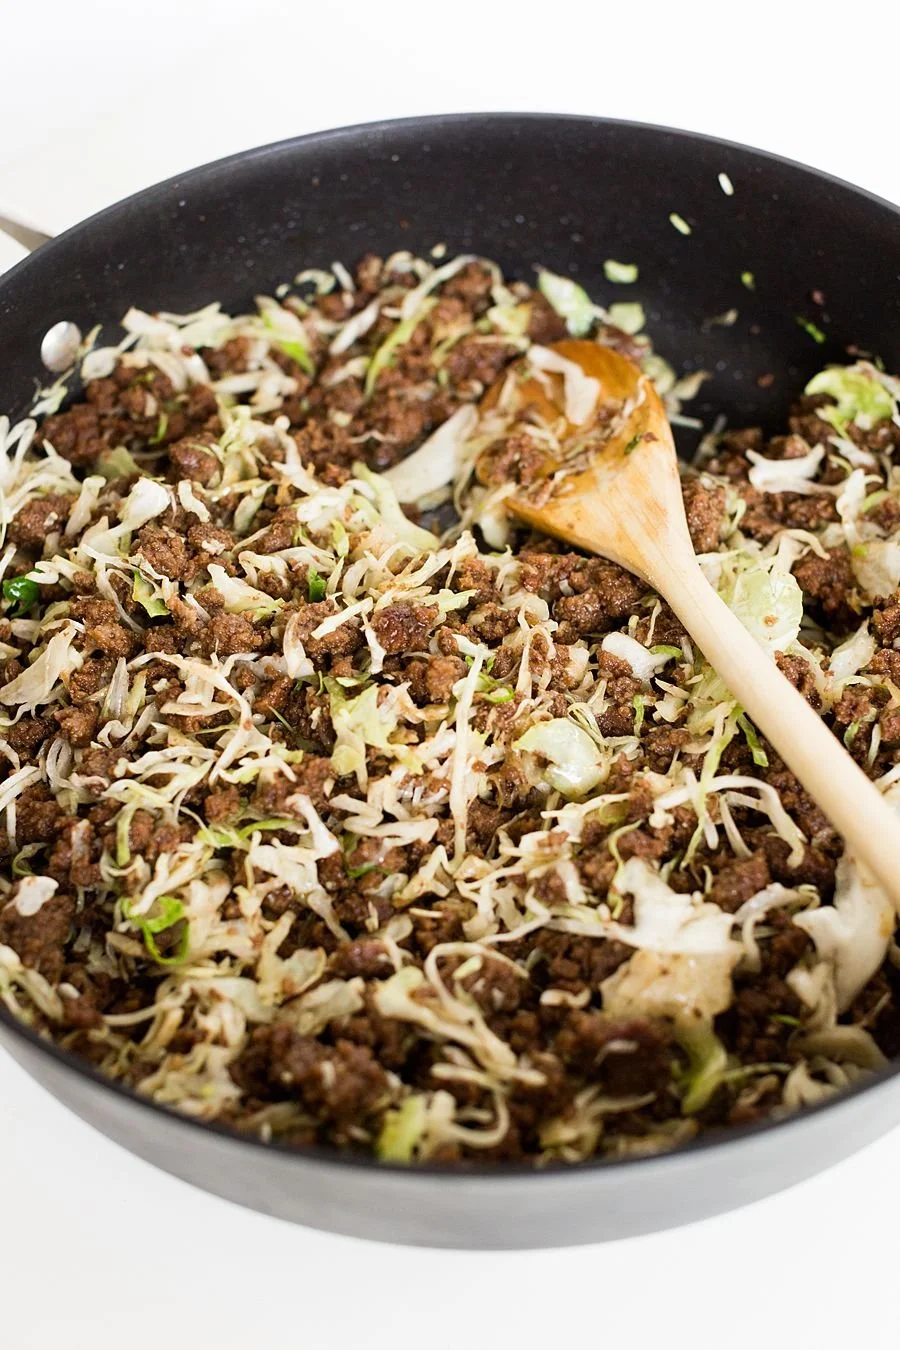
Korean Ground Beef Egg Roll Bowls

This recipe started off as Korean ground beef egg rolls, but then I realized my wonton wrappers were expired. So a Korean ground beef eggroll bowl it is!
Korean Ground Beef Egg Roll Bowls

- 2 pound lean ground beef
- 2 Tablespoons sesame oil
- 6 cloves garlic (minced)
- 2 teaspoons ground ginger
- 1 cup brown sugar
- 1/2 cup lite soy sauce
- 1 Tbsp Sriracha (use less if you don't like spice!)
- 10 oz bag of coleslaw veggie mix
- Heat a large pan over medium high heat. Brown the meat with sesame oil, garlic and ginger.
- Drain 75% of the fat, add brown sugar, soy sauce, and Sriracha. Cook until the liquid has reabsorbed and the meat is shiny but not soupy.
-
Add the coleslaw veggies to your pan. Heat through until they just wilt.
If making into eggrolls:
In sets of 4 lay out your egg roll wrappers. Add two tablespoons of beef. Wet the sides with water using your finger. Fold the sides in and wet the folded in sides. Roll closed like a burrito and set aside until you finish all 24. Freeze on a cookie sheet or tray without them touching each other. From frozen, fry for 3-4 minutes in 350 degree oil. Drain on drying rack to prevent sogginess or the egg rolls sitting in oil.
More Recipes For Easy Weeknight Dinners:
Salisbury steakOne Pan Creamy Tuscan Chicken PastaOne Pan Chicken Spaghetti If you’d like to see more recipes like this, be sure to SUBSCRIBE to my Youtube channel!
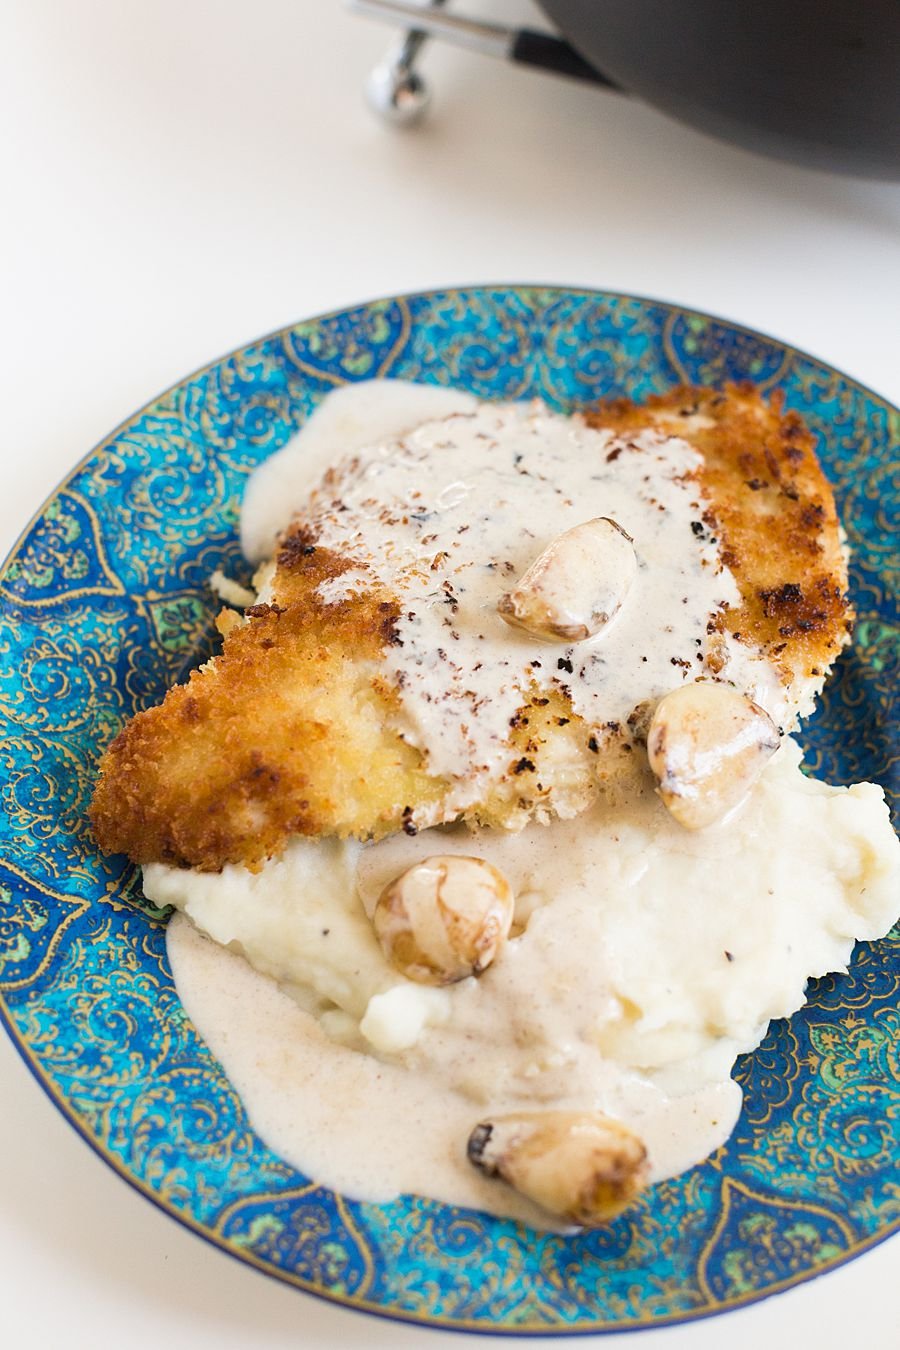
Creamy Double Garlic Chicken

I really dislike grocery shopping.You would think with as many recipes as I make that I’d be used to it by now, but no. I’m totally a fan for the curbside option – unless I need produce. Somehow, I always end up going home with the ugliest or smallest bell peppers and onions you’ve ever seen that way!So instead of going to the grocery store this week, I opted to see what I could make using the items I already had in my pantry and fridge.This creamy garlic chicken is a winner, y’all. I mean, when a recipe calls for both garlic cloves and garlic powder, you know it’s going to have some serious flavor going on!Ready to get cooking? Let’s do it!
Creamy Double Garlic Chicken

- 4-5 chicken cutlets (or 2 chicken breasts cut in half length-wise)
- 1 ½ cups Panko bread crumbs
- Pinch of salt
- 1 tablespoon olive oil
- 2 tablespoons butter divided
- 1 whole head garlic cloves (peeled)
- 1/2 cup chicken broth or stock
- 1/2 teaspoon lemon juice
- 1/2 teaspoon garlic salt
- 1 cup heavy/whipping cream
- Salt & pepper to taste
- Parsley chopped (optional)
- Combine the panko bread crumbs and a pinch of salt and coat the chicken cutlets on both sides.
- Add the olive oil and 1 tbsp of the butter to a skillet over medium-high heat. Once the pan is hot, sauté the chicken for 4-5 minutes/side or until it's nice and golden. Take the chicken out of the pan and set it aside.
- Reduce the heat to medium (or even med-low if using cast iron), and add the rest of the butter to the pan. Let it melt and then add the garlic cloves. Cook them for 3-4 minutes, stirring often, until they're lightly browned on the outside.
- Add the chicken broth, lemon juice, and garlic salt to the pan. Let it bubble for around 4 minutes or until the liquid is noticeably reduced.
- Stir in the cream let it cook for another 5 minutes or so, until the sauce is reduced. Serve with freshly chopped parsley if you wish.
More Chicken Recipes You'll Love
One Pan Creamy Tomato ChickenEasy Chicken EmpanadasSlow Cooker Honey Garlic ChickenLike this recipe? Be sure to SUBSCRIBE to my Youtube channel to see more!

PUMPKIN WHOOPIE PIES | Easy Fall Dessert

More There is nothing I love more about fall than pumpkin. Pumpkin flavored everything! Except, I’ve never actually had a pumpkin spice latte from Starbucks. I should probably get on that. Oh well. Moving on… I seem to find a reason to make these soft and yummy pumpkin cookies every year. A like them because they’re light and airy and they don’t feel like you’re eating something that’s going to weigh you down. And with the scrumptious flavor of pumpkin pie in it, you really can’t go wrong. This is definitely my go-to pumpkin dessert recipe.
PUMPKIN WHOOPIE PIES | Easy Fall Dessert

For the Whoopie Pies:
- 3 cups 375 g all-purpose flour
- 1 tablespoon cinnamon
- 1 teaspoon baking powder
- 1 teaspoon baking soda
- 1 teaspoon salt
- 1 tablespoon pumpkin pie spice
- 1 cup granulated sugar
- 1 cup dark brown sugar
- 1 cup canola or vegetable oil
- 2 14.5 oz cans pumpkin puree, canned pumpkin
- 2 eggs
- 1 teaspoon vanilla extract
For the Maple-Cream Cheese Filling:
- 3 cups powdered sugar
- 8 ounces cream cheese (at room temperature)
- 4 ounces unsalted butter (at room temperature)
- 3 tablespoons maple syrup
- 1 teaspoon vanilla extract
- Preheat oven to 350 degrees F. Line baking sheets with parchment paper or a silicone baking mat.
- In a bowl, whisk the granulated sugar, the dark brown sugar, and the oil together. Add the pumpkin puree and whisk to combine thoroughly. Add the eggs and vanilla and whisk until combined.
- Next, add in the flour, cinnamon, baking powder, baking soda, salt, and pumpkin pie spice.
- Put the pumpkin mixture into a zip-top bag, snip the corner, and make half dollar size swirls one inch apart on the prepared baking sheets.
- Bake for 10 to 12 minutes, making sure that the cookies are just starting to crack on top and a toothpick inserted into the center of a cookie comes out clean. The cookies should be firm when touched. Remove from the oven and let the cookies cool completely on a cooling rack.
- To make the filling, beat the butter on medium speed until smooth with no visible lumps, about 3 minutes. Add the cream cheese and beat until smooth and combined, about 2 minutes. Add the powdered sugar a little at a time, then add the maple syrup and vanilla and beat until smooth.
- To assemble the whoopie pies: Turn half of the cooled cookies upside down. Pipe or spoon the filling (about a tablespoon) onto that half. Place another cookie, flat side down, on top of the filling. Press down slightly so that the filling spread to the edges of the cookie. Repeat until all the cookies are used. Put the whoopie pies in the refrigerator for about 30 minutes to firm before serving.
More Fall Recipes You'll Love:
Goat Cheese Stuffed FigsSweet Potato Casserole BitesIf you’d like to see more recipes like this one, be sure to SUBSCRIBE to my Youtube Channel!
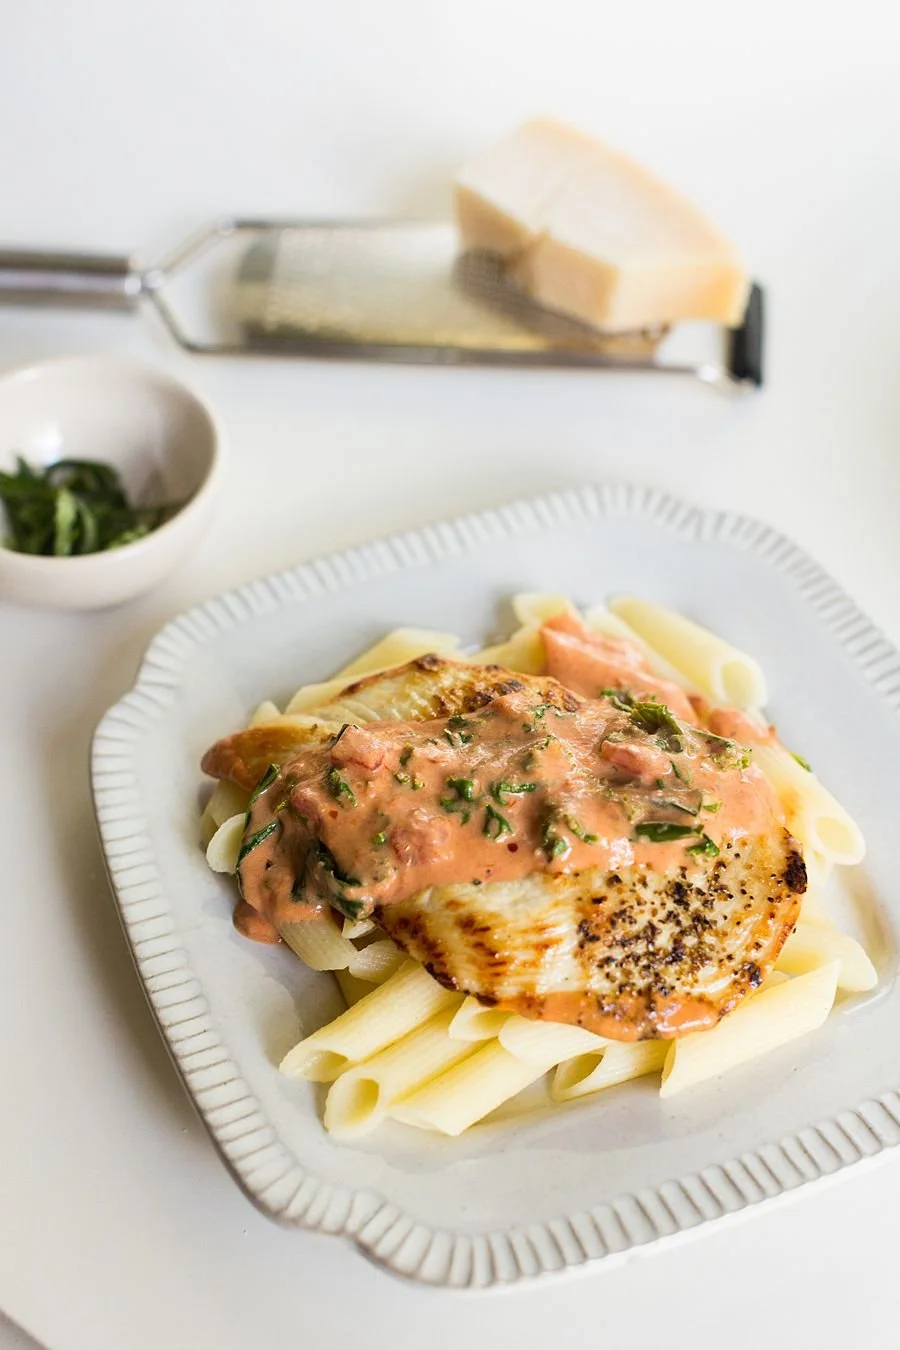
One Pan Creamy Tomato Chicken

This one pan creamy tomato chicken recipe is so easy and flavorful, it’ll have you wondering why you didn’t start making this recipe for dinner sooner!If you’re looking for a chicken recipe idea, this is it. And let me tell you…I thought I would never find a way to eat kale that made it taste good. It turns out that if you cover it in heavy cream, it tastes great!Try this recipe tonight and let me know what you think!
One Pan Creamy Tomato Chicken

- 2 tbsp Olive oil
- 1.5 lbs Chicken breast (4 medium, boneless, skinless)
- 1 tsp Salt (divided)
- ½ tsp Pepper
- 2 tbsp Tomato paste
- 3 Cloves garlic (minced)
- 1 tsp Fennel seeds
- 1/2 tsp Crushed red pepper flakes (optional)
- 1 14 oz can Crushed tomatoes
- 1 cup Heavy cream
- ½ cup Parmesan cheese (divided)
- 4 cups Kale (ribs removed, torn into small pieces, packed)
- 1/4 cup Basil leaves (thinly sliced)
- Heat olive oil in an ovenproof skillet cast iron skillet over medium-high heat.
- Season chicken breasts with 1/2 teaspoon salt and pepper.
- Add chicken to skillet and cook until golden, about 5 minutes. Turn and cook on the other side for another 5 minutes. Remove chicken from the pan and set aside.
- In the same skillet, add tomato paste, garlic, and fennel seeds and cook until just fragrant, about 1 minute.
- Add crushed tomatoes and red pepper flakes and bring to a simmer, allow to cook for 3 minutes.
- Stir in heavy cream, ¼ cup parmesan cheese and kale, stirring until kale is just wilted, about 3 minutes.
- Season with remaining ½ teaspoon salt and add chicken back into the skillet. Allow to cook for 5 more minutes or until the internal temperature of the chicken breasts reaches 165°F with an instant read thermometer.
- Serve topped with fresh basil and remaining cheese.

More Chicken Recipes
Easy Chicken EmpanadasOne Pan Everything Bagel Chicken & PotatoesOne Pan Creamy Tuscan Chicken Pasta If you’d like to see more tasty chicken recipes like this, subscribe to my Youtube Channel!
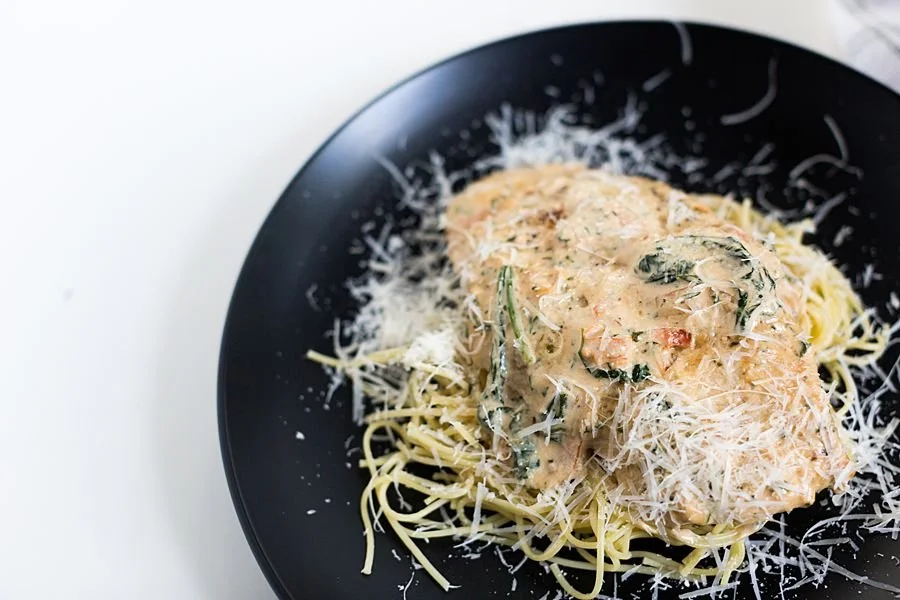
One Pan Creamy Tuscan Chicken Pasta

One pan chicken dinner recipes are the best!Do you ever get burnt out on the same old chicken meals? I know I do.This past week, I found myself looking to get something new added to the regular dinner rotation. So after we had the usuals of the week – spaghetti, tacos, etc., I made this chicken recipe.It’s a game changer, y’all!This easy chicken recipe is definitely being added to the regular dinner schedule!

One Pan Creamy Tuscan Chicken Pasta

For the chicken
- 4 chicken breasts
- 2 teaspoons salt
- 1 teaspoon pepper
- 1 tablespoon oil
For the sauce
- 3 cloves garlic (chopped)
- ½ onion (diced)
- 1 to mato (diced)
- 2 cups spinach
- 2 cups heavy cream
- 1 teaspoon salt
- 1 teaspoon pepper
- ½ cup grated parmesan cheese
- 2 tablespoons fresh flat-leaf parsley (chopped)
- Season the chicken all over with salt and pepper.
- Heat the oil in a skillet over medium-low heat.
- Place the chicken in the skillet and cook until browned and the internal temperature reaches 160 degrees.
- Remove the chicken from pan.
- Add the garlic and onion, stirring until onions are translucent. Stir in the tomatoes and spinach until the spinach is wilted.
- Add the heavy cream, salt, and pepper and bring it to a boil.
- Add the Parmesan cheese and parsley, stirring until the sauce has thickened slightly.
- Place the chicken back in the pan, spooning the sauce on top of the chicken.
- Serve with pasta and enjoy!

More One Pan Chicken Meals You'll Love
One Pan Chicken SpaghettiOne Pan Rosemary & Orange ChickenOne Pan Balsamic Chicken & Peach Skillet If you’d like to see more family friendly vacations like this, subscribe to my Youtube Channel!
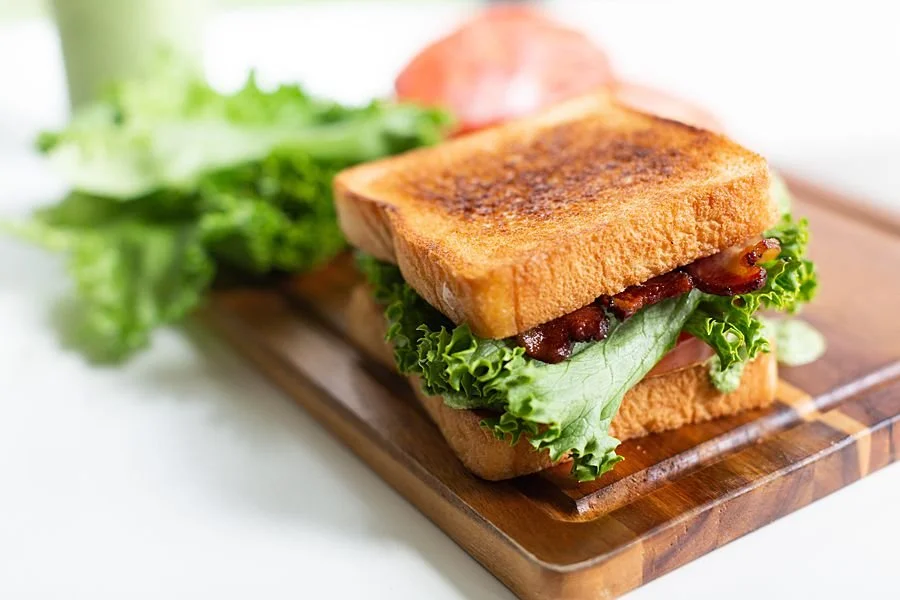
How to Make The Ultimate BLT Sandwich Recipe

How does one improve upon a classic sandwich like the BLT?The classic bacon, lettuce, and tomato sandwich is an icon in the sandwich world. Hole in the wall diners and upscale restaurants all feature their own version of this famous sandwich, but none that I’ve tried come even remotely close to this ultimate BLT sandwich recipe.
This tasty bacon sandwich is easy to make and has one shining star – the Amazon sauce. Instead of regular old mayo, the ultimate BLT sandwich has this amazing delicious jalapeno cilantro sauce on it.The jalapeno cilantro sauce is only as spicy as you want, but it has a ton of flavor and packs a punch that pairs perfectly with the salty bacon. You’re going to love it!
The Ultimate BLT Sandwich Recipe

Amazon Sauce Ingredients
- 3 jalapeños
- 1 bunch fresh cilantro
- 5 medium cloves garlic
- 1/2 cup mayonnaise
- 2 tbsp fresh lime juice
- 2 tbsp avocado oil
- 1/2 tsp sea salt
- 1/4 tsp freshly ground black pepper
Sandwich Ingredients
- 2 slices Texas toast
- 3-6 slices bacon
- 1 leaf Lettuce
- 1 slice tomato
- 2 tablespoons butter
Making the Sauce
- For a milder sauce, remove the seeds and ribs from the jalapeños, then roughly chop them. For a spicier sauce, leave the seeds and ribs in, and simply chop the jalapeños. You should have about 1 cup of chopped jalapeños.
- Place the jalapeños into a blender along with all the remaining ingredients (I even include the cilantro stems), and blend on high for at least 30 seconds, until the sauce is smooth and creamy.
- You can store in the refrigerator for up to 1 week.
Putting the Sandwich Together
- Preheat the oven to 350 degrees. On a baking sheet with raised sides, cover the bottom with foil and place your bacon in one even layer on top. Place another sheet of foil loosely on top of the bacon (this will keep it from splattering grease all over the oven). Let bake for 25-30 minutes, depending on how crispy you like your bacon.
- Heat a griddle or skillet to medium high heat (350 degrees). Once it’s hot, put the tablespoon of butter on the griddle and use a spatula to spread it out. Once it’s melted, place the slices of Texas toast on top of the buttered area. After it becomes golden brown (about 3 minutes), flip the bread and toast the other side.
- Spread a generous amount of the Amazon Sauce over one piece of toast. On top of it, lay the slice of tomato, and then the lettuce. Place the slices of bacon on top of the lettuce and then the other piece of toast on top.

Utensils Needed
More Lunches You’ll Love
Italian Tuna Stuffed TomatoesEasy & Colorful Pasta SaladFig & Feta Flatbread If you’d like to see more recipes like this, subscribe to my Youtube Channel!

S'more Cones

Hello, my name is Stacy and I’m a chocaholic.
This is not something I’m proud of necessarily, but hey, it’s who I am! I love any form of chocolate I can get – except for that disgusting stuff they try to pull off as real chocolate – “white chocolate”. Yuck.So naturally, any recipe that has chocolate in it is okay in my book. Chocolate chip cookies, brownies, tarts, cannolis, and even cocoa powder used as a seasoning for steak – I’ll try it all. But the best way to use chocolate?S’mores.
S’mores have a bit of nostalgia attached to them, don’t they? You can probably remember the first time you had one, or maybe a camping trip where you set many a marshmallow ablaze over an open campfire. But while simple in nature, there are many different ways to enjoy a s'more.The one I’m going to show you today is a less mess version of that roasted marshmallow classic. In this recipe for s’mores cones, waffle cones are stuffed full with chocolate pieces and marshmallows, wrapped in aluminum foil, and put in a heat source.Now, I say “heat source” because these have been known to have been made in an oven, on a grill, and even over a campfire with a stick protruding out of them. Think of them as the fancier cousin of the traditional s’more. In theses s’more cones, you get all the delicious flavors of a traditional cone – but in a neat, compact package. They’re perfect for backyard barbecues, family movie nights, while camping under the stars, or when you just need a sweet treat on a weekday evening.What I also like about this recipe is that you can use any different type of chocolate that you have – Hershey bars, Reese’s peanut butter cups, chocolate chips, snickers, etc. You can even add peanut butter to the inside of the cone to make it even heartier of a dessert.Ready to try them for yourself? Let’s get to it!
S’mores Cone Recipe

In this recipe for s’mores cones, waffle cones are stuffed full with chocolate pieces and marshmallows, wrapped in aluminum foil, and put in a heat source.
- Waffle cones
- Mini marshmallows
- Your favorite type of chocolate
- Fill the waffle cone with mini marshmallows and chocolate pieces.
- Wrap in aluminum foil.
- Place on a grill and cover for 2 minutes, flip at the 1 minute mark.
- Remove with tongs and let cool.
- Unwrap foil and remove cone.
If making on a campfire, wrap the end of a s'mores stick in with the cone with foil. Rotate in the fire for a couple minutes.
If making in an oven, turn your oven onto 400 degrees and place the foil-wrapped cones on a baking sheet. Allow to cook for 1 minute and then flip the cones to the other side and cook for another minute.
More Summertime Recipes You’ll Love
Candied Bacon Deviled EggsColorful Pasta SaladFresh Dewberry Cobbler If you’d like to see more family fun ideas like this, subscribe to my Youtube Channel!
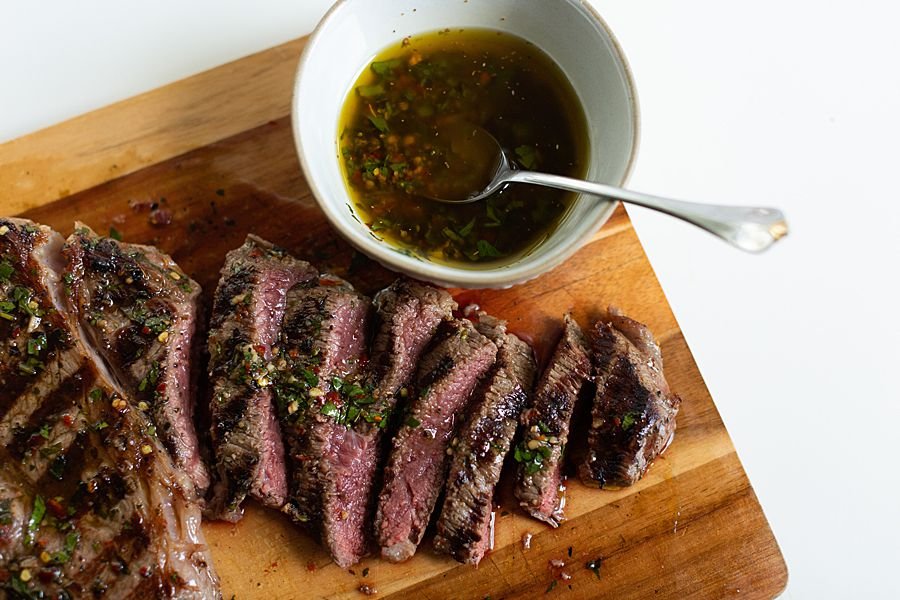
Easy Chimichurri Recipe

What’s that green stuff?The first time I went to Fogo de Chao (a Brazilian steakhouse), the waiter put down a small bowl of green sauce in front of me. It looked like a cross between pico de gallo and salsa (can you tell I’m from Texas) but I didn’t know what to do with it.
I soon found out that in Argentinian cooking, they would put this green sauce – called chimichurri – on their meats. Chimichurri can be used as a marinade, basted while on the grill, or served alongside any kind of grilled meat. I prefer to use chimichurri on steak, but it works well on chicken as well.Packed with parsley and garlic, this is one addictive sauce! It has an amazing flavor that adds a little zing to any meat.Here’s an easy chimichurri recipe for you to make it at home.
Easy Chimichurri Sauce Recipe

Packed with parsley and garlic, this is one addictive sauce! It has an amazing flavor that adds a little zing to any meat.
- 1/2 cup olive oil
- 2 tablespoons red wine vinegar
- 1/2 cup finely chopped parsley
- 4 cloves garlic (finely chopped or minced)
- 1-2 teaspoons dried red pepper flakes
- 3/4 teaspoon dried oregano
- 1 level teaspoon coarse salt
- ½ teaspoon pepper
- Mix all ingredients together in a bowl. Allow to sit for 5-10 minutes to release all of the flavors into the oil before using. Ideally, let it sit for more than 2 hours, if time allows.
- Chimichurri can be prepared earlier than needed, and refrigerated for 24 hours, if needed.
- Use to baste meats (chicken or steaks) while grilling or barbecuing. You can use it as a marinade or to baste our meats with chimichurri. Also, add a couple of tablespoons over your steak to serve.
More Grill Recipes You’ll Love
Grilled Corn with Spicy ButterGrilled PineappleThe Best Burger Recipe If you’d like to see more recipes like this, subscribe to my Youtube Channel!
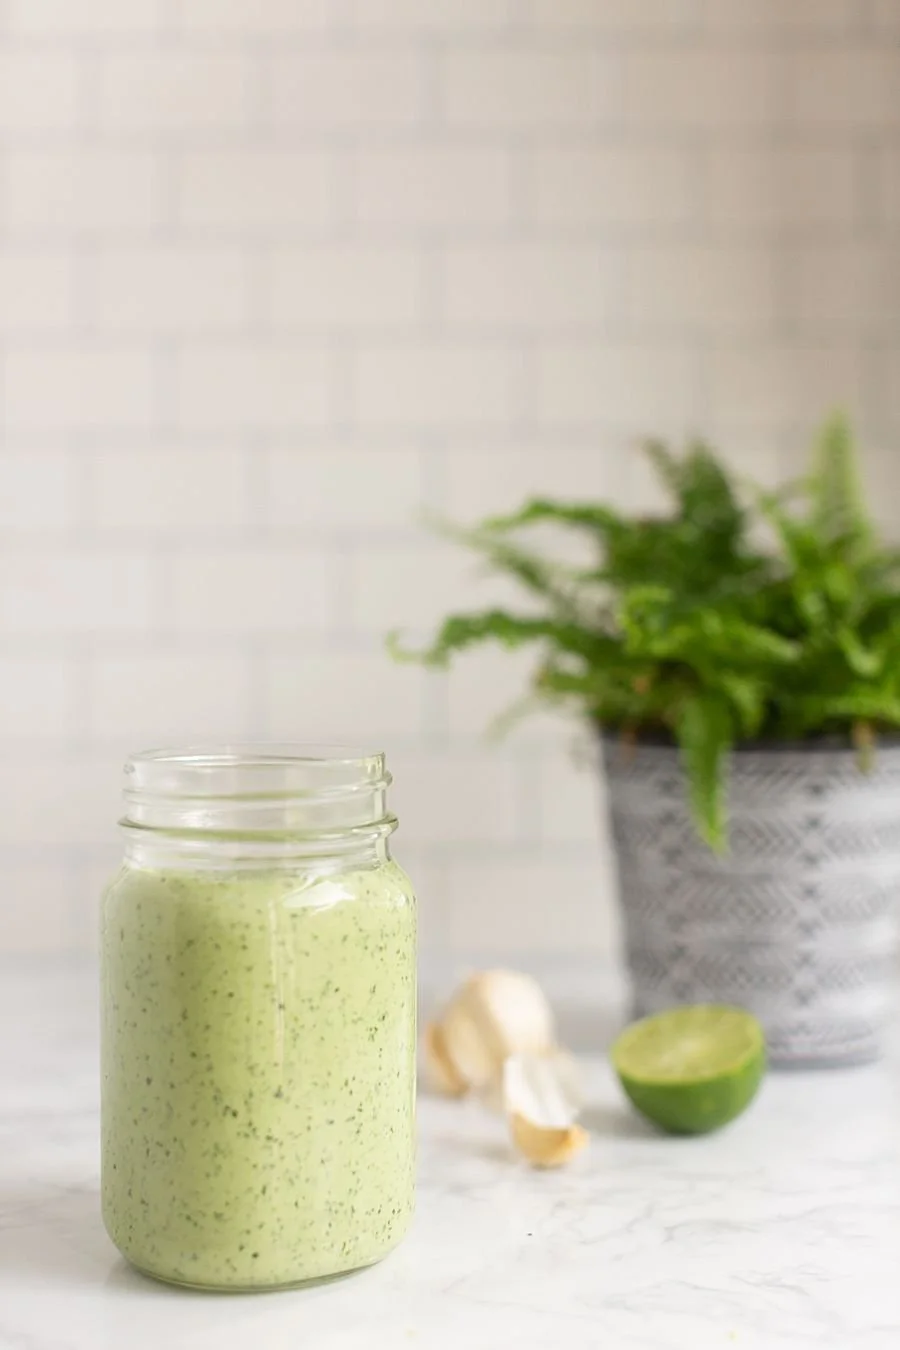
Gringo's Tex Mex Copycat Amazon Sauce

Move over, chips and queso!So there’s this Tex-Mex restaurant near where we live called Gringo’s. My family has been going there for *literally* decades. Now they have multiple stores all across Texas, but I still remember eating at that first little restaurant of theirs. The food is out of this world good. Their fajita chicken is just as flavorful as their beef fajita and they always have the greatest quality. You always know what you’re going to get and I like that in a restaurant.One menu item I have ordered a lot in the past is called an Amazon Wrap. It’s a spinach tortilla loaded with fajita chicken, lettuce, tomato, and Amazon sauce.Now, this is no ordinary sauce!
This green sauce is everything you want in a Tex-Mex offering – loads of flavor with a taste you just can’t quite put your finger on why it is that you love it so much.Jalapeno and cilantro are the stars of this show. And what I love most about this Gringo’s copycat Amazon sauce is that you can make it as spicy or as mild as you like – just by including the seeds and ribs or not.Ready to make some for yourself? It couldn’t be easier! No heat required – just throw everything in the blender and enjoy!Let’s get started…
Gringo’s Copycat Amazon Sauce Recipe

- 3 jalapeños
- 1 bunch fresh cilantro (2oz)
- 5 medium cloves garlic (1.5 tbsp)
- 1/2 cup mayonnaise
- 2 tbsp fresh lime juice
- 2 tbsp avocado oil
- 1/2 tsp sea salt
- 1/4 tsp freshly ground black pepper
- For a milder sauce, remove the seeds and ribs from the jalapeños, then roughly chop them. For a spicier sauce, leave the seeds and ribs in, and simply chop the jalapeños. You should have about 1 cup of chopped jalapeños.
- Place the jalapeños into a blender along with all the remaining ingredients (I even include the cilantro stems), and blend on high for at least 30 seconds, until the sauce is smooth and creamy.
- Store in the refrigerator for up to 1 week. Enjoy!

Utensils Needed
More Sauces & Dips You’ll Love
Goat Cheese LogCarrabba’s Copycat Italian Herb DipLayered Taco Dip If you’d like to see more recipes like this, subscribe to my Youtube Channel!
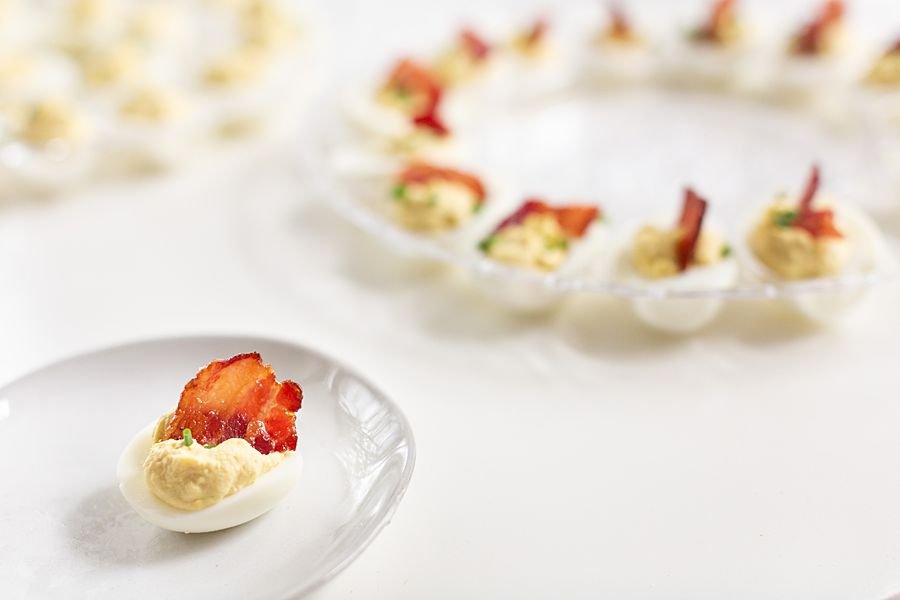
Candied Bacon Deviled Eggs

Bacon and eggs has never tasted so good.I have found that deviled eggs are one of those things that people either love them or hate them. I am definitely in that first “love them” camp.I think that The hardest thing about making deviled eggs is getting the shell off of the boiled egg. It’s always the most time-consuming and frustrating part of the whole process, isn’t it? Once I figured out how to get the shell off an egg cleanly every single time by using an egg cooker (see below for the one I use), my world has officially changed. I had tried boiling them, baking them in the oven, you name it but I could not get them to cook to the right done-ness or get those dang shells off without ripping the eggs apart.So once they are steam to perfection and the shells come off cleanly, that’s when the magic starts. But the real winner in this recipe is the candied bacon on top. There’s something about that salty sweet goodness on top of the tangy egg yolk mixture that just makes this recipe sing.It is so dang good.Ready to try it for yourself? Let’s get it started.
Candied Bacon Deviled Eggs Recipe

Candied Bacon
- 5 slices thick cut bacon
- 2 tablespoons brown sugar
- pepper (to taste)
Deviled Eggs
- 18 large eggs
- 1/3 cup mayonnaise
- 3 teaspoons Dijon mustard
- 3 teaspoons apple cider vinegar
- green onions
For the bacon
- Preheat the oven to 400 degrees.
- On a foil lined baking sheet, place your strips of bacon and sprinkle the brown sugar over the bacon. Add pepper to taste as well.
- Place another sheet of aluminum foil over the top of the bacon and place another baking sheet on top of it (this will keep the bacon from wrinkling up and will stay flat).
- Bake for 20 minutes.
For the deviled eggs
- Boil the eggs and let cool.
- Once the eggs have cooled completely, peel them and slice in half lengthwise. Remove the yolk to a small bowl with a spoon and place the egg whites on a plate.
- Mash the yolks with a fork and add the mayonnaise, mustard, vinegar, salt and pepper. Stir everything together until it's smooth.
- Put the mixture into a zip top bag and cut the tip off in order to make a make-shift pastry bag. Squeeze the mixture back into the hole of each egg white. Sprinkle green onions on top for garnish.
- Tear apart (or slice) bacon into 1 inch pieces and place on top of each egg.

Products Used
More Brunch Recipes You'll Love
Blood Orange Prosecco MuleEggwhite FrittataProtein Packed Yogurt BowlIf you'd like to see more recipes like this, subscribe to my youtube channel!
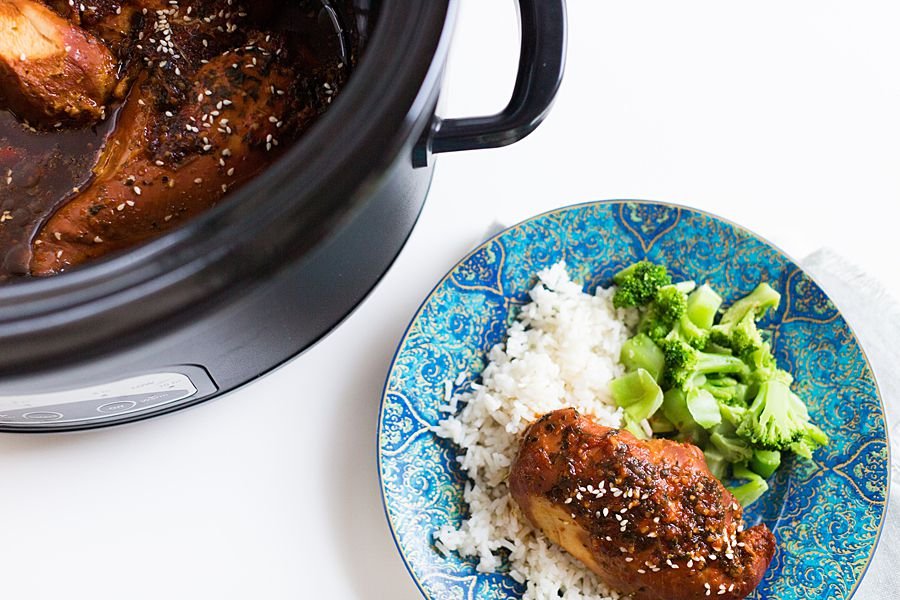
Slow Cooker Honey Garlic Chicken

When I was in college, I worked at a couple different stores in the mall. The best thing about working in the mall is the food court. After all, whatever you are hungry for, they have it there – and they have free samples (which every broke college kid can appreciate).One of my favorite places frequent (which I can’t remember the name of it now) used to sell something called bourbon chicken. Now, I don’t think it had any bourbon in it at all, but it did have this delicious brown sugar/honey glaze on the roasted chicken that made it absolutely delicious.So I thought I’d try my hand at baking something like it.
Slow Cooker Honey Garlic Chicken

- 4 boneless (skinless chicken breasts)
- 4 garlic cloves (minced)
- 1/3 cup honey
- 1/2 cup low sodium ketchup
- 1/2 cup low sodium soy sauce
- 1/2 teaspoon dried oregano
- 2 tablespoons fresh parsley
- 1/2 tablespoon toasted sesame seeds
- Arrange chicken thighs on the bottom of your slow cooker; set aside. (please look at the notes section)
- In a mixing bowl, combine garlic, honey, ketchup, soy sauce, oregano and parsley; whisk until thoroughly combined.
- Pour the sauce over the chicken thighs. Close with a lid and cook for 4 to 5 hours on LOW, or 3 to 4 hours on HIGH.** (please look at the notes section)
- Remove lid and transfer chicken to a serving plate.
- Spoon the sauce over the chicken and sprinkle with toasted sesame seeds. Serve.
Use enough chicken breasts or thighs (bone-in or boneless, skin-on or without) to cover the bottom of your slow cooker.
**All crock pots cook at different times and temperatures. Some readers suggest to only cook the chicken for 3 hours, while others said it took 4 hours in their crock pot. More importantly, 165 degrees Fahrenheit is the safe internal temperature for both the white meat of the chicken and dark meat. If you would like to thicken the sauce, 30 minutes before the chicken is done, whisk a cornstarch slurry into the sauce; cover and continue to cook.
How to make a Cornstarch Slurry: Use 1 tablespoon cornstarch mixed with 1 tablespoon cold water; mix it together until mixture forms a paste. 30 minutes before the chicken is done cooking, whisk the cornstarch slurry into the sauce inside the slow cooker; cover and continue to cook for 30 minutes.

More Recipes You'll Love
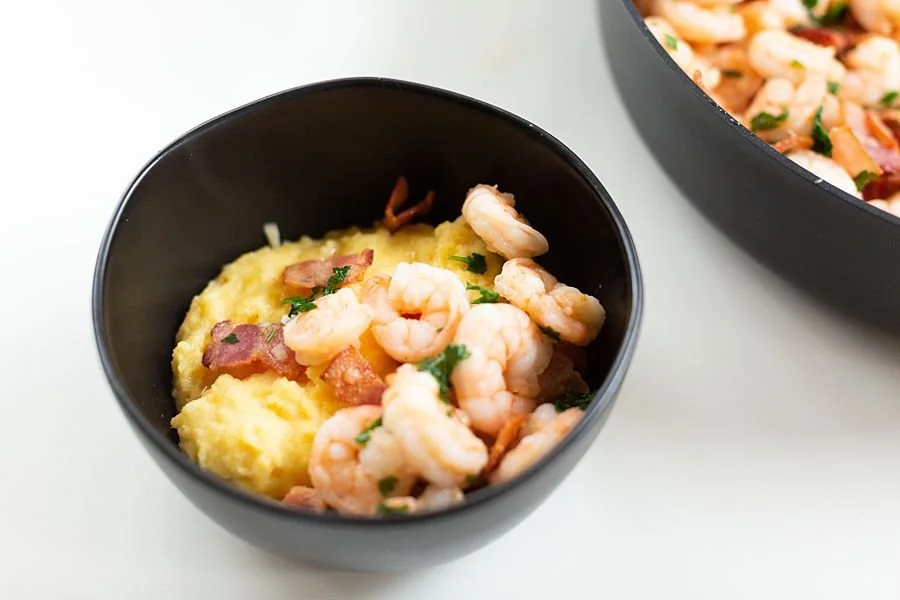
Sauteed Shrimp with Creamy Polenta Recipe

My family is French Cajun (Akadian), so those delicious creole flavors and all the butter you can stuff into a recipe are okay in my book.
One of my all time favorite cajun recipes is that for shrimp and grits. It’s got creamy grits and is topped with sauteed shrimp in a light “gravy”. But for this shrimp recipe, I though I’d do something a little different.Polenta Valsugana recently sent me some of their authentic Italian polenta. It’s so authentic, the package and use instructions are all in Italian. So in brainstorming what I should make with this polenta, it hit me – shrimp and grits. Except instead of grits, I’d be making some fresh polenta.Did you know that grits and polenta are both made from corn? (Read below to find out how they’re different)
What is Polenta?
Polenta is a traditional Italian dish that is ground corn (cornmeal) that it ground to a medium or coarse consistency.
What are the Different Types of Polenta?
Stone-ground: Stone-ground cornmeal can be yellow or white, and is produced by literally grinding corn between two millstones. Stone-ground cornmeal makes a rustic polenta with a bit of texture, as it still has the bits of the whole grain, including the hull and germ. It has deep corn flavor.Coarse: Coarse cornmeal is somewhat gritty, similar to stoneground in that it has bits of grain visible. Coarse-ground cornmeal has a noticeable corn flavor and nubby texture.Medium: This type of cornmeal is ground to a finer consistency than coarse or stoneground kinds, with the kernel sifted out. If you prefer a super-smooth polenta and very creamy texture, this is the one to use.
What’s the Difference Between Grits and Polenta?
Both grits and polenta are made from ground corn, but the main difference here is what type of corn. Polenta, as you can probably guess from the color, is made from yellow corn, while grits are normally made from white corn (or hominy).
Cajun Shrimp and Creamy Polenta

Creamy polenta and sauteed shrimp are perfectly paired in this delicious cajun shrimp and polenta recipe
For the Polenta
- 4 cups chicken stock
- 1 cup milk
- 1 cup coarse or medium-grind cornmeal
- 3 tablespoons butter
- 1/2 cup grated Parmesan cheese
For the Shrimp
- 2 pound shrimp (peeled and deveined)
- 10 slices bacon (chopped)
- 2 tablespoons lemon juice
- 2 tablespoons chopped parsley
- 1 cup thinly sliced scallions
- 2 large clove garlic (minced)
For the Polenta:
- Bring the chicken stock and milk to a boil in a heavy-duty sauce pan or small Dutch oven.
- Gradually sprinkle the polenta into the pan while whisking at the same time. Turn the heat to a very low simmer, cover and continue to cook the polenta for 25 – 30 minutes, until it’s thick, fluffy and begins to pull away from the sides of the pan. Stir occasionally so it doesn’t stick to the bottom of the pan.
- When it’s done, remove from the heat and stir in the butter, cheese and additional salt to taste if needed.
- Serve warm, sprinkled with additional cheese if desired.
For the Shrimp
- Rinse shrimp and pat dry. Fry the bacon in a large skillet until browned; drain well. In grease, add shrimp. Cook until shrimp turn pink.
- Add lemon juice, chopped bacon, parsley, scallions and garlic. Saute for 3 minutes.
- To serve, spoon some of the polenta into a bowl and top it with the shrimp mixture.
Products Used:
More Dinner Recipes You'll Love:
Beef StroganoffSlow Cooker Mongolian BeefOne Pot Creamy Chicken and Rice If you like this recipe, make sure to subscribe to my Youtube Channel so you can see more.
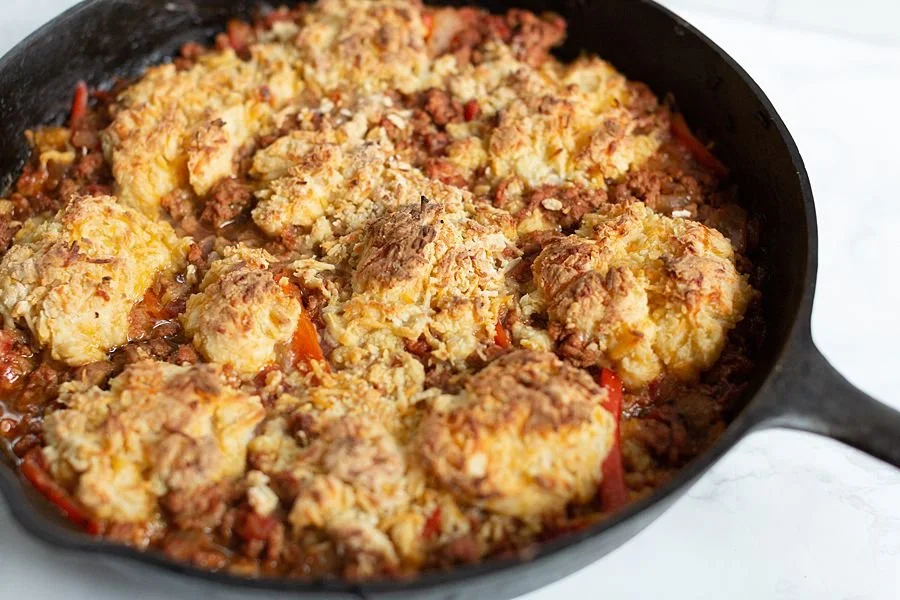
Ground Turkey and Biscuit Skillet

I’m trying to eat healthy. I really am. And yet, food is just so darn good!What must all of the deliciousness be so full of fat and carbs?While this recipe is not carb-free, it is lower in fat than traditional chili recipes because of the use of ground turkey instead of ground beef.But the real star of the show is that soft and delicious cheesy biscuit on top! It’s the perfect texture that as soon as your spoon hits it, your mouth starts watering.So if you’re looking for healthy ground turkey recipes, this is definitely one to try!
Turkey & Biscuit Skillet

Biscuits:
- 1 cup all-purpose flour
- 1 teaspoon baking powder
- ¼ teaspoon baking soda
- 3 tablespoons salted butter
- 1/3 cup buttermilk
- 1 ½ cups grated cheddar cheese
Turkey Chili
- 1 tablespoon vegetable oil
- 1 medium onion (diced)
- 1 red bell pepper (thinly sliced)
- 2 pounds ground turkey
- 1 tablespoon chili powder
- 2 tablespoons tomato paste
- 1 can (14.5 ounces diced tomatoes)
- Salt and pepper (to taste)
For the Biscuits:
- Preheat your oven to 425 degrees. In a bowl, whisk together flour, baking powder, baking soda, and ¼ teaspoon salt.
- Cut butter into flour mixture with a pastry cutter (or two knives) until mixture is crumbly. Stir in the buttermilk and cheddar until just incorporated.
For the Chili:
- In a large, heavy ovenproof skillet, heat oil over medium-high heat. Add bell pepper and onions. Cooking, stirring, until tender, 8 to 10 minutes.
- Add the turkey, tomato paste, and chili powder to skillet and cook until the meat is no longer pink.
- Add the diced tomatoes (with liquid) and cook until the liquid has reduced, about 3 minutes. Season with salt and pepper. Remove from heat.
Putting it all together:
- Take 3 tablespoon size scoops of the batter and place it on top of the chili. Bake in the oven until the biscuits are golden brown, about 20 minutes.


Products Used:
More one pan meals recipes you’ll love:
One Pan Chicken SpaghettiOne Pot Shrimp & Corn ChowderOne Pan Balsamic Chicken & Peach Skillet If you’d like to see more recipes like this, follow me on Youtube!