Blog
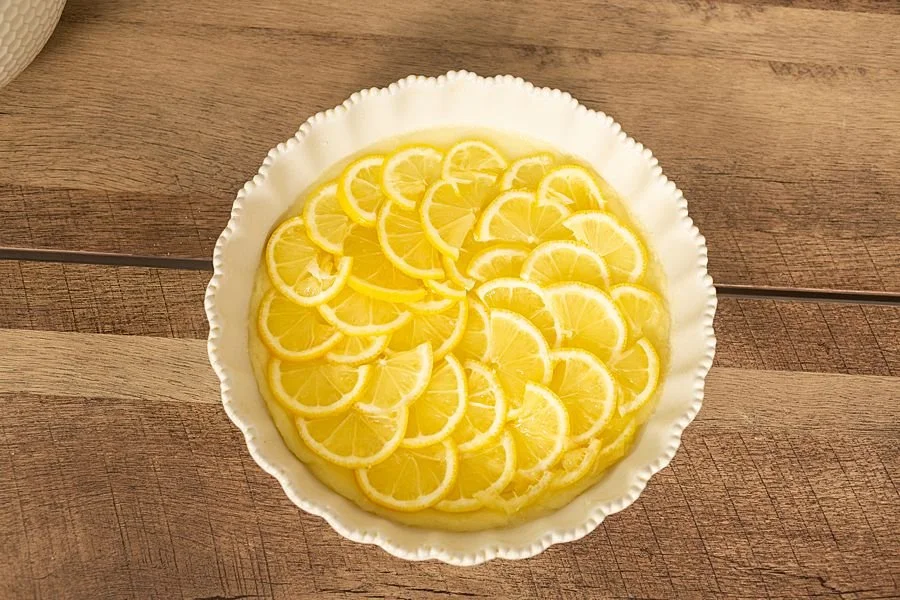
Lemon Upside Down Cake

One of my favorite cakes is the pineapple upside down cake. Oh man.It's got a delicious fluffy cake layer with that caramelized sugar and pineapple on the bottom, so that when you flip it over, all that goodness sits right on top, making such a beautiful and delicious summer dessert.Well, after Wonderfully Seedless Lemons sent me some of their seedless lemons to try, I knew I needed to make the next best thing - Seedless Lemon Upside Down Cake. If you can't find seedless lemons, you can always remove the seeds yourself.This is sure to be a new lemon dessert for your summer dessert table during these warm months.
Lemon Upside Down Cake

Upside-down layer:
- 1 stick unsalted butter
- ½ cup (plus 2 tablespoons sugar)
- 2 large unwaxed lemons (ends trimmed, then halved, seeded, and sliced ⅛ inch thick)
Cake:
- 2½ cups all-purpose flour
- 1 teaspoon baking powder
- ½ teaspoon baking soda
- ½ teaspoon kosher salt
- 2 large eggs
- 1 cup olive oil
- 1 cup full-fat plain Greek yogurt
- 1 cup sugar
- Position a rack in the center of your oven and preheat the oven to 350°F. Butter a 9-inch round cake pan and line it with parchment paper.
- In a medium saucepan over low heat, melt the butter. Remove the pan from the heat and add ½ cup of the sugar and 2 tablespoons of water. Whisk the mixture until the sugar dissolves and the mixture is glossy and thickened a little. Pour the melted butter and sugar into the prepared cake pan and smooth into an even layer to cover the bottom. Place the cake pan in the freezer until the butter and sugar layer freezes; leave the pan in the freezer until you are ready to transfer the batter to the pan.
- In a small bowl, gently toss the lemon slices with the remaining 2 tablespoons of sugar. Leave the lemon slices in the sugar to macerate for 10 minutes.
- Sift the flour, baking powder, baking soda, and salt into a large bowl. Set aside. Combine the eggs with the olive oil in another large bowl and beat vigorously with a whisk until well combined. Add the yogurt and sugar. Make a well in the flour mixture and add the wet mixture in three additions, folding in each addition until no dry bits of flour remain. Set aside.
- Fan the lemon slices out to cover the melted butter and sugar in the cake pan, overlapping the slices by as much as 1⁄8 inch. Pour the cake batter directly on top of the lemon slices.
- Bake for about 1 hour, until a cake tester inserted into the center comes out with only a few moist crumbs clinging to it. Transfer to a wire cooling rack and let cool for 15 minutes. Invert the cake onto a serving plate and carefully remove the parchment-paper lining. Allow the cake to cool for 1 hour more before serving
More Dessert Recipes You'll Love:
Bourbon Chocolate Pecan PieStrawberry TrifleSweet, Sweet Summertime Blueberry Cookies If you'd like to see more recipes like this, SUBSCRIBE to my YouTube channel!
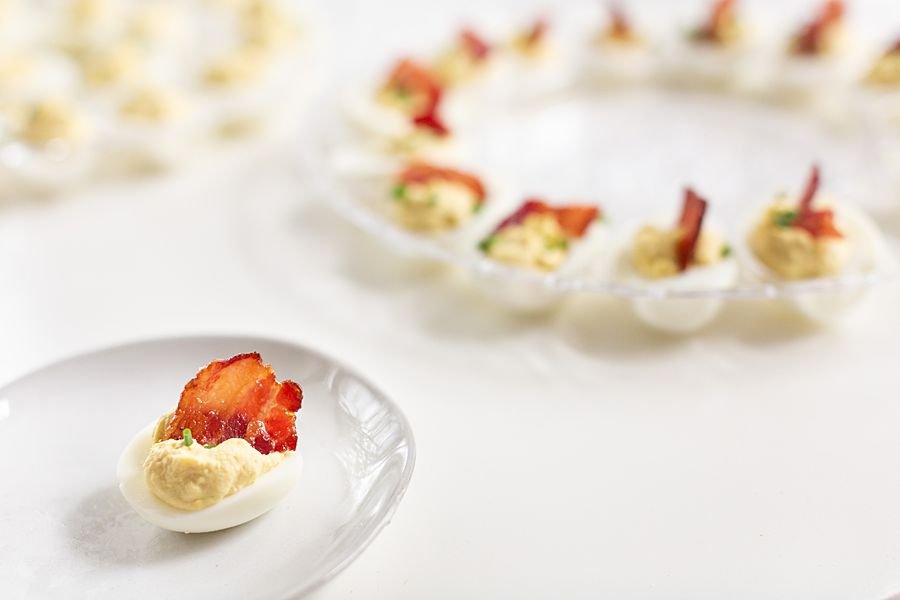
Candied Bacon Deviled Eggs

Bacon and eggs has never tasted so good.I have found that deviled eggs are one of those things that people either love them or hate them. I am definitely in that first “love them” camp.I think that The hardest thing about making deviled eggs is getting the shell off of the boiled egg. It’s always the most time-consuming and frustrating part of the whole process, isn’t it? Once I figured out how to get the shell off an egg cleanly every single time by using an egg cooker (see below for the one I use), my world has officially changed. I had tried boiling them, baking them in the oven, you name it but I could not get them to cook to the right done-ness or get those dang shells off without ripping the eggs apart.So once they are steam to perfection and the shells come off cleanly, that’s when the magic starts. But the real winner in this recipe is the candied bacon on top. There’s something about that salty sweet goodness on top of the tangy egg yolk mixture that just makes this recipe sing.It is so dang good.Ready to try it for yourself? Let’s get it started.
Candied Bacon Deviled Eggs Recipe

Candied Bacon
- 5 slices thick cut bacon
- 2 tablespoons brown sugar
- pepper (to taste)
Deviled Eggs
- 18 large eggs
- 1/3 cup mayonnaise
- 3 teaspoons Dijon mustard
- 3 teaspoons apple cider vinegar
- green onions
For the bacon
- Preheat the oven to 400 degrees.
- On a foil lined baking sheet, place your strips of bacon and sprinkle the brown sugar over the bacon. Add pepper to taste as well.
- Place another sheet of aluminum foil over the top of the bacon and place another baking sheet on top of it (this will keep the bacon from wrinkling up and will stay flat).
- Bake for 20 minutes.
For the deviled eggs
- Boil the eggs and let cool.
- Once the eggs have cooled completely, peel them and slice in half lengthwise. Remove the yolk to a small bowl with a spoon and place the egg whites on a plate.
- Mash the yolks with a fork and add the mayonnaise, mustard, vinegar, salt and pepper. Stir everything together until it's smooth.
- Put the mixture into a zip top bag and cut the tip off in order to make a make-shift pastry bag. Squeeze the mixture back into the hole of each egg white. Sprinkle green onions on top for garnish.
- Tear apart (or slice) bacon into 1 inch pieces and place on top of each egg.

Products Used
More Brunch Recipes You'll Love
Blood Orange Prosecco MuleEggwhite FrittataProtein Packed Yogurt BowlIf you'd like to see more recipes like this, subscribe to my youtube channel!

5 Tips for Easy Spring Cleaning

This post contains affiliate links. All photos and opinions are mine and should not be used without written permission.
I don't know about you, but all of this time I'm spending at home is making me look around my house and realize I need to purge. Badly. I've got a few unorganized spaces and I know that when I'm organized, I'm more focused and productive. So in case you need some help in this department, I'm going to show you what I do in order to get inspired and get tidy. This post is adapted from a video I created for Walmart's Grocery Pickup Magazine.
Focus on one space at a time
Rome wasn’t built in a day and cleaning up your house isn’t going to happen that fast either! Start with one area that bothers you most and take it from there. For me, it’s my desk. Let’s get this thing cleaned up!
Get Everything Out.
Take everything out of the area you’re working on. Clean out every drawer. Open the doors and pull out all of those loose papers.
Make the Hard Decisions
Once you have everything out of your space, separate all of the items in 3 categories – Keep, Donate/Sell, Trash. This is definitely the hard part because you simply cannot keep everything! You’ve got to purge some stuff, Mama! Use a Great Value trash bag to bag it all up.
Clean everything before you put it back.
Dust, wipe down, and disinfect it all so that you know that everything that is going back into that space is going to be clean and safe for your family. One thing I do is I keep all of my general cleaning supplies in one easy to carry tote. I love using my magic eraser to get those hard to clean marks off of walls, tables, and floors. I seriously don’t know how they work but they’re amazing! I also use this time to fix anything that may be broken or missing pieces.
Create a space for everything you’re keeping
Before you just start shoving everything back into the space, have a plan in mind! Make sure you have a specific place for everything, because if everything has its own place, you’re sure to stay organized.
I feel so much better now that I have a clean desk and area to work in!Happy Spring Cleaning![activecampaign form=1]
Springtime Protein Packed Yogurt Bowl
This post is sponsored by Randalls. All photos and opinions are mine and should not be used without written permission.
After a dreary Winter, I am really loving the weather during this sunny Spring! Spring time to me means eating outdoors, fresh seasonal food, and enjoying that glorious sunshine! So when some girlfriends of mine wanted to get together for a garden party (pre-quarantine), I said yes so fast they weren’t ready for it!As the writer of a food blog, I knew I was going to be bringing my A game to this themed party. I’ve been trying to eat healthier lately, so I felt like keeping the menu light was definitely the way to go. I couldn’t decide if I wanted to do gluten free, plant based, or just include ingredients that promote relaxation, so I decided to do all of the above!
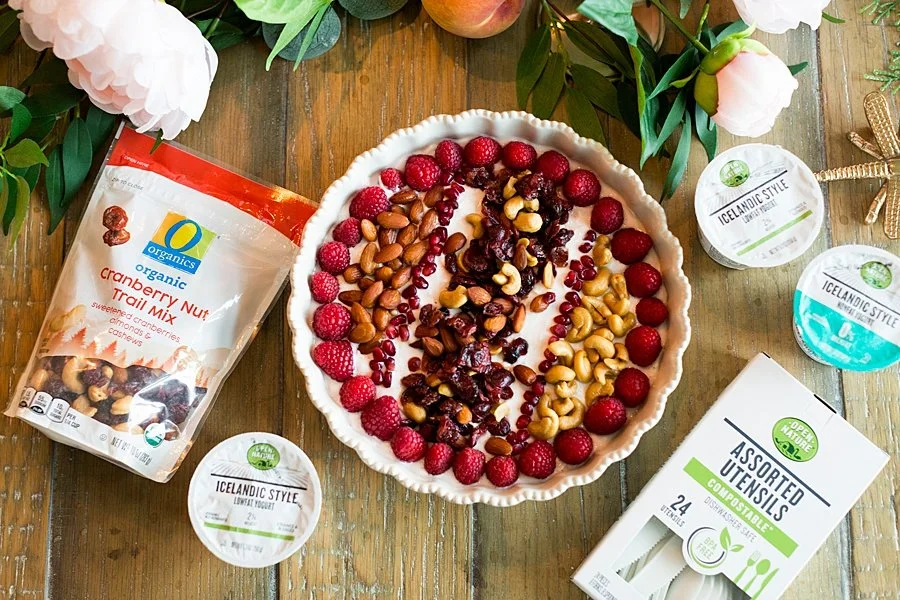
First up is this protein-packed power bowl. This healthy bowl is packed full of pro-biotics, fresh fruits, and healthy fats - so what’s there not to like? But the best part is that it’s easy to make but it looks like a million bucks.What I like about this recipe too is the versatility. You could easily make this yogurt bowl as individual plated portions, serve it family style, or even create a yogurt bar complete with all the toppings so your guests/family members can mix and match their own ingredients.
What’s in a Power Bowl?
I’m going to let you in on a little secret...power bowls include whatever you want to put into it.But they also typically have lots of protein, good fats, nuts, and are generally good for you.So for this specific power bowl, I wanted it to have fresh ingredients, be low in fat, and be packed with flavor. Here’s what’s in my bowl:
Open Nature Icelandic Yogurt, Mixed Berry Acai Flavor
Part 2% and part skim milk, this sweet yogurt contains a plethora of fruits such as strawberries, raspberries, blackberries, and acai. Not only is that color perfection, but the flavor is as well. I hate boring yogurt and this flavor is anything but boring!
Open Nature Icelandic Yogurt, Vanilla Flavor
This lowfat yogurt is made with 2% milk, so it’s perfectly creamy with just the slightest hint of vanilla. It made for a great contrast with the mixed berry acai yogurt I added it to, but I’m sure it would be equally as delicious on its own.
Pomegranate seeds
After cracking open a hard, red pomegranate, you’ll find these gems. These crunchy black seeds are encased in sweet red juice and are a great texture contrast to the smooth and creamy yogurts. They have tons of antioxidants and fiber too, so they’re perfect for digestive health.
O Organics Trail Mix Cranberry Nut
I hate a trail mix that is nothing but granola, so this trail mix rates pretty high for me (there’s no granola in it whatsoever). It’s got crunchy almonds, cashews, and tangy dried cranberries in it, so it really does make your tastebuds do a little dance.
Raspberries
Packed with Vitamin C and E, raspberries are great for brain health. Plus, they taste good - even if you just eat them off of your fingers like my daughter does.
Where do I Find the Ingredients?
I purchased all of my O Organics® and Open Nature® ingredients for this power bowl at my local Randalls.They also carry these brands exclusively at all of the Albertsons Companies family of stores, including ACME Markets, Jewel-Osco, Vons, Pavilions, Tom Thumb, Shaw’s, Star Market, United Supermarkets, and Carrs/Safeway. You can visit Albertsons.com or randalls.com to find a store near you. And while you’re there, be sure to check out their meal prep tips and recipe ideas as well!The best part about shopping at my local Randalls is the online savings. I love creating my shopping list online, adding my digital coupons, and making things easier on myself for when I’m actually in the store (especially if I have the kids with me).While I’m not spending much time in store lately, Randalls has made some awesome accommodations to their shopping experience - like special shopping hours for seniors and keeping the shelves stocked.
Ready for the recipe?
Protein-Packed Power Bowl
This healthy bowl is packed full of pro-biotics, fresh fruits, and healthy fats - so what’s there not to like? But the best part is that it’s easy to make but it looks like a million bucks.
- 4 containers Open Nature Icelandic Yogurt Mixed Berry Acai
- 1 container Open Nature Icelandic Yogurt (Vanilla)
- ½ package O Organics Trail Mix Cranberry Nut
- 1 pint Raspberries
- 2 oz Pomegranate gems
- Open the yogurt containers and pour the content of them into your bowl. You can use as much or as little as you like of each (I used mostly Mixed Berry Acai Open Nature Icelandic Yogurt with just a dollop of Vanilla Open Nature Icelandic Yogurt).
- Add the fruits and trail mix however you like (I, of course, had to make a design, but that’s totally up to you).
- Enjoy!
 Now, when you’re eating your good-for-you yogurt bowl, make sure to use your good-for-the-planet cutlery! These Open Nature® Compostable Spoons are perfect for a garden party or just a night eating around the dinner table. Since they’re made out of a plant-based material, you can enjoy these use and toss spoons and not feel guilty about adding to a landfill somewhere.
 This garden party had everything I love in it - food, flowers, and good friends. I just love the freshness of this time of year!If you’d like to see more Spring recipes like this, follow me on Facebook!
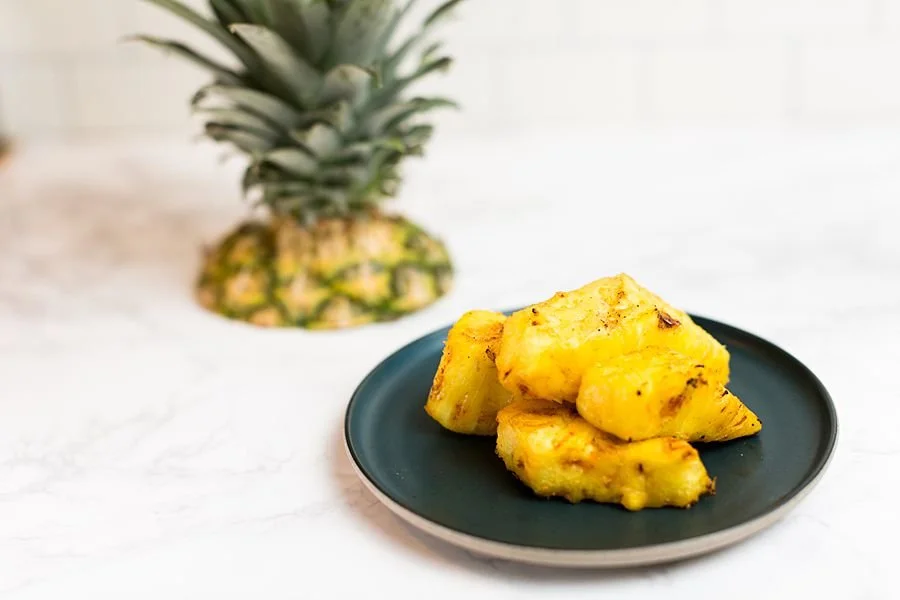
Spicy Grilled Pineapple

This post contains affiliate links. All photos and opinions are mine alone and should not be used without written permission.
Meal Planning
Lately I've been really trying to plan out what we're going to have for dinner in advance. On one day a week - usually Sundays, I plan out what we're going to have for dinner the rest of the week. I take into account what activities we have that day and how much time I actually have to spend in the kitchen. At the same time, I write out the grocery list and make sure I have all of the seasonings I need. I like using my HEB app on my phone to make my grocery list because it puts every item on the list categorized by aisle number, so I'm not going to be criss-crossing across the store. I'm not sure if other grocery stores have that, but that's where I shop and it's a huge plus for me that the app has that feature!
Here's what last week's menu looked like:
Last Week's Menu
Sunday - Chicken Enchiladas, Rice, and Charro BeansMonday - Spaghetti & Garlic BreadTuesday - Fish TacosWednesday - Chicken & DumplingsThursday - Texas HashFriday - Chicken FettuccineSaturday: King Ranch Casserole
If you're interested, I got the recipe for the chicken enchiladas, chicken and dumplings, chicken fettuccine, and king ranch casserole all from the Magnolia Table cookbook and can vouch that they're all amazing and were gobbled up. (and now there's a second one coming out? I need it!)
Taco Tuesday
So on Tuesday, tacos were on the menu and I thought, why not add a pineapple relish on top? So I bought a fresh pineapple along with the rest of my groceries. I like prepping my ingredients all at once, so while I was coring the pineapple, I thought, why not grill it? Flavors of fruits are always so much more enhanced when they're grilled, so why not grill it before I chop it and add it to my tacos? So I marinated the pineapple and got it ready for the next day - Taco Tuesday.After marinating overnight, the pineapple chunks went on the grill. Y'all, the smell of that sweet pineapple hitting the grill was like Heaven to my nose. Holy moly! I knew as soon as I smelled it that I was going to have to try a bite as soon as I was done grilling it.
We have a situation on our hands.
The pineapple came off the grill and I took a bite. At first, it was that familiar, sweet taste of pineapple, but then the cayenne kicked in just at the end, giving it just the right amount of heat. So good. Like, so so good. I called for my husband to come over and try a bite and soon it was all gone. We devoured that whole dang pineapple before it ever even touched a taco. Now, even as I write this, my mouth is watering for me to make it again. And I will very soon - you can bet on that!So I guess the right thing for me to do now is to give you the recipe, huh? If I must....but don't say I didn't warn you when I say that this pineapple doesn't last off the grill long!
Uses for Grilled Pineapple
You could easily make this spicy grilled pineapple in slices to put on a teriyaki burger, in chunks to serve alone as an appetizer, paired with vanilla ice cream for dessert, or (if you can restrain yourself better than I can) as a pineapple slaw to top your tacos. Or how about a refreshing pineapple margarita? Now that I think about it, the possibilities are endless when it comes to this grilled pineapple recipe! Maybe I should find a support group...
Spicy Grilled Pineapple

Sweet and juicy pineapple has a little kick of heat for the perfect summer treat.
- 1 pineapple (peeled, cored, and sliced)
- 1/4 teaspoon honey
- 3 tablespoons butter (melted)
- 1 teaspoon cayenne pepper
- 1/8 teaspoon salt
-
Combine the honey, butter, cayenne pepper and salt in a resealable plastic bag.

-
Place the pineapple in the bag, seal it, and toss it to coat evenly. Let marinate for at least 30 minutes (or overnight)
-
Grill pineapple for 2 to 3 minutes per side, or until heated through and grill marks appear.

Products Used
If you'd like more recipes like this, follow me on Pinterest!
[activecampaign form=1]