Blog

Rotisserie Chicken Poblano Soup

I’m going to tell you right now, when I made this for the first time for my husband, his response was, “this needs to be something we have every week.”I guess that means it’s good, right?When I set out to make chicken chili, it somehow tuned into this chicken soup and I’m so glad it did. It’s got a ton of flavor, protein and heartiness that’s perfect for the winter months.
Rotisserie Chicken Poblano Soup

- 2 14.5-ounce cans white beans
- 1 tablespoon canola oil
- 1 medium jalapeno pepper (minced)
- 2 medium poblano peppers (chopped)
- 1 large onion (chopped)
- 4 garlic cloves (minced)
- Kosher salt and freshly ground black pepper
- 1 tablespoon ground cumin
- 1 1/2 teaspoons ground coriander
- 1 teaspoon ancho chili powder
- 4 cups low-sodium chicken broth
- 2 limes (juiced, plus lime wedges, for serving)
- 1 rotisserie chicken (skin removed and meat shredded)
- 1/4 cup chopped cilantro leaves
- Drain and rinse the canned white beans. In a medium bowl, mash half of the beans with a potato masher until chunky. Reserve the beans until needed.
- Add the canola oil to a large Dutch oven and heat it over medium-high heat. Add the peppers, onions, and garlic and saute until soft and fragrant, about 5 minutes. Season the vegetables with salt, and pepper, to taste. Add the cumin, coriander, and chili powder and continue to saute for 1 more minute to toast the spices. Stir in the chicken stock, and lime juice and bring to a simmer. Add the beans and continue to simmer for 20 more minutes.
- After 20 minutes of simmering, taste for seasoning, and adjust if necessary. Stir in the shredded rotisserie chicken and cilantro and simmer until heated through, about 5 more minutes. Serve the chili in individual bowls topped with a dollop of sour cream, crushed tortilla chips, and lime wedges.

More Rotisserie Chicken Recipes You'll Want To Try
One Pan Chicken SpaghettiCreamy Chicken and RiceSlow Cooker Chicken Noodle Soup Like what you see? Be sure to SUBSCRIBE to my YouTube Channel!

How to Make Homemade Hot Chocolate

Do you have any family Christmas traditions?
One of our favorite family activities is driving around to see Christmas lights each year. Sometimes we stay close by and others, we’ll drive quite a ways. But the outcome is always the same – we create lasting moments with our family that we will always remember.
Now, Christmas light viewing isn’t complete without having a cup of warm hot chocolate in your hands. Before we leave the house, I’ll make my super easy homemade hot chocolate recipe. This stuff is delicious, y’all.No, it’s not as easy as just opening up a packet and adding some hot water, but it is so creamy and delicious that you’ll never want to go back to the packets if you can help it.So whether it’s an evening of driving around in the car or a day spent opening up presents, this recipe is one the kids and kids at heart in your family will love. And make sure to include a few toppings for each person to make it their own.
What Toppings Go Well With Hot Cocoa?
The amount of toppings are endless when it comes to what you can put on your hot coca. Some of my favorite toppings include: marshmallows, toffee bits, coarse sea salt, mini chocolate chips, crushed peppermints, candy canes, soft peppermint sticks, whoppers, Lindt truffles, pirouette cookies, whipped cream, dark chocolate syrup, and caramel sauce.
Homemade Hot Cocoa

- ¼ cup cocoa powder
- ½ cup hot water
- 20 ounces chopped semi-sweet chocolate
- 10 cups whole milk (or 2%)
- 2 ½ cups half and half
- 1 12 ounces can evaporated milk (not fat-free)
- ½ cup sugar
- ¼ teaspoon salt
Stove Top Instructions
-
Add the water and cocoa powder to a large stock pot and whisk until mixed.
-
To the cocoa mixture, add the chopped chocolate, milk, half and half, evaporated milk, and salt.
-
Heat over medium heat until the chocolate is melted, stirring periodically.
Slow Cooker Instructions
- Start by adding the cocoa powder to a bowl, pour in the hot water, and whisk until mixed.
-
Add the cocoa mixture along with the chopped chocolate, milk, half and half, evaporated milk, and salt to a 6-quart slow cooker or larger. If you're serving this with a hot chocolate bar and toppings, consider leaving out the sugar to avoid the hot chocolate being too sweet. If you're serving the hot chocolate solo, add in the sugar.
- Cook the hot chocolate on the high setting for 3-4 hours or on low for 6 hours. Low for 6 hours is what I prefer. Make sure to stir the hot chocolate every hour to keep the chocolate from settling to the bottom.
- Keep on the warm setting if you're serving it hot chocolate bar style with toppings on the side. Leftover hot chocolate can be refrigerated for up to one week and warmed in the microwave before serving.
More Christmas Recipes You'll Love
Candy Cane Christmas Cake RollMeringue TreesHot Chocolate Monkey Bread With Marshmallows
Thank With Google
If you’ve been a reader for a while, then you’ve noticed something new here at the bottom of each blog post. I’ve gotten the awesome opportunity of being a part of an experiment pilot feature called Thank with Google. I’m excited to be one of Google’s paid early testers and get to tell you more about this new project from Google. What is Thank with Google? Thank with Google is a way for my fans/readers to support me and show their appreciation for certain posts through the purchase of a virtual sticker. It’s a fun and interactive way for my fans to connect with me and show me appreciation for my work. And I love the personal notes that can be included with the paid stickers as well. You can find the new Thank with Google feature floating at the bottom of the page here or on the sidebar (if you’re using a desktop). Please feel free to test it out and let me know what you think!
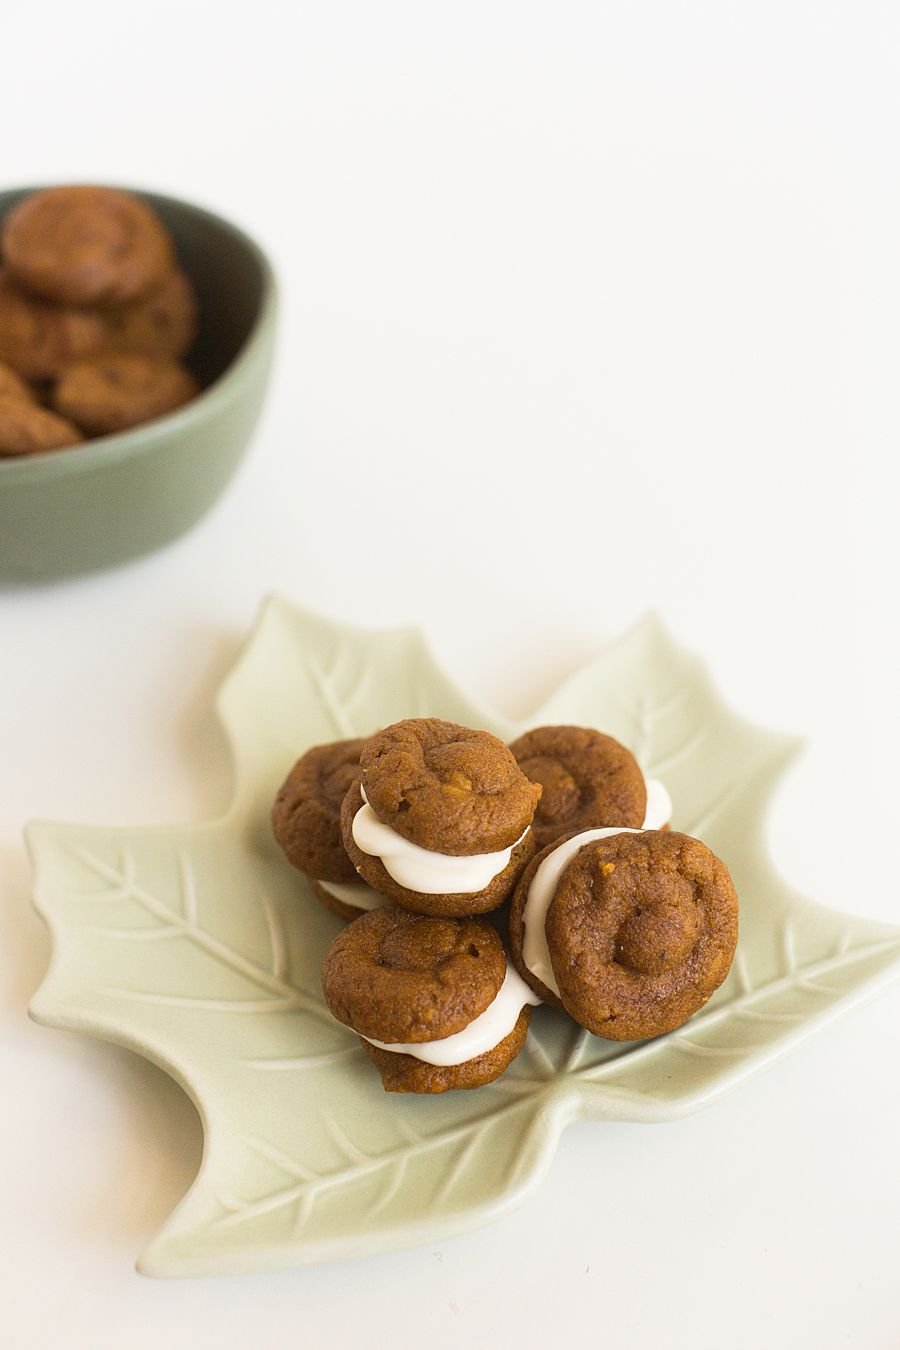
PUMPKIN WHOOPIE PIES | Easy Fall Dessert

More There is nothing I love more about fall than pumpkin. Pumpkin flavored everything! Except, I’ve never actually had a pumpkin spice latte from Starbucks. I should probably get on that. Oh well. Moving on… I seem to find a reason to make these soft and yummy pumpkin cookies every year. A like them because they’re light and airy and they don’t feel like you’re eating something that’s going to weigh you down. And with the scrumptious flavor of pumpkin pie in it, you really can’t go wrong. This is definitely my go-to pumpkin dessert recipe.
PUMPKIN WHOOPIE PIES | Easy Fall Dessert

For the Whoopie Pies:
- 3 cups 375 g all-purpose flour
- 1 tablespoon cinnamon
- 1 teaspoon baking powder
- 1 teaspoon baking soda
- 1 teaspoon salt
- 1 tablespoon pumpkin pie spice
- 1 cup granulated sugar
- 1 cup dark brown sugar
- 1 cup canola or vegetable oil
- 2 14.5 oz cans pumpkin puree, canned pumpkin
- 2 eggs
- 1 teaspoon vanilla extract
For the Maple-Cream Cheese Filling:
- 3 cups powdered sugar
- 8 ounces cream cheese (at room temperature)
- 4 ounces unsalted butter (at room temperature)
- 3 tablespoons maple syrup
- 1 teaspoon vanilla extract
- Preheat oven to 350 degrees F. Line baking sheets with parchment paper or a silicone baking mat.
- In a bowl, whisk the granulated sugar, the dark brown sugar, and the oil together. Add the pumpkin puree and whisk to combine thoroughly. Add the eggs and vanilla and whisk until combined.
- Next, add in the flour, cinnamon, baking powder, baking soda, salt, and pumpkin pie spice.
- Put the pumpkin mixture into a zip-top bag, snip the corner, and make half dollar size swirls one inch apart on the prepared baking sheets.
- Bake for 10 to 12 minutes, making sure that the cookies are just starting to crack on top and a toothpick inserted into the center of a cookie comes out clean. The cookies should be firm when touched. Remove from the oven and let the cookies cool completely on a cooling rack.
- To make the filling, beat the butter on medium speed until smooth with no visible lumps, about 3 minutes. Add the cream cheese and beat until smooth and combined, about 2 minutes. Add the powdered sugar a little at a time, then add the maple syrup and vanilla and beat until smooth.
- To assemble the whoopie pies: Turn half of the cooled cookies upside down. Pipe or spoon the filling (about a tablespoon) onto that half. Place another cookie, flat side down, on top of the filling. Press down slightly so that the filling spread to the edges of the cookie. Repeat until all the cookies are used. Put the whoopie pies in the refrigerator for about 30 minutes to firm before serving.
More Fall Recipes You'll Love:
Goat Cheese Stuffed FigsSweet Potato Casserole BitesIf you’d like to see more recipes like this one, be sure to SUBSCRIBE to my Youtube Channel!
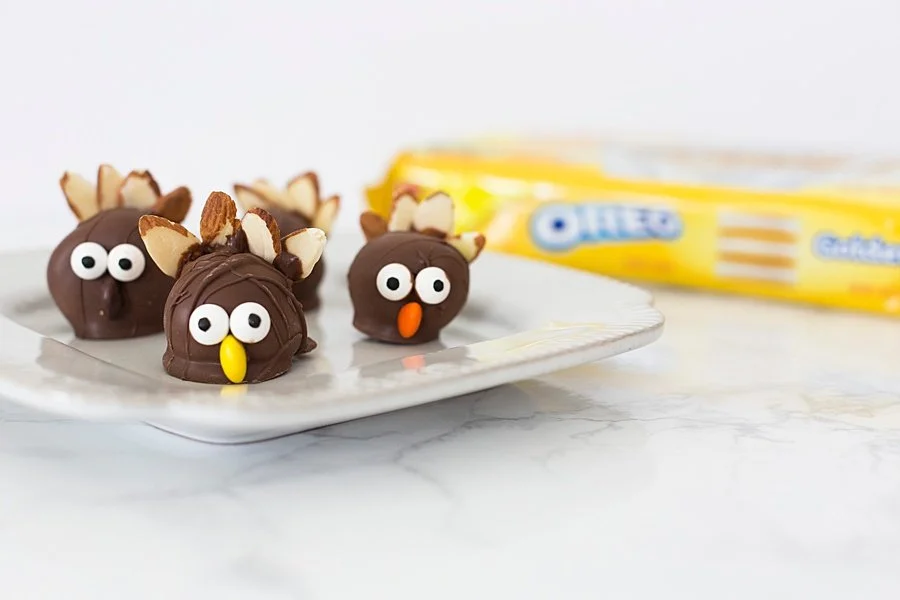
OREO Cookie Ball Thanksgiving Turkeys

This post contains affiliate links. All photos and opinions are mine and should not be sued without written permission.
It's time to get our gobble on! Thanksgiving is only a week away and I'm stoked to get together with family and talk, laugh, and eat! These OREO turkey cookie balls are the cutest desserts you'll see on that Thanksgiving table of yours and everyone is sure to love them!
OREO Cookie Ball Thanksgiving Turkeys

Tasty OREO cookies are mixed with cream cheese, coated in chocolate, and decorated to look like cute little turkeys = perfect for your Thanksgiving table!
- 1 pkg (8 oz brick cream cheese, softened)
- 36 OREO Cookies (finely crushed)
- 16 oz dark chocolate melting chocolate (melted)
- 48 Candy eyes
- ¼ cup Peanut butter candy (halved)
- ¼ cup Almond slices
- Crush the OREO cookies until they’re a breadcrumb consistency.
- Mix the cream cheese and cookie crumbs until well blended. Using a 1 tablespoon scoop, scoop the portion the balls out and roll in your hands until smooth.
- Place on a parchment paper-lined cookie sheet and freeze for 1 hour.
- Dip the balls, one at a time, in the melted chocolate.

- Using the melted chocolate as the glue, attach the candy eyes, peanut butter candy, and almond slices to the cookie balls.
- Refrigerate 1 hour or until firm. Keep refrigerated.
Products Used:
If you'd like to see more recipes like this, follow me on Pinterest!
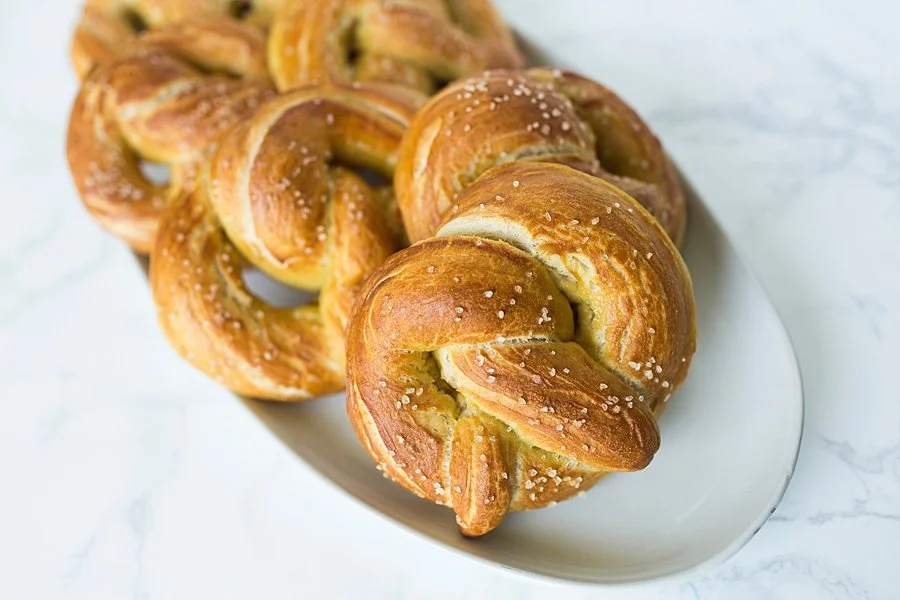
Game Day Soft Pretzels
This post contains affiliate links.
I'm not one for actually watching a baseball, basketball, or football game, but I'm all for a watch party! Especially when it comes to the food part of it. But I get tired of the same old stuff time and time again. This time, I decided to try my hand at homemade soft pretzels. I was inspired by my recent trip to Clarksville, Tennessee where I had the best soft pretzels ever at Strawberry Alley Ale Works. They were so good, y'all! After making these soft pretzels from scratch, I am a firm believer in making it yourself. For starters, it was so much cheaper than buying the frozen pretzels! This literally cost me under $3 to make. Second, the taste was just out of this world good. I paired my homemade pretzels with my Bob Armstrong Chile Con Queso and man oh man was that a match made in heaven! Yum!So enough about me, let's get cookin'!
Game Day Soft Pretzels
Get your party at home game day ready with these easy to make and eat soft pretzels. Trust me, you will want to double this recipe, they're so good!
- 1 1/2 cups warm (110 to 115 degrees F water)
- 1 tablespoon sugar
- 2 teaspoons kosher salt
- 1 package active dry yeast
- 4 1/2 cups bread flour
- 2 ounces unsalted butter (melted)
- Vegetable oil (for pan)
- 10 cups water
- 2/3 cup baking soda
- 1 large egg yolk beaten with 1 tablespoon water
- Pretzel salt
- Combine the water, sugar and kosher salt in the bowl of a stand mixer and sprinkle the yeast on top. Allow to sit for 5 minutes or until the mixture begins to foam. Add the flour and butter and, using the dough hook attachment, mix on low speed until well combined. Change to medium speed and knead until the dough is smooth and pulls away from the side of the bowl, approximately 4 to 5 minutes. Remove the dough from the bowl, clean the bowl and then oil it well with vegetable oil. Return the dough to the bowl, cover with plastic wrap and sit in a warm place for approximately 50 to 55 minutes or until the dough has doubled in size.

-
Preheat the oven to 450 degrees
-
Bring the 10 cups of water and the baking soda to a rolling boil in an 8-quart saucepan.
-
In the meantime, turn the dough out onto a slightly oiled work surface and divide into 8 equal pieces.

-
Roll out each piece of dough into a 24-inch rope. Make a U-shape with the rope, holding the ends of the rope, cross them over each other and press onto the bottom of the U in order to form the shape of a pretzel. Place onto the parchment-lined half sheet pan.

-
Place the pretzels into the boiling water, 1 by 1, for 30 seconds. Remove them from the water using a large flat spatula. Return to the half sheet pan, brush the top of each pretzel with the beaten egg yolk and water mixture and sprinkle with the pretzel salt.

-
Bake until dark golden brown in color, approximately 12 to 14 minutes. Transfer to a cooling rack for at least 5 minutes before serving.
Want the bite size version?
Check out how to make these bite size soft pretzels - complete with cheddar dipping sauce! If you'd like to see more recipes like this, follow me on Pinterest!